Here’s the work-in-progress version of my how-to infusion article: Introduction to Vacuum Infusion
Oh no, I’ve got bubbles in my infusion!
I was discussing vacuum infusion trouble-shooting with a friend and I wanted to write down some notes on fixing things that go wrong with infusions. Stuff got out of hand! A main problem with vacuum infusion are “gasses” – the ones that make the bubbles. I don’t just mean air leaking into your vacuum bag (cavity, envelope, place where air shouldn’t be, etc.) or riding in with resin. These are the biggest usual problems, but there’s also the vapor that forms inside your infusion when things that used to be liquid turn into gas as their vapor pressure is reached. Controlling the pressure and movement of air, resin and volatile material is the whole name of the game with infusion. There are lots of things that can go wrong and lots of ways to fix those problems. My hope is that this article addresses some of the most common problems and provides some solutions.
So, what is actually happening in vacuum infusion?
Just a quick summary of what we’re dealing with before getting into the troubleshooting. At the heart of it we are dealing with using vacuum and the resulting controlled pressure differential to replace air (or “no air”) with resin in a laminate. First a vacuum is pulled on the dry stack, compressing it, removing air, and increasing the pressure differential between the atmosphere and the zone under the bag.
Pressure Stuff
When you remove the air from under your vacuum bag, two things happen: first, the atmosphere pushes down on the dry fiber (and core) stack compressing it until compressing it anymore would take more pressure than the atmosphere can exert. Second, the air that was inside the gaps between the dry fibers is “vacuumed” out, leaving mostly vacuum (nothing) and a few air molecules – depending on the amount of vacuum you can pull. It can take some time under vacuum for all this air to actually get pulled out through the vacuum pump.
The compressed dry laminate stack “experiences” the full pressure of the atmosphere – and so does the open top of the pot of resin you are going to infuse. The infusion process is about the atmosphere acting almost like a plunger on the pot of resin, pushing it down – and then through the hose into the low-pressure zone inside the bag. It’s like pressing the plunger on a syringe and “injecting” the resin into the part – just that the “plunger” is atmospheric pressure! Once resin is in the part, it pushes back “up” on the bag with the a fraction of same atmospheric pressure pushing down on the resin in the pot – because the resin inside is linked directly to the surface of the resin in the pot. It isn’t the full pressure pushing back because there is still the low pressure from the vacuum front – causing resin to flow toward the low pressure.
Darcy’s Law is the fundamental model underlying the process. It links flow rate to resin viscosity, dry-stack permeability, and pressure gradient across the part. Like any equation, it describes a set of relationships between stuff that can be measured or adjusted. Given how hard it is to apply actual numbers to things like “permeability” – it is of limited practical use but is very good to have as a mental framework for understanding the process.
Resin Stuff
As resin flows through the part it has to displace any air or vapor that it runs into. Trapped gasses in the resin will mostly “boil” off the resin front and go out the vacuum. “Things” in the resin will boil off if the combination of temperature and vacuum are below their vapor pressure – adding more potential gasses to worry about. If the resin flows too fast, it can over-run some of this gas and trap it in the laminate. Resin will continue to flow through the part at an ever-slower rate as it gets further from the resin inlet. The friction of moving through the fiber stack is the main reason it slows down. The other reason is that the resin is under more pressure at the inlet side and less as it gets closer to the vacuum outlet side – the pressure gradient impacts the feed speed. Pressure differential drops as the part fills. Remember, the resin is being pushed in, not sucked through! Ok, whatever.
Finally the resin will fill the part and the inlet will be clamped off. Now the resin is only under the pressure of the atmosphere pressing down on the bag minus the pressure that the resin is pressing back up with… and this is way less pressure than you had before! The vacuum is still connected, but because the pressure differential is much reduced and transmitted hydraulically (via the resin) instead of pneumatically, it is very sensitive to any air intrusion. Air can no longer be pulled through the resin because there is no flow across the part surface. The only exception is with cases where there is pressure introduced during (or just after – as long as it isn’t clamped off) the infusion from the “head” caused by the resin source being above (or below – the opposite effect) the part. Placing (or lowering) your resin bucket below the part will impart a negative pressure on the resin in the part because of gravity – a bucket 2′ (600mm) below the part will decrease the pressure by about 1 psi (7000 Pa). Resin will tend to flow slowly in the part to reach equilibrium pressure but in reality this is very minimal because the energy needed to move resin through a part is higher than the available energy from the pressure differential on the bag.
Hopefully you have no leaks… and everything gels and you get a nice part. But sometimes it doesn’t work out. This article is about some of the ways it doesn’t work out and some ways you can fix the problems.
Naming Parts of an Infusion
Here are a pair of pictures showing a part under the bag pre-infusion and the finished part. It has lots of different stuff going on and I have labeled some of the parts to make it easier to understand what I am talking about. Here’s the first picture:
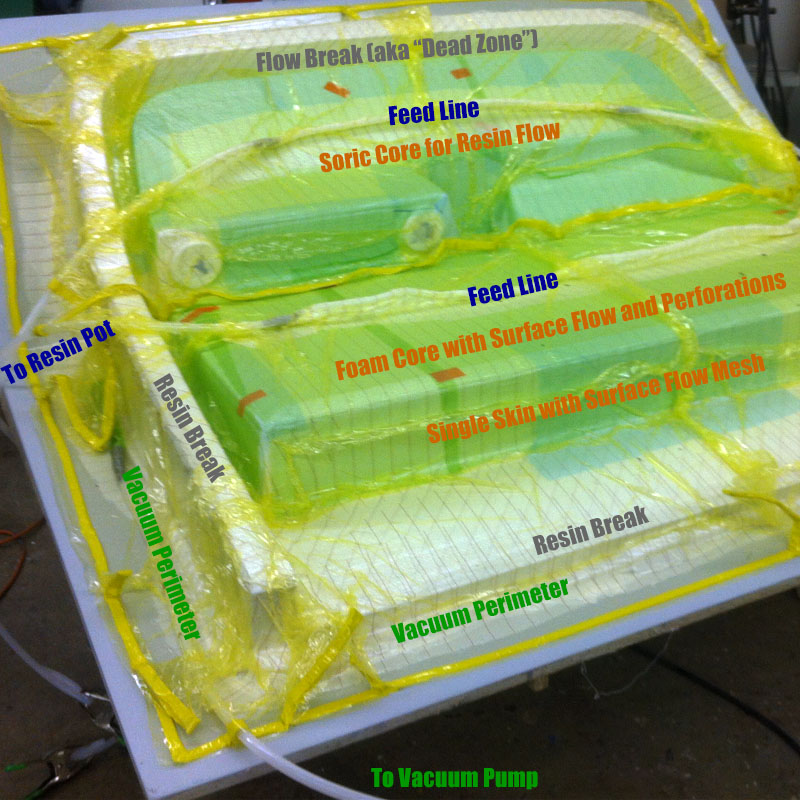
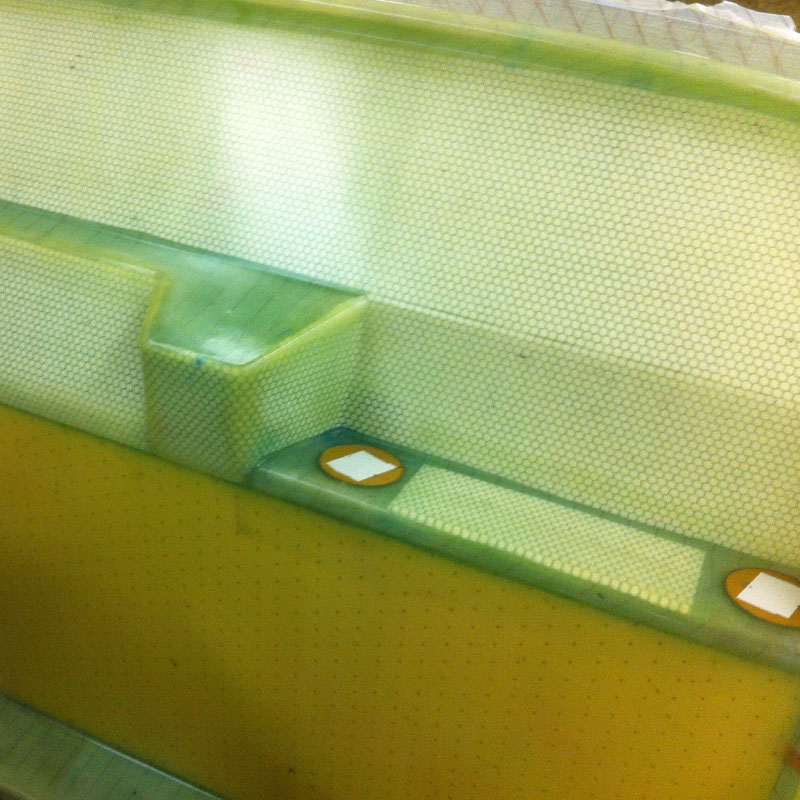
And here’s the de-molded part. This part has two different cores and some thicker single-skin areas. Being e-glass it is easy to see what is happening. The part image shows the cores and the perforations in the foam very clearly. The little round MDF plants can be used to orient yourself in part-space. You can see the thicker slip-joint areas in the corners where there is double the glass as slightly yellower from the thicker resin:
Air – Related Problems
Now a list of things that can go wrong! We’ll start with the most common – leaks!
Air From Outside
This is the easy one – air coming in from the outside. Also known as “leaks” – these sources of air come from holes in your bag, mold, or sealant tape around hoses or fittings. These are good because for the most part you can find them before infusing your resin and really having problems.
Everything in this article is based on a situation where your problems are not leak-related – but most infusion problems are leak related. The rest of this article is a look into those subsets of infusion drama that aren’t, but lets get leaks out of the way first.
If you have leaks in your bag or mold, none of the other things matter!
Here are some common sources of vacuum bag leaks with infusion:
- Dry fibers under the sealant tape making tiny slow leaks that only show up after the part is full
- Sealant tape not pressed down fully – or leaky pleats
- Leaks around hose penetrations
- Edges of surface flow-mesh poking tiny holes in the bag
- Holes in the bag from handling or manufacturing defects
- Leaks in plumbing (making you crazy because you didn’t think to check those hose joints and have been looking all over and can’t find the leak!)
The main tools for finding leaks are a your fingers and ears. Also: a vacuum gauge (preferable digital), a leak detector (not necessary but nice) and a roller for tacky tape. I hear from some infusion nerds I know that a thermal camera can be great for finding leaks – going to have to be a pretty good one because my little Flir E4 doesn’t work. The biggest thing you need is patience – and a systematic approach to finding and sealing leaks – and you gotta think like air.
I’m going to assume you’re using a disposable bag here – for reusable bags or closed molds with a solid B-side, your job is simpler because you just have the perimeter seal and fittings to worry about – once you know your tooling is all air tight. Ok, checking silicone bags for leaks is going to be a pain. Here’s how you check that you’ve got a good vacuum:
Drop Testing New Tooling
The first thing to do when you have a new mold that you are planning to fill with expensive material is a vacuum test. My preferred way to do this is to test before you put a release system on the mold. Sealer and release will only make your mold more vacuum tight by filling tiny holes so you may as well test worst-case. It’s also way easier to fix any leaks and repair vacuum integrity if everything is not slathered in release agent! Cover the surface with breather fabric or some other clean breathable material and put a nice vacuum bag over it. Try to run your bag as close to the outside of the flange as possible – at or outside where you plan to do it normally. Put (at least) two connections through the bag – one connected to the vacuum pump – the other to your (ideally digital) vacuum gauge.
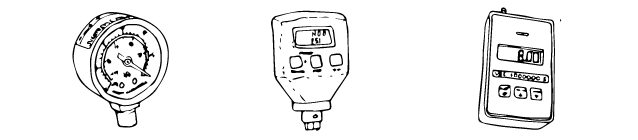
The reason I recommend a digital absolute gauge is that the resolution is much finer (set to millibar or Torr) and it is much easier to see the way the numbers are changing when they are actual numbers as opposed to a moving needle. Absolute gauges read independent of atmospheric pressure so you’ll have a constant reference no matter the weather. They also usually read in millibar or some other fine degree of measurement – or decimal inches of mercury. If you are doing commercial vacuum infusion, its worth the few hundred dollars you’ll spend on a basic digital absolute gauge just to know where you’re really at with vacuum levels.
And just because we’re on that topic – here’s my article on vacuum bagging: INTRODUCTION TO VACUUM BAGGING
So pull a vacuum and get your bag all nice. After a few minutes the vacuum level should be quite high (or low – depending on your gauge) – and your bag all tight and looking leak-free. My favorite gauge reads in millibar (thousandths of an atmosphere) and full vacuum reads as zero. You can chase your tacky tape and fittings around until your vacuum level gets to near what your pump can pull. Check your pump vacuum first by connecting the gauge right to the pump and taking a reading. Only very nice pumps will pull near-full vacuum and you definitely don’t need one of those for successful vacuum infusion. It’s nice to do better than 28in/Hg or so though for general purpose stuff. For fussy epoxy infusions you want as near to full vacuum as you can get. When it is really looking good – close a valve to your pump – you have a valve between your catch-pot and your pump right? You’re testing how well the bag stands on its own without the pump constantly sucking air out. What happens to the vacuum level will tell you a lot!
Drop testing new molds will give you a good baseline for the ultimate vacuum your system will pull and what kind of leaks you may have. Give it an hour or so to really suck the air out before you try to drop test it – moisture in the breather can mess with your readings.
I have found that molds are leakier near the perimeter and near complex features. If your tooling itself is infused, any mistakes in the tool infusion could result in pinholes in the tooling. If it is hand-laid or bagged wet-layup there may be porosity around the edges or around any spots where the mold itself had demolding drama from the plug. If your mold absolutely won’t hold good vacuum, you can go over it with a leak detector or do a single layer sacrificial infusion and watch for bubbles! Often coating the back of a mold with resin will help.
Fittings are always suspect as are feed lines and the plumbing outside the bag. It doesn’t take much for a vacuum level to drop like crazy on a digital gauge – and in a way that you might not have noticed with even a nice dial gauge. Now’s your chance to find the leaks in the mold, the perimeter and the plumbing and make sure that your tooling is infusion-ready.
Drop Testing Pre-Shoot
But you’re just trying to do an infusion here so we’ll assume that you have a fully loaded and hooked up mold. So run through that bagging operation and pull it down. Once your vacuum level stops going down, give it a few more minutes and then valve-off the pump.
Chances are – unless you are a vacuum bagging wizard – the vacuum level will fall disconcertingly fast. Chase the sealant tape and fittings for leaks until it gets better. This is the value of a drop test – you see how leaky your bag really is. Once the resin front passes a spot in your tooling, there will be no more vacuum-pump pulling air out – but there will still be negative pressure – so the air from the outside will creep in and mess shit up.
If you have concerns about your drop test and think vapor may be messing with you, try it at a lower vacuum level. See what happens when you clamp off your bag at 27inHg instead of 29.5inHg. It’s not so much about the ultimate vacuum as about making sure that the level of leaking is acceptable.
How much leakage is acceptable before shooting a part is up for debate and it depends on who you are and what you’re doing. NASA may have one standard – and I have another entirely! I generally go with small infusions if the drop test goes less than 15 millibar (0.5 inHg) in 5 minutes. This is pretty good really and even a much less tight bag will work for small one-off stuff – where the leaking is makes more difference than the volume of the leak. Aerospace standards can be well below 0.01 inHg in 5 minutes – which is crazy hard to do even with a double-bag setup and perfect tooling. Some people are amazing at vacuum bagging and can get bags that do not drop at all in 5 minutes – but that’s never been me – maybe some day!
Special case: If you have a mold in an envelope-bag or are bagging a big chunk of something (MDF, tooling board, etc.) down to a table for the infusion then you have to wait longer to see how good your bag is – because moisture and other volatile materials will continue to boil out of the block of mold material for hours – or even days – under vacuum. This is especially likely if you are working in a warm place and at very high vacuum. It will make your bag seem way worse than it is. I often cut myself slack on a drop test with an envelope bagged mold and go for an infusion even if its not ideal. If the mold is sealed, the vapor escaping from the tooling material will go out the perimeter of the mold and back into the vacuum manifold rather than through the part – so all that’s lost is some ultimate vacuum level. Its risky business though so be careful!
Catastrophic Air Leaks
Just a note on what happens when you have fully or almost infused a part and you get a bunch of air all at once. The most common way this happens is that you let air in a feed line because the resin runs out or you have an oops clamping things off. Holes in the bag or hoses pulling out of through-bag connections are also ways to dump a bunch of air in there.
This is super bad. If you’ve had this happen you know how fast that air shoots into the bag and how widespread the disaster area becomes. While small amounts of air are usually recoverable, a big gulp of it when the infusion is almost or completely full will almost always ruin your part. The only way to get the air out is to run in a bunch more resin, and the problem is that this will only work to clean up the top side of your part if you’re using surface flow media. The tool-side (especially if you’ve got a cored part) will be totally f-ed up. I’m sorry, there’s not much you can do – there’s air all through it and if you need good cosmetics or performance, you’re starting over.
B.Y.O. Air
Is your resin bringing air into the part? Watch your feed lines and see if you can spot little bubbles flowing along. This air can come from mixing. In many cases these will flow off to the resin front and forever out of your life – and into your vacuum pump where they should go. As your part fills, this gets harder. This air will often stay in your part especially if you don’t have flow media and are using core for this purpose – like grooved and perforated foam – or Soric. Surface flow is great at minimizing the impact of air problems – because air goes up into it and hangs out there instead of in your laminate. Be careful of accepting a situation where there is air in your flow media after the part fills – this is trouble brewing! If you see many little bubbles coming in with the resin and you think it’s causing a problem – look into degassing:
Degassing
You’ll probably be mixing your resin (hopefully!) after catalyzing or combining parts A and B – which will introduce some air to the mix. While gentle “folding” of the resin is much better than a frantic “whipping” – either will introduce some air to the mix. If you are having problems with air in your infusions, an easy fix to try to eliminate some problems is degassing. It’s not necessary and I have had plenty of good infusions with no degassing – but if things aren’t working or you have a part that really has to be perfect it is a good idea. First you could try just letting your (gently) mixed resin sit for 5 or 10 minutes before shooting the infusion – provided you have the time – so the bubbles will rise to the surface.
When you degas resin, you are using the ol’ vacuum-induced reduction in pressure to suck air bubbles out of your mixed resin. You get a big strong pot (not any pot, you’ll want a pressure pot or ideally a de-gassing pot with a clear lid) and put the container of mixed resin inside. You then pull a vacuum on the pot. If you have a clear topped pot, you will see what looks like a head of froth form on the resin surface as the vacuum level increases. Be sure to use a resin mixing pot that is only half full or so or it may boil over! Also, apply release coat to the inside of the pot and maybe put a plastic plate or a “liner” of some sort in there – it will overflow and dribble resin at some point! After a minute or two the bubbles will pop and the surface will be clear without bubbles streaming up from the volume of resin. You want to reduce the vacuum slowly and remove the mixed and degassed resin. Now it is ready to be used for infusion!
Make sure your pot (especially if it has a clear glass or plastic lid) is safe to pull a vacuum on – and test it without stuff in it first. A lid collapsing with a bang into a big bucket of mixed resin will totally ruin your day!
Have a look on YouTube or search for images of vacuum degassing setups. It is used a lot in plastics casting, where bubbles are a real bummer too. In aerospace applications, a combined metering/mixing and degassing machine is often used to deliver resin at a controllable pressure and volume – but these machines are crazy expensive.
Vapor – Related Problems
So your bag situation is vacuum tight on the outside, now the trouble comes from things that are (and become… I guess) inside the bag! The first is moisture. The second are volatile components of the resin system you are using for infusion. And the third is air that’s still in there – because even though your bag is good, there are still plenty of air molecules in there – just way way fewer than there were. Again, if your bag is not excellent and you don’t have a high vacuum level, not much from here on out will save you. First thing: no leaks!
Vapor From the Inside
So, now let’s consider moisture and volatile components or resin. Volatility is a measure of how readily something takes on its gaseous form. The two big variables driving phase change from liquid to gas are temperature and pressure. The major bummer here is that vacuum lowers pressure and therefore the temperature at which stuff turns from a liquid to a gas. It Boyle’s (ugh) down to the “ideal gas law” which looks like this:
P * V = n * R * T
( P = pressure, V = volume, n is the “amount of material”, R is the ideal gas constant, and T = temperature )
Supposing the (n * R * T) bit stays constant – if P goes down, V has got to go up!
So with this vacuum we’re reducing the vapor pressure and making it easier for the liquids (water, other volatile compounds in our reinforcements, cores and resin) to boil off into their gaseous forms. And double bummer here – the same number of molecules of something take up WAY more room as a gas than as a liquid! Like 1000’s of times more room! So that harmless little bit of water that you couldn’t even see is now many thousands of times larger – and becomes a nasty old bubble. High vacuum and higher temperature can make this a big problem. Especially nasty is the increased heat generated as resin starts to gel – which can make moisture that was still in liquid form turn to vapor at just the wrong time.
The vapor pressure curve for water shows this very clearly – at 29inHg (a good but not amazing vacuum level) water boils at about room temperature (77F / 25C). As the vacuum gets closer to “full,” the boiling point goes down further. If you are working warm at 100F (38C) or so, water boils at 28inHg!
Check out this great article by Vacmobiles on this very subject – they explain far better than I can!
Volatiles Before Infusion
Half the problem is getting all the dry material under your bag free from volatile stuff. The biggest problem I have found here are envelope bagged molds that consist of large blocks of wood/MDF (very bad) or tooling board (way less bad). To get decent infusions on wood or MDF tooling it is essential to coat and seal the MDF surface facing your part so any moisture – because there’s going to be some – will go out the back way and into the vacuum pump without passing through your laminate first – and maybe hanging out in there.
You can’t get good results bagging to the surface of MDF – bad idea! Even if it is sealed with resin, envelope bag or bag to a table every time!
I leave the back of MDF molds uncoated and sitting on a layer of breather or peel ply – and for large blocks, drill up into the the block from the bottom so moisture can easily escape from layers further up. Besides sealing the MDF really well, I try to leave the fully loaded mold under the bag for several hours (minimum) and over night (ideal) to boil off as much moisture as possible. One of the reasons shooting infusions at elevated (above room) temperature works so well is that it forces all the moisture to boil off (combination of temperature and vacuum lowers boiling point – see previous section) before the infusion resin even gets to the part.
So supposing you’re not using any wood and have a nice foam cored fiberglass panel on a mold of known vacuum integrity. If you have moisture in your materials, you’ll notice it as a slowly decreasing vacuum level even after you stop sealing leaks. This can go on for a few hours and will depend on the ambient temperature and vacuum level (more later on this). If you were to chart vacuum levels they would taper down slowly – sometimes in noticeable “bubbles” as moisture is boiled off – finally reaching a steady level. Some of this has to do with permeability – how easy it is for air and vapor to actually flow though all the stuff in there. The rest has to do with boiling off moisture that was in the materials. As vacuum levels get high, the volume most vacuum pumps can move goes way down, so even a very small amount of water or other volatile material will be 1000+ times bigger after it boils – and will take a while to suck out. Bigger volume pumps handle this better.
Volatiles in Resin
You know when a product is labeled “Low VOC” or something like that – well those “Volatile Organic Compounds” are materials that “boil” and go from liquid to gas at a low temperature. Sometimes you can even smell them – like when you open a can of paint. The “vapor pressure” is related to temperature and pressure, and so as vacuum and temperature increase, volatile liquids more readily turn into gasses. Infusion resin systems are designed to have low quantities of volatile materials within their usable temperature range but this still can amount to 1-3% of the resin volume for epoxies – which is a lot. In the case of vinyl-ester and polyester resins, they need volatile components (MEKP, styrene) to work. For epoxies, the hardeners are often very hygroscopic – which means that they really love to suck up moisture (water) out of the air. Keep the tops tight on your epoxy hardener! Water is only moderately volatile at room temperature – but heat it up or place it under vacuum – and it gets volatile fast!
Resin – Specific Problems
Epoxy Issues
With epoxy, your main issues will be air from mixing, and moisture that has been sucked up by your hardener. If you are having problems, first make sure you have new hardener or that you have always kept the lids firmly tightened down on the A and B components of your resin system – hardener especially is hygroscopic – loves to suck up water from the air. If you find separating of solids or discoloration, it may be time to look into some new hardener. Resin can usually be heated and mixed to resolve precipitated solids problems. Ask the manufacturer. If your drop test went well and your hardener is new and you have degassed your resins, the big additional thing I would recommend is to dial back your vacuum pressure right before you close the resin inlets. Most of the time I will switch over to an oil-less lower vacuum pump (bleeding air isn’t great for oil-lubricated rotary vane pumps – and oil mist can blow out the exhaust) before closing the inlets but after the infusion is completely filled. See more on vacuum levels below in the “Reducing Vacuum” section.
Vinyl-ester and Polyester Issues
I am no expert on infusing polyester and vinylester (VE) resins but I have seen and made many mistakes doing it – and talked to lots of people about it. The cool thing about “poly” and VE is that they can be catalyzed (sorry – “initiated” for the engineers!) to cure at different speeds. This is totally terrible if the resin gels before filling your part, but awesome if it gels right after filling your part and before too many crappy little bubbles form. Getting your gel-time dialed in for the part and infusion layout is key.
Standard MEKP (methyl ethyl ketone peroxide) catalyst boils at a modest (23 inHg – ish) vacuum level at warm (90F – think exothermic onset before resin starts to gel) temperatures. It could potentially make bubbles if you don’t do the “reduce vacuum before clamping feed-lines” trick described below – but often doesn’t. Styrene boils much closer to full vacuum – but still well within the range of a good bag – again especially at high temperatures present in “exotherming” resin. As always, the higher the temperature, the lower the boiling point in terms of vacuum level.
You can successfully shoot infusions at lower vacuum levels – and for these “esterified” resins this can be a good option. If you see volatile stuff bubbling in the first few inches of the flow front, dial the vacuum back until it goes away. It will look frothier than just air trying to escape up from the lagging (wedge shaped) flow front from deeper in the laminate stack. You can try bumping the vacuum level up again after the part has filled but this may cause trouble. There is no shame in infusing a part at 20inHg if it fills in time and there isn’t a trapped gas problem – that’s just winning!
It is also important to use resin and catalyst that is designed for infusion and like with the epoxy, you’ve got to keep it sealed up so moisture doesn’t get absorbed. If MEKP might be a source of problems, ask your resin supplier about switching to a CHP or MEKP/CHP blend. CHP (cumyl hydroperoxide) doesn’t boil in the kinds of temperatures we’re dealing with here. It also helps soften the cure profile and can give you more working time without going too low (sub 1%) with the ratio with MEKP.
If you can, try to give as much time as possible under the bag at full vacuum before shooting the resin. Especially if you have used a hand-laminated skincoat over your gelcoat – this and the solvent you wiped it with can cause trapped volatiles, and air that will take some time to come out.
Managing Vacuum
Reducing Vacuum
In almost all situations, except maybe double-bagged infusions (which are kind of silly unless you’re Boeing or have unusually high standards and really know what you’re doing) you can get a margin of safety by dialing back the vacuum level just before you clamp off your feed lines. This reduces the vacuum pressure and keeps potentially volatile gasses safely in their much smaller liquid (non-bubble) form. With epoxy, it is moisture mostly, and with VE and polyester it is mostly styrene that will boil off – but it should have already. Either way it is a problem. As the resin starts to gel, the temperature will shoot up – vapor pressure will drop – and you need a buffer of reduced vacuum to keep things from off-gassing. Reducing vacuum is a great low-trouble way to help ensure low-void infusions with minimal risk of over-bleeding resin and starving the laminate.
For minimizing all these problems it is best to draw as high a vacuum for as long as possible on the dry stack and during the infusion. For large parts or infused tooling, you really need a minimum of several hours and ideally overnight to draw volatile stuff out of the dry stack before infusing. Increased temperature helps too. A larger volume pump will handle moisture better, so use the biggest one you can – and/or one with a gas ballast to help deal with the moisture so it doesn’t mess up the oil. I don’t know all the reasons why, but I (and several other people I have talked to) swear that using a bigger pump works better – and using a pump that pulls really good vacuum works better too. You’re getting down there on the vapor pressure curve for water so approaching full vacuum, every little bit counts for a lot. In theory the difference between 35mbar and 5mbar should make a huge difference in the boiling of water at room temperature, so probably it does.
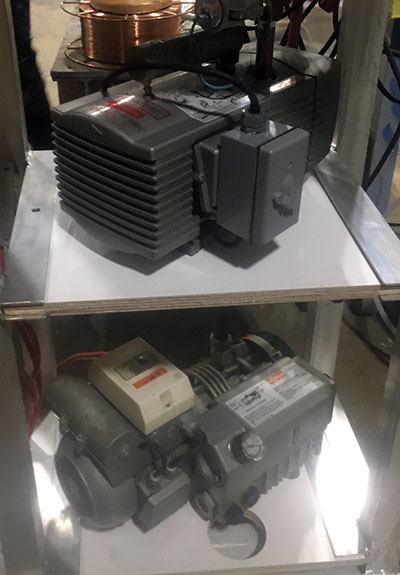
When it’s time to clamp off the resin – hopefully you’ve left a good resin break (peel-ply or something) so you have filled your part but not blasted too much (or ideally any) resin into the catch pot – you should have a way to switch to lower vacuum level. At the left is a picture of my friend Rob’s infusion setup with two pumps – one high-vac oiled rotary vane one (bottom) and another dry rotary vane pump (top) with adjustable vacuum level. (I have one of these “setups” too but it’s just two pumps sitting on the floor in a tangle of hoses and cords.) Switch the bag over to the lower vacuum pump right before clamping off the resin inlet(s). By lower vacuum, I mean roughly 2/3 of full vacuum – about 15-18 inHg / 400mbar. Experiment and keep notes on your successes and failures. You may be fine at 25inHg – but you’ll have to experiment.
For epoxy infusions where the dry stack has had plenty of time to dry out at high vacuum and heat you may not need to do this at all – the moisture is already gone. This is ideal – but you’ve got the have the experience to know what you can get away with. Better safe than bubbly/voidy. This is especially scary with carbon where things will look fine but actually suck. In thick laminates, any trapped vapor will have the bad habit of forming larger pockets in the middle of radii and features where there are a stack of slip joints – and more exotherm heat.
If you do this a lot you can make a pretty cart system like Rob and a manifold so its easy to switch over without disconnecting hoses. Check out the Vacmobiles vacuum systems – they have differential (high/low) vacuum options and really good integration for infusion. Buy one if you can (I’ve used them but never owned one – wish I did!) or study them and make up your own similar version out of crap from eBay – ideally with high and low-vacuum pumps so the pump is always right for the job.
Don’t Turn off The Vacuum
One more thing – leave the pump on and connected to the bag until you are ready to demold the part. No really, please don’t clamp the outlet hose and shut off the pump before the resin has cured – I’ve seen people in online forums recommend that and it sounds like logical advice but no, please, no – you’re just asking for trouble! Nobody I have ever seen doing this for a living (and this is a big sample of real process experts) will turn off the pump before the resin has cured except in rare and exceptional situations. It won’t starve your laminate if you have a decent resin break, and you shouldn’t be bleeding excess resin into your catch pot anyway. The catch-pot is a safety item to preserve your vacuum system – it is not good practice to suck volumes of resin into it. If this is happening, you need a better resin break or more careful or versatile feed layout.
Leave parts under vacuum to post cure (epoxy problems) and don’t whatever you do set a vacuum pump on a timer unless you’re doing production infusion with polyester or vinyl-ester resin and know your (quick) gel time. By all means run a smaller pump than the monster you use for high-vacuum stuff – you shouldn’t hardly need any CFM once the infusion is shot – but don’t shut it off!
Actually, there are a few times when shutting it off won’t be terrible. If you are using a vinyl-ester or polyester resin that is catalyzed to cure almost immediately, then this will be ok. If your bag is crazy-good, and especially if you have sucked resin into your catch pot, turning off the vacuum after clamping it completely will just eliminate the potential to boil off MEKP or styrene in the few minutes before you have gel.
Also, if you are an aerospace manufacturer using some heavy-duty proprietary process with double-bags and controlled resin feed then maybe you shut off your vacuum AND resin – but if so – why are you reading this? Get in touch with me and tell me your secrets!
Another time I have seen people do ok is with very shallow (or flat panel) molds and very thin laminates. Here any air will stay on top of the laminate in the flow media and the part will probably be cosmetically ok. For thicker parts or parts with more up and down geometry – you will struggle! Pressure differences from gravity alone will cause issues with resin pooling.
Easy Composites (a retail seller of composites materials in the UK) has a popular video that shows the infusion of a car hood scoop. In this video they show the pump turned off after clamping both the inlet and the vacuum side plumbing. It looks ok in this video and the part comes out nice, but when the part is demolded, you can see lots of air in the flow mesh all over the part. This is not good and would indicate a problem in a more commercial or demanding situation – probably a leak or air from not-degassed resin. I’d suggest that this is a special case of a flat and thin (just a few plies) part, where the only potential defect would have been bad surface finish. Air went/stayed up, and that was the into flow media. This is a case of a sub-optimal process not happening to cause a problem. It isn’t a universal good practice as the video suggests and should be avoided, especially by those just starting out who may not have a good feel for the dynamics of the process. The videos and instructional information Easy Composites offers are otherwise excellent – and set a real standard for how more businesses in the composites industry should provide great educational material to accompany their products!
Mid-shoot “Clamp and Wait a Minute” Method
One thing I like to do is to “pump” the brakes a little with the feed lines during an infusion that is going fast. This is done by closing the resin inlet mid-way through the infusion. By restricting resin flow for a minute or two, you allow air to escape out the resin front as it temporarily stops advancing. Air that has been trapped and passed by with resin will rise up into your flow media. Sometimes it’s amazing how much air/vapor you see start to pop up to the surface as soon as the inlet is clamped off. This tends to be a helpful thing with thicker laminates or cored panels with the potential to hold air like balsa. When you have a nasty bunch of bubbles in your flow media, open up the resin feed hose and watch then all scoot out over the top and out the resin front and out of your life forever.
You have to do this before the part is full – and the flow media can’t make contact with the vacuum outlet side without getting choked off by resin. This really only works with epoxy when there is lots of time. It can be a great way to in-process de-gas the whole infusion.
Refilling Your Infusion
This is a sketchy one and well into “rebel laminator” territory – but I have done it and it works. So what if you get your feed lines or your resin mix wrong and it gels before filling all of the part? You wait until it gels hard and then re-infuse it! Most resins have a “green window” where (especially without air exposure) they still have enough un-cross-linked molecules that they will make primary bonds to new resin. So if you have a dry corner or a big zone that got “race-tracked” around… you can stab some holes through the bag once the surrounding area is mostly cured and infuse more resin in. Sometimes it is easiest to place tacky tape on the bag and then razor-knife out the middle and add new vac and feed lines. It should fill all the dry areas as long as you set up the vacuum perimeter outside the dry area so resin has to pass over and displace all the air. It’s not structurally ideal and don’t let an engineer catch you doing it – but for less structurally critical one-off parts, it is totally a reasonable “get out of jail free” card.
Setup and Layout Details
Resin Breaks

If you are finding resin in your catch pot before the whole part is full, you need to look into your resin-break features around the edges. Any surface feed media (mesh, shade cloth, etc.) should be cut back a bit (1″-6″ depending on the part volume and laminate) so that resin has to slow down and fill the part before running off into the vacuum-side manifold. Resin should fill up the the edge of the flow media fast and then slow down, allowing all the areas with flow mesh to fill, and any air in the resin to come to the resin front and escape into the vacuum side of things. Your resin-break can just be a single-skin zone of the part near the edge or just one or two layers of peel ply extending out to the perimeter vacuum manifold (spiral wrap covered in peel ply, MTI hose, strips of flow mesh, etc).
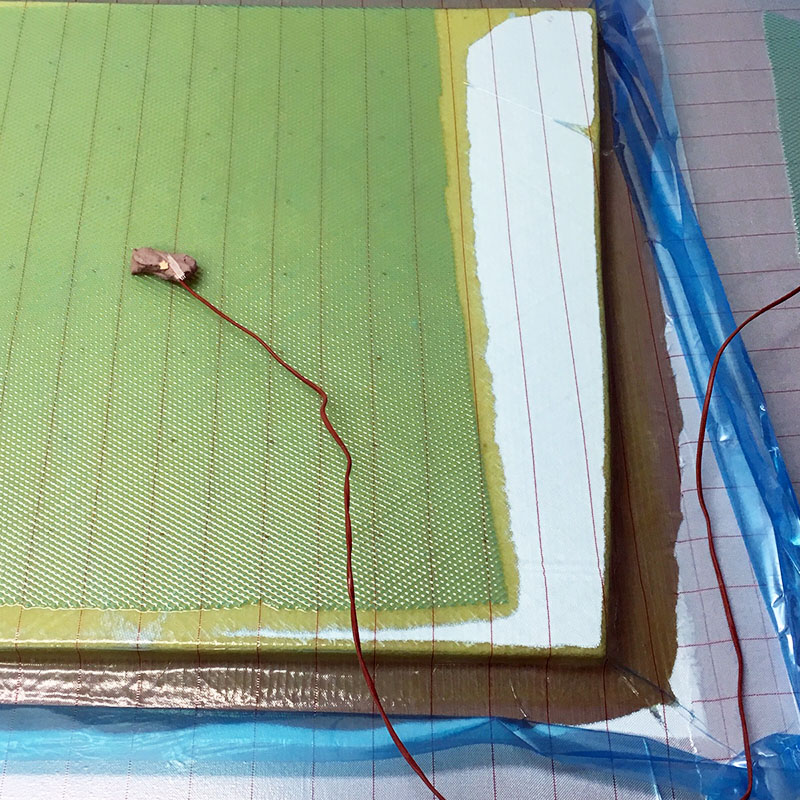
In this picture, the resin break is the wide swath of peel ply between the end of the part and the vacuum perimeter. In this case the vacuum perimeter is just a strip of flow mesh with a hose dropped on top. I’ll be able to use this one again because the resin never reached the vacuum side of the resin break – which is the plan! I actually clamped the feed off when the resin was at the dashed line about an inch from the end of the Soric – rest filled in fine with resin that was in the part already. It takes a while for resin to flow and you don’t want it to be thick at one end and thin on the other.
Note that the 2mm Soric XL core is the flow media here – so no mesh on the surface. It flowed about 20″ in 20 minutes at 78F. It’s not light, but it’s easy and fast and handles curves and corners gracefully.
Flow-front Shape and Flow Break / Dead Zone
I also like to hold my flow media back a few inches from the perimeter/edge of the part – so that resin has to slow down and fill in areas it hasn’t reached yet. This helps parts fill completely and evenly and (along with the “resin break” described above) keeps excess resin out of the vacuum-side plumbing. The flow front of the resin when using surface flow media will be further ahead on top and further behind on the tool surface – forming kind of a wedge of resin moving through the laminate in section. It is totally possible to over-run a band of air on the lower surface on the vacuum-side of the part. By cutting the flow media back 1-2″ / 25-50mm (or more) from the end of the part and beginning of the resin break (see above) you can bring the flow front into a more “vertical” shape, reducing the possibility that resin will flow over a part of the bottom the laminate and leave a stripe of dry or voidy part. This flow media “dead zone” allows time for the resin on the bottom to catch up to the resin on the bottom.
Semi-Permeable Vacuum Perimeter / Points
If you don’t have room for a perimeter resin break, or need to pull vacuum on some mid-part high spot, there are products that let air through but not resin. The most common is MTI hose – which is a spiral wrap with a semi-permeable sleeve over it. Airtech makes a similar product called Dahlpac and a semi-permeable membrane is sheet form called Dahltexx. Neat stuff!
What MTI hose lets you do, is eliminate your resin break – because the hose is a resin break itself. You just place it in contact with the part perimeter – even overlapping the flow media – and call it good. You can lay it on your part or up in a pleat wrapped with flow media and it will pull out air from there. If you have a dry-spot that always happens or an “island” in the part that is a local high-spot – try this out.
Feed Pot Height and Head Pressure
The height of the feed pot of resin relative to the part will impact the effective pressure on the resin flowing into the part. The pot should be below or even with the part to reduce the extra pressure from gravity. Having the pot below the part will force a negative pressure (approx .5psi per foot) and should result in a more compact laminate. Placing the feed pot above the part will work in reverse – increasing the pressure on the incoming resin – which can cause pooling or significant differences in part thickness across the direction of the flow. By not filling your vacuum-side plumbing with resin and leaving an air-pressure link to the bagged cavity (MTI hose or Dahlvac are good for this too) you can use the height of the feed pot to control the hydraulic pressure on the infused laminate. This lets you adjust the thickness gradient and overall compaction – a little – during the end of the shoot.
Adjusting Parameters
Temperature and Viscosity
The hotter a resin is, the lower its viscosity. If you are having problems with flow through your part taking forever, or if the resin is taking hours to gel after filling the part, maybe try heating things up. Heat will reduce viscosity and reduce gel time. This is usually only an epoxy consideration, but you should look into shooting your part at 90-100F or more – after warming the mold and the unmixed resin slowly to that temperature (probably overnight while the dry stack is under the bag). More important to heat the tooling than the resin, but don’t let the difference in temperature be too much. Shooting hot resin into a cold mold won’t do much except reduce the pot life – so avoid that. Viscosity can have a big impact on lots of the variables and you may find that it really helps. Some tooling resins really can’t be infused at room temperature because the viscosity is too high. At 100F, they flow like… well not water but less like molasses!
Be careful though because heat will also reduce the level of vacuum needed to boil moisture. So your perfect bag at 100F will be turning all the moisture in the vacuum envelope (in core, dry fiber, etc.) into steam – and this could take a while. If you monitor vacuum with a data-logger you can actually watch the moisture leave! This is the reason I’d suggest leaving your part hot and under full vacuum for 6+ hours before you infuse if you are trying the hot room method. This makes most sense for infusion of tooling where the stakes are high and you may be using a high temperature resin system that has an unusually high viscosity for infusion. For tooling you only have to do it once so waiting an extra 12 hours or overnight won’t hurt anybody’s schedule.
Infusion Speed
So, many people swear by infusing at very warm temperatures and get excellent results. This is a combination of low viscosity resin and of the high temperature time the dry stack spends under the bag boiling off all the moisture. Shorter cure time can help with epoxy too.
Be careful of getting too warm – excessive exotherm (heat) can make resin cure so fast that it gets all bubbly and gross – like a pot of resin left to go off by itself. This is only really an issue around feed features and for thick laminates.
Depending on your flow media, laminate and core as well as resin system and mold temperature – there are a lot of variables that effect resin infusion rate. If you go too slow you may not fill your part before the resin gels. If you go too fast you may have “race-tracking” – either locally or globally as the resin rushes to fill the easiest spots first. The different degrees of permeability of the reinforcements and core may allow resin to “pass” bubbles of air – trapping them behind the resin front and locking them away in your part.
Things that make infusions go faster:
- more heat: warmer resin, warmer mold = lower viscosity and faster flow
- bigger/more feed lines
- flow media orientation and type
- resin viscosity (independent of heat) – low viscosity = faster
Generally the opposite of those things make infusions go slow. The problems with going too slow aren’t likely to cause strange results or voids. But going too fast will. If you are getting not-completely-wet-out skins or lots of air around the perf-holes in a cored panel, you may just not be allowing the air to escape before the resin takes over. Slowing the resin front speed by throttling the feed lines can really help.
Other Common Problems
Race-tracking or Missed Spots
Sometimes your resin finds a short-cut and misses filling an area because it has already reached an outlet and is pumping itself into your catch-pot and ignoring the unfilled area. This is a bummer but it’s easy to do. My first piece of advice is to make sure you have a “resin-break” around the edge of your vacuum side (or perimeter) of the part. This was already covered above, but it’s important.
Core can be a major source of race-tracking. If you have core joints that aren’t tight you are effectively creating tubes for resin to flow through – and it will! Gap-free core fits really help. CNC-cut core kits are great for production, and it is totally ok to stick strips of foam into gaps rather than leave them wide!
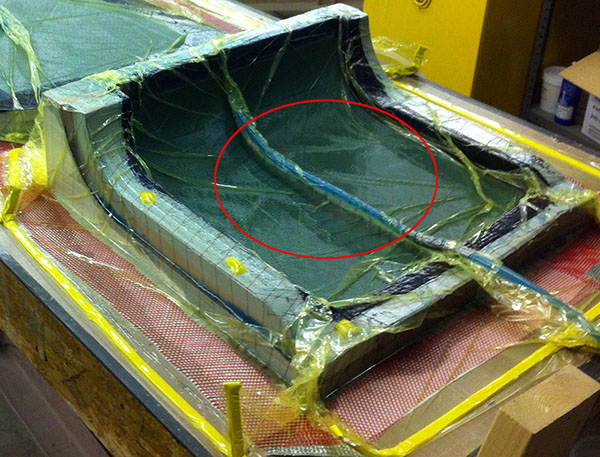
The image on the right shows resin having surrounded an area of un-wet-out material. This happened because the resin ran around the edges of the core where there was a little tube formed by bridged fiber. The flow media wasn’t centered in the panel and the lower edge is slowly filling. In this case it finally filled as the air crept out through the resin break – but the reinforcement should have been held back from the edges or pressed in tight to close off the “racetrack.”
If you are using core and having problems filling the back side of your panels, holding back flow-media and fiber short of the edge of the core can stop flow over the top of the panel and force resin through the feed holes in the core and into the bottom skin. This assumes you’re able to run core past the edge of your part, which is not always an option. If you have a core ramp to single skin, then leaving the surface flow media back from the edge of the core ramp by an inch or so can force resin to fill out the bottom skin before choking off the vacuum-flow to those mold-side fibers with resin from the top skin.
Also note that most surface slow-media is directional – it flows faster one way than the other. Usually if there are diamond shape features it flows fastest in the longest axis of the diamonds – also usually the roll direction. Tweaking flow media orientation can make a difference by speeding or slowing resin flow – and changing the primary direction of flow.
When to Clamp Your Feed Lines
You control how much resin goes into your part with the feed lines. As the part fills, you have to decide when to stop letting resin in. This has a big impact on how well things turn out! If you clamp it off too soon, your part doesn’t fill completely. If you let too much resin in, you’ll have too much resin in your part. When you have a large vacuum break or a semi-permeable vacuum-side plumbing, it becomes impossible to remove excess resin by bleeding it off into the catch pot.
The problem is that there’s no rule of thumb for this! For small parts, it is easiest just to feed more slowly. You’ll almost always want to clamp off the resin feed before the part is completely full. The vacuum will continue to pull the resin through the part and any excess resin near the feed plumbing will slowly equalize across the part, and fill the remaining perimeter area.
Variable Thickness
If you find that your parts are different thicknesses that they should be – or that in areas with the same laminate there is a variety of thickness – you may have issues with excess resin or excess bleed. This is usually the result of over-filling the feed side so you get a puddle and then over-drawing the vacuum side so you get a much lower resin ratio. The height of the feed pot is a major concern here. Ideally you will place the pot of resin below (just) the lowest part of the part. This will prevent siphoning and over-filling. When the pot of resin you are feeding from is above the part, you have both the atmospheric pressure and the static head of the difference in height – resin flows down hill too. Using a slower resin may help too if you are having a part gel before the resin has had time to sort itself out to the equal pressure under the bag once the part is filled.
If you do not have enough of a resin break or allow your flow media to run all the way into the vacuum side manifold, you can pull too much resin out of the vacuum side of the part – making it too thin. At the same time, the resin may not be able to flow through the fiber to equalize the thickness across the part. Avoid getting any resin in your catch-pot. If this is happening, and you have thickness issues, try to work on your flow and resin breaks and check out the section above on that.
Feed-line Print from Resin Exotherm Heat
Depending on your flow media choices, you’ll probably have some type of feed grid and some type of surface (mesh) or interlaminar (Soric, grooved core, etc.) flow media. The feed grid has to move a lot of resin and so when the resin starts to cure, there is a big chunk of it still in all the feed grid parts. If you use spiral wrap or Enkafusion or any other feed system that lays on the surface of the part, you can expect it to create some heat while it cures. If your part is thin compared to the feed feature laying on its surface, there can be problems from the heat generated by the exothermic reaction of the resin curing in a big volume. The result can be bubbles on the surface that follow the feed layout and are caused by the excess heat. Also the hose can distort the weave by creating low-pressure areas on either side of he hose where the bag bridges… making for distorted weave or other ugliness.
My advice for things that are thin or important is to make your feed system so that it can be pulled up into a pleat (red circle in picture to the left) in the bag after the resin has flowed into the part. Spiral wrap works great for this if it is wrapped in peel ply. If you don’t wrap it in peel ply it will pop your bag when the bag gets sucked into the slots.
For larger projects you can buy feed lines with a stitched cover with flow media inside to carry the resin out. This is only really a problem with single-skin parts – core isolates the mold side of the part from the hot feed lines. But still, having feed lines lay on your part causes all kinds of nasty wrinkles and resin blobs. If you have to leave flow media on there at least use coated peel ply (teflon peel-ply is great too) under your feed features – or at worst, two layers of regular un-coated peel ply will work ok. Keep your handy point-and-shoot thermometer ready to monitor for a rise in temperature. If it goes up to a point where it feels hot to the touch you may need to make a system for getting the feed lines off the part…
Process Details
Mold Surface and Release Issues
The quality of your mold surface effects the degree to which bubbles will want to stay on it – this has something to do with surface tension and I am not 100% sure how it works – but it’s real! If you have a surface sanded to 220 grit vs. a surface sanded to 1500 grit and polished – the polished one will have a lower likelihood of having surface porosity caused by moisture expanding into vapor or air bubbles getting “stuck” as the resin front rolls over top. I am not sure how this works but I have seen it over and over again.
Release coats also have an effect on surface porosity. I am not sure how to quantify or explain the do’s and don’t of release systems and their interaction with infusion processing, but if you are having issues that won’t go away after trying all the other stuff, a semi-permanent release system like Chem-lease or Frekote may give you better results than wax. You’ll also want to use a mold sealer before applying a semi-permanent release. Ask your release system provider about primers and sealers! And there’s always adhesive PTFE film which I really like for one-off tooling.
“Bridging” and Crappy Corners
If you have problems with outside radii looking all bubbly or resin-filled, you may have a “bridging” problem! When fiber is unable to slide into an outside corner, resin fills in in a much larger volume that is ideal. Your solution is the “slip-joint.” This is just a layup detail that means that you place cuts and laps in all (or most) outside corners. This way as vacuum comes down on the part, the lapped plies can slide by each-other and make full contact with the tool.
More on slip-joints here: Slip Joints and Why You Need Them!
It is ok to use a roller or the edge of your scissors to “break” in inside corners (that become outside corners on the part face) to help the reinforcements fit tight against the tool. Try not to scrape or bump the mold itself – or any in-mold coatings. Rollers are more gentle and are a better choice.
If you have big fat wrinkles forming on the bag-side of your part along what are “ridges” (or outside corners on the bag-face) you are dealing with excess fiber not having a place to go when compressed. As you load the part with dry reinforcements, the material is all fluffy and goes over outside corners neatly. When the bag presses this stack down, the effective radius the outside-most plies go over will get smaller – so there will be excess length of material. The excess has nowhere to go but up into a big fat snake-like wrinkle. This will look terrible, be structurally terrible and perhaps even cause print on the part face.
Your solution is to apply the plies tighter to the mold when loading and to try to minimize fiber running at 90 degrees to the part feature that forms the ridge that the wrinkle forms around. Usually the engineering will allow this 90-degree fiber (which doesn’t do much) to be replaced around tight corners with +/-45 degree “tapes” that make this problem much less of an issue. Remember it’s only as good as you can build it no mater what the engineer says – so push for buildable AND good. Nothing strong about a huge nasty wrinkle!
Spray Adhesive
Spray adhesive (or “spray snot” as it was called in the first composites shop I worked in) is the tacky contact adhesive used to hold the dry infusion stack together. You can use 3M Super 77 from the hardware store to do this and it will (probably) work ok but you have to use a very small amount. I have never had a catastrophic failure from spray glue – worst case it leaves smudgy places on the surface. If you think it is causing problems it is probably time to do a test panel and adjust the spray glue “variable” so you can figure out what is going on.
There are many products available that are “resin soluble” or at least “infusion friendly” and these are a much better option if you’re doing this commercially or at some scale. The products designed for infusion often have a color to guide in application – to see where you’ve sprayed already – and so you don’t get carried away and hose things down with the stuff. Don’t do that.
Try to use very little (ok, none) on any surfaces that have to be really nice. If it’s going to get clear-coat, figure out how to avoid spray-adhesive on the mold surface because it can cause little pinholes and defects that will be hard to repair.
Some reinforcement manufacturers can supply pre-tacked fiber. This is much more uniform and requires less adhesive. It’s kind of like pre-preg without the resin!
Clamps
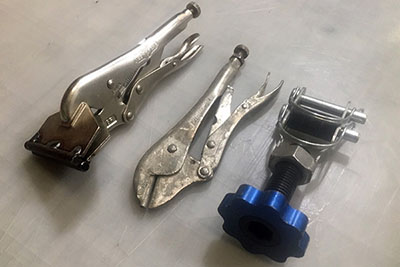
You should use something robust to clamp off your feed lines both before and after you infuse the resin. There are plenty of options but the throttle-able ones (blue knob) are awesome. Its not a bad idea to double up your clamps, especially if you use the Vise-Grip style – with or without modifications. The rug-puller style work ok without any welding of round rod – but sometimes its fun to solve problems that aren’t really problems yet! Ok, breaking a hose with your clamp and letting a huge swoosh of air into your part really sucks – though I’ve never had it happen in 10+ years of this.
Look into disposable plastic valves for use in the feed system. They are pretty cheap and allow you to tweak the feed speeds, especially handy for large complicated parts with tons of hoses. Some people think they are leak-prone – and they probably are compared to no-valve. There is risk to everything and clamping hoses and risking a slip up and pulling them out of the bag or the resin is risky too. For larger parts, many people think disposable valves are a risk worth taking.
Clamping isn’t really a problem unless you make it one – just like keeping your resin bucket full and the hose down at the bottom while you’re infusing – ’cause sucking even a few seconds of air will really mess you up – see Catastrophic Air Leaks above. Too often its the easy to solve problems that really bite you – the ones that come from getting distracted or rushing. For me, these have always been the ones to hurt the most because a little preparation or focus would have saved me. The more you do it, the more you’ll see these and head them off.
Test Panels
When in doubt stop and make some smaller test panels. Either use a flat table or a part of your mold. Don’t make them so small that you don’t learn anything though – they feed line spacing and flow speed are important pieces of information. People often use glass sheet to test on because you can see the extent of the wedge-shaped flow front if you are using surface flow media – or keep track of core and resin flow on the back side.
Try to use the same team that makes the full size parts – or a representative sample of them – and don’t be any fussier than you could be at part-scale. There’s a lot you can learn when the layup is quick and the mistakes are cheap – jut remember that not everything translates from flat to curved and small to large – but most things do!
Conclusions
This is hardly exhaustive, but hopefully you can use something here to help you have more wins and make less trash. The details here are mostly for people who have the basics down but are having a problem and are super frustrated and can’t figure it out. This has been me and that’s why I know this stuff! I have certainly threw away plenty of “learning experiences.” It can be confusing and there are lots of moving pieces at play. Once you know air isn’t leaking in through holes in the mold or bag – or riding in with the resin – it can be hard to figure out what going on. The biggest one is just to be aware of the volatiles issue and to set up your vacuum system so that you can seamlessly switch from high to low vacuum. For me, this is huge. If your resin creates heat when it starts to cure (exotherm) and that heat, combined with low pressure (vacuum) reduces the vapor pressure of volatile materials inside your infusion, these materials will go from liquid to gas and get huge. These (relatively) huge gas bubbles will be bad. Degassing and “soaking” your dry stack under vacuum really help sometimes and keeping your material dry is important too. Shooting your infusion warm or hot can be a game-changer too but you have to plan ahead and warm everything up.
If you get in a jam, shoot me an email and I’ll try to help. Also don’t be shy about getting in touch with a technical representative with your resin manufacturer – they have seen lots of stuff and really want you to win. I wish you uneventful infusing and no bubbles!
Updates:
Updated 12/19/12 – Added section on surface and release and section on race-tracking. fixed typos.
Updated 1/3/19 – Added some about not shutting pump off and tried to edit and clarify others – also resin breaks.
Updated 4/5/20 – Added bit about MEKP and CHP re: vapor pressure for Poly and VE
Updated 9.9.20 – Converted to a page from a post. Edits, images at top.
Updated 11.16.20 – added, subtracted, tidied up. MTI hose part.