This doesn’t get said enough: thermocouples are pretty cool. By an interesting fact of physics, different metals stuck together create a very small electrical voltage that changes depending on temperature. It’s not much of a voltage, registering in milli-volts which are small – 1/1500th of the voltage a standard single cell AAA, C or D battery might give you. But it’s real and it’s repeatable and it makes for an excellent way to measure temperature without glass tubes and mercury. And even cooler, it can be measured by an analog-to-digital converter and input into your computer – so you can easily keep track of (and log) temperature at many points over time.
More about ovens here: OVEN OPTIONS FOR PRE-PREG CURING
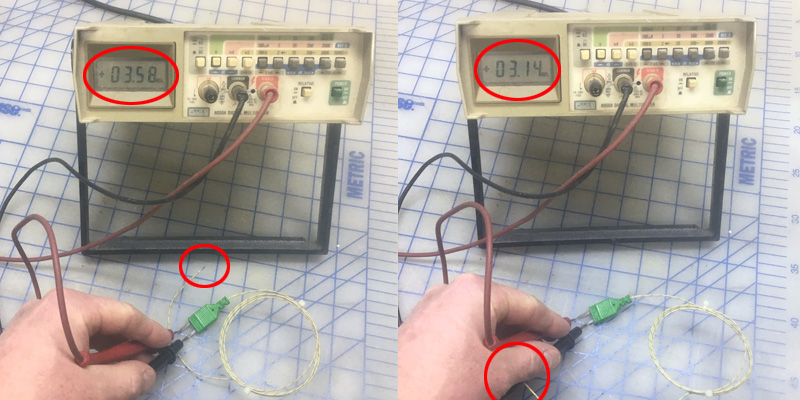
Here you can see the different reading (in milli-volts) when the thermocouple junction is in the air compared to when I hold it against my hand. I may have had the positive and negative leads reversed here, but the result is visible over just 10 or 20 degrees. These aren’t very big voltages!
This is a K-type thermocouple, and I ran out of hands to hold both the leads on the connector and also hold a camera and a thermocouple junction.
Types of Thermocouples
There are lots of different metal combinations that can be used to make thermocouples. The two that are most commonly used in composites work are J (iron-constaintain) and K (chromel-alumel). Both these types work very well at temperatures from 0C – 500C which is where we’ll be hanging out. If you are doing deep freeze or kiln work, you may find another type is more suitable.
Usually you can buy thermocouples already made up with plugs. The are available with a wide variety of sheathing and protective covers depending on your use case. You can also make your own using thermocouple wire and plugs. There are a few different plug standards, with different sized male and female connectors with either flat or round pins. Polarity is important, so the pins are different sized to make sure the thermocouple is always plugged in the right way.
Assembly
To assemble a thermocouple from J-type wire (for example) cut the wire to length and strip about 1/4″ (6mm) from one end and 1/2″(12mm) from the other. The crazy thing here is that for J and K type thermocouples (in the US and Canada at least) the negative wire is red! On a K-type thermocouple, the negative (red) wire is not magnetic, but the positive (yellow) one is. So you take the 1/4″ stripped end and attach it to the plug, and your tightly twist together the 1/2″ stripped ends to make the junction. This can be zapped with a TIG welder to melt the junction together, but I have found that a tight twist works fine.

Thermocouple Care
Thermocouples are easy to mess up if you get kinks in the wires or if the junctions get pulled apart. Having a “flaky thermocouple” is a common occurrence, especially if you are monitoring something large with lots of wires leading everywhere. On large part cooks for boats, sometimes you have dozens of thermcouples that have to be numbered so that you can identify which part of your part each is measuring. It is important to store unused thermocouples in neat coils so that wired don’t kink, which can cause the wire insulation to fail and make your junction happen at the kinked spot instead of at the tip of the wire. This is infuriating, especially when it only happens intermittently and you’re getting readings that jump around.
Reading Temperature
To interpret the millivolt signal coming from your thermocouples, you need a piece of circuitry that can scale the voltage signal and show a temperature readout, or that can amplify the signal to a larger current or voltage signal. Thermocouple readers are relatively inexpensive and can be bought from most places that sell thermocouples. The simplest are just a screen with a plug. Others can handle input from multiple types of thermcouples. If you are handling a large number of thermcouples, you need a multi-channel analog to digital converter that can feed your readings into a computer program.

One problem with thermocouples is that they need a reference temperature, called a cold junction to provide a stable voltage to compare with the voltages that are fluctuating with the changing junction temperature. This is basically just a different kind of thermocouple that is housed outside the measured space. In a multi-channel input device, the cold junction will usually be in the hardware – to serve as a reference for the measurements. If your “room temperature” fluctuates a lot or your logger is sitting on top of an oven – expect that your measurements will be off!
Logging
Loggers and logging software are great for taking thermcouple input and reading and storing the values over time. Software settings can control the logging frequency and label each channel. If you’re cooking or postcuring, it is useful to see how part temperature compares to the oven air temperature and so you can verify completion of cure cycles across more than just one or two places on a part.
I have an 8-channel logger made by Pico Technology – it’s their TC-08 Model. I have used it and abused it for almost ten years and it and the PicoLog software are simple and easy to use. There are many similar units available from a variety of vendors. Eight channels is plenty for small parts, but you’ll want more for big parts or multiple-part cooks. Here’s an example of three channels logged over a cook cycle:

There are a bunch of all-in-one loggers that have a screen and a slot for a SD card that look very nice. I have seen a Graphtec unit that looked very nice but I haven’t used it. It would be nice to not have to have a laptop sitting around the oven all the time – going to sleep, restarting itself, and doing Windows Update – among other endearing qualities!