EC! Home: Articles: Tools and Equipment: Oven Options for Pre-preg Curing
Updated: 3/23/22
By: Chris Rogers
Building with pre-preg materials is great, but you need a freezer for storage and an oven for curing. Of these, the oven is often the biggest obstacle and the one with the scariest failure mode. A pre-preg oven fire (ok, any fire) is bad news! This article discusses your options for choosing ovens and how to go about building and outfitting one yourself.
Please note: The information here reflects my opinions and I make no promises about its correctness or usefulness! Your use of this information is entirely your own responsibility and EC! (and me Chris) will not be held liable for any injury, damage or other unwelcome outcomes. This stuff (heat, electricity, gas etc.) is dangerous and you should be super careful and get professional assistance with anything you aren’t qualified to do. No, really!
Big-Picture Planning
The type of oven you choose depends on four main parameters:
- How hot do you need to go?
- How big are the things you need to cook?
- How much thermal control/consistency do you need?
- How much money can you spend to build or buy your oven?
Generally, to increase any of #’s 1-3 you will need to increase #4!

If you’re getting into pre-pregs, have a look at my article: LAMINATING WITH PRE-PREGS for an introduction and plenty of details.
Your Oven Parameters
Here are a few things to consider…
Temperature
Probably the biggest driver of your oven decisions will be temperature requirements. If you have to go hotter (120C/250F or more), that will push you out of the practical “build-it-yourself” realm. There are ways to do it of course depending on your fabrication skills, but chances are, if you are building your oven oven, you will be (or should be) processing lower temperature pre-pregs. There are many great resin systems (epoxy) that cure below 100C and you should look into these and determine the lowest temperature that you can get away with – because why not? If cure speed is an issue for reduced cycle time, see if you can get a resin system that cures faster at a lower temperature.
Above 120C/250F, my recommendation is to buy an oven from a manufacturer (new or used) that has safety features, is made of fire-proof materials, and has a good circulation system. As the temperature differential between the ambient air and the oven air gets larger, there is more need to focus on thermal performance and insulation rather than just sealing the oven envelope. More energy is needed to raise the temperature and more heater firepower is required. This gets complicated and requires some carefully thought-out circulation systems and temperature monitoring. Again, its not that you can’t do it – it just gets harder – and more dangerous if you screw up.
But a low temperature pre-preg oven (100C/212F) looks a lot like a sauna. If it’s big enough, you can walk in there for short periods of time. The insulation will need to handle a 60-70C (140F-160F) temperature differential. You can use standard building materials and even wood to build a low temperature oven. Some circulation fans can be used at an ambient temperatures around 100C – you have to buy the right ones. Later on, I’ll discuss considerations for building a low-temperature pre-preg oven.
How Big?
If you’re building big, you’re going to need a big oven – and big ovens require big heaters! Many manufacturers can supply “walk-in” type ovens for composites curing and this is a great option for large businesses with scheduled cooking on a daily basis. They’re super expensive though and require gas plumbing, fire suppression systems and sophisticated logging and control computers. This is great if you can justify the expense, and for high temperature pre-pregs, you would benefit from the fast ramping rates (how fast it gets hot) and overall well-sorted-out-ness. Your safety and fire inspections will go better too!
If you are building big but using low-temperature cure pre-pregs (up to 100C/212F) there are plenty of ways to build a custom one-time use oven or set up a modular system for curing different sized parts depending on what is needed. Coming from a background in high-end custom boatbuilding, this was always the way. At the simplest, boat shops would build quick “rooms-inside-rooms” with stud and plywood walls and fiberglass or foam board insulation and point gas heaters through holes in the walls. Temperature was logged with an array of thermocouples, and temperature controlled by adjusting heaters manually. It’s not efficient and it takes a lot of labor to operate, but if you only need to cook huge parts a few times a year, it is very cost effective. For smaller ovens that get used more often, there are electric heater options that are safer and much more readily controllable.
Check with your local fire inspector and make sure that any built-in permanent oven is compliant. You may need to have built in sprinklers and fire detection systems – because a built-in oven is a room! The last thing you want is a fire – and the second to last thing is having to make expensive last minute changes to comply with the rules and risking fines or suspension of operations. Modular break-down ovens tend to skirt these issues because they are temporary.
Thermal Control
The keys to thermal control are good sensors for measuring temperature, good air circulation and enough heater power to make changes to the oven temperature quickly. Circulation is probably the most important with regard to actual cook performance. A room-sized oven can easily be 10 degrees (F or C – take your pick) hotter at the top than at the bottom – especially if the floor is poorly insulated. It is necessary to really move the air around and blow hot air from the top down to the bottom. Some heating systems are designed to pull air from the top, heat it, and blow it back down to the bottom, creating rapid stirring and a uniform air temperature throughout. Good ovens should have air circulation that feel like being outside on a windy day – a really really hot day!
Once you’ve got the circulation down, measuring the temperature can be done at fewer points in the air. If you are using an automatic heater controller to adjust the temperature, it is important to have it run off the air temperature rather than a thermocouple stuck to a part. You want the air to be uniform, and the uniform air to heat the part and tooling to be cooked. You can then monitor the part temperature in many spots to be sure it is heating as you need, and conforming to the required cure cycle.
Wait, can you use a direct heating strategy?
Sometimes it makes sense to heat your tooling directly with insert heaters or silicone pad heaters. This can be a lot more efficient, faster and safer.
Insert or cartridge heaters require good regulation and control – and they get hot fast. For aluminum molds they can be a great solution!
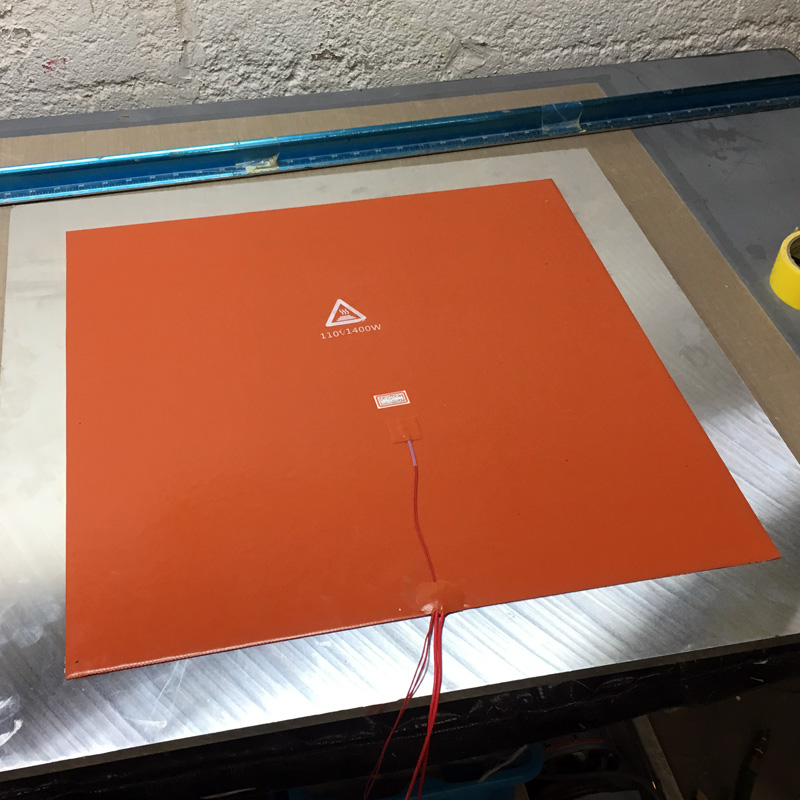
Silicone pad heaters are found in hot-bonder kits and 3D printer beds. They can be purchased with high-temperature adhesive or bare and are available in a wide range of dimensions and power levels.
This picture is of a silicone 3D printer heating pad adhered to a piece of 1/2″ (12mm) MIC-6 cast aluminum plate which has release coat on the opposite face – shown upside down here. This little table heats up fast and works fine for temperature controlled layups and even low-temperature pre-preg curing. The control thermocouple is attached to the top face and the bottom is left exposed so it doesn’t overheat.
It is worth looking into…
So, Buy or Build?
My advice is to buy if you can, and build if you must. Unless your job is “oven-builder” your efforts are probably better used elsewhere. But necessity is also the mother of… oven building. Big ovens are expensive and huge – if you need to cure composites but can’t afford the money and space that an industrial oven takes up then you only have one option.
If you have to build a big oven, it might be helpful to look for a smaller commercially-built oven for day-to-day use on smaller parts. They’re more efficient, safer and you don’t have to “babysit” them. People use home-style electric ovens – like you’d bake a pie in – but the temperature regulation isn’t great. You can buy used industrial ovens for reasonable money and (especially if electric) install one easily. It might even be on wheels! I bought a 3’x3’x5′ Grieve box oven off Craigslist, drilled some holes for vacuum ports and thermocouples and used it almost daily for years. Not just to cure pre-preg either – kicking off filler or speeding up bonding jobs that would otherwise have me waiting overnight for the next operation – very handy!
Buying an Oven
If you’re looking to buy an oven you have lots of options. Small ovens are often movable (not attached to the floor) and this can be a big factor in ease of use and flexibility. Large ovens are almost always attached to the floor of whatever building they are in and are often required to have built-in fire suppression systems. Larger ovens are usually gas powered and require specialized gas plumbing and safety systems. If you are at that level, you know more than I do about what you need! Large oven suppliers have sales staffs and applications engineers who can help you out. See Appendix A at the bottom of this article for a list of oven manufacturers commonly used to cure composites.
For small shops and people who would otherwise consider building an oven, I would recommend looking for a used industrial oven. Between Ebay, Craigslist and surplus dealers (my favorite – HGR Surplus in Ohio, USA often has lots to choose from) and just asking around – there are plenty to be had. Many industries use ovens for drying, curing and heat treating and the demands of composite processing are pretty tame by comparison. The only down side is that some of the used ovens you’ll find are super dirty and have ancient control circuitry. Ovens are fundamentally pretty simple and the parts are often available or upgrade-able. Old temperature controllers can be upgraded to modern PID units with ramp and soak cycles.
If you buy a used or potentially modified oven, make sure the safety features work! Oven controls should be designed with a main heater controller (PID, or plain old thermostat style) and also an over-temperature controller with a different thermocouple that shuts down the power to the heaters if the over-temperature threshold is reached. There should also be a way to shut off the heaters if the fan or blower stops working. Most electric ovens use a set of relays to control the power in a looped setup, where each relay is engaged (power flows through the switch) if a certain logical condition (input voltage) is met. Make sure the relays default to open (N.O.) without power and that the logic of the system doesn’t allow for any runaway conditions. When in doubt, get an electrician or qualified and experienced person to advise on changes to a control system. Often original manufacturers can supply schematics (or you can find them online) for even quite old ovens. But anyway – try out your over-temperature shutoff system!
Building an Oven
So your heart is set on building an oven… ok, great. If that’s what you are after then I will share what I know about building ovens and how to do it effectively and safely.
Safety Note: Don’t do it! There are lots of ways to seriously mess this up – fire, electrocution, fire, ruined parts, fire, gas explosions… did I mention fire? Be careful! Also, hire an electrician if you aren’t one.
So there are four main things you’re going to have to figure out:
- Envelope: How will you enclose and insulate your oven volume?
- Heat Source: How will you heat your oven?
- Controls: How will you control your heating system?
- Monitoring: How will you know what is happening to your parts while you cook them?
Oven Envelope
Building an oven is a lot like building a house. You have to build the structural part that holds everything up, and then you have to build the thermal parts that keep the warm in and the cold out. Unlike a house you shouldn’t have to worry about rain! There are ways to build that combine the structural and the thermal requirements into one solution (like SIP panels for buildings), and other ways that keep the two separate. Our main focus here is the thermal performance. You just need to make sure it doesn’t fall down on you, your buddies and your stuff.
If you are only trying to cook low-temperature pre-pregs or post-cure infused or wet laid parts, you will probably only cook up to around 100C. This is hot, but not so hot that you need to worry about the hot air actually catching your oven materials on fire – but it could melt them if you don’t choose carefully. Saunas that people actually go it can be 100C – and with dry air it is uncomfortable but not painful to be in 100C air – just don’t touch anything metal!
The gold standard for this is metal-faced foam panel material (Kingspan is a common brand). Often used in commercial freezers, garage doors, and many other industrial situations, it is made of thin metal sheets sandwiching a foam core. You have to be careful to find panels with foam that will handle the elevated temperature. Ovens can be built over internal or external welded structural frames (often mobile – with wheels!) – the foam panels are assembled over the frame with gaskets to seal air-leaks. Metal feels nice because it is fire resistant and easy to clean.
Similar to the metal panels, I have seen ovens “stick-built” with metal studs and rock-wool insulation and then clad with exterior metal roofing material. This could also work for a modular or mobile oven. The main idea is structure, plus insulation, plus relatively air-tight envelope. You can get here however you wish.
If you are going to consider a modular oven, you can also make it in sections – or better yet with collapsable nesting sections! This is a favorite option for boatbuilders who have to deal with long skinny parts but not all that often. A collapsed oven or one section of a larger oven can be used to cure smaller parts. The versatility is excellent!
Keep in mind that you have two ways to lose heat: through lack of insulation and through air leaks. You want to focus on both. If you have 6″/150mm of insulation but huge gaps – that’s no good. Better with 2″/50mm of insulation and gaskets or tape over joints to keep heat from pouring out the holes.
Wood ovens are ok for low temperature cooks. Wood is cheap, light and can be painted with a fire-retardant “intumescent” paint. It has the benefit of having low thermal conductivity so it won’t draw out your heat as much as metal. Still, it is good to think about your oven as you would a well-insulated house. And consider fire. Wood burns easily and is a poor choice to use with heaters that have an open flame.
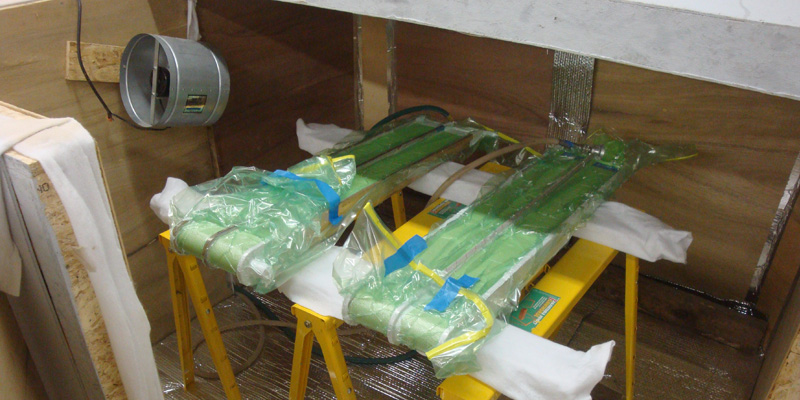
Here’s a picture of a wood oven I used to have many years ago. It was made of 1/4″/6mm plywood over wood frames with fiberglass insulation. The heaters were the electric “monster hair dryer” style and there were a few circulating fans (duct fans with a high temperature rating) that kept the air swirling around. You can see some improvised gasketing made of breather fabric and foil-faced insulation on the floor. The parts are held up off the floor and the vacuum hoses run out through a hole near the bottom. A thermocouple was dangled through the top so it hung about a foot above the parts, and several thermocouples were attached to the parts to log the cure temperature.
Probably the easiest and cheapest oven is a box made of foil faced insulation panels. The sheets are rigid and can be cut with a razor knife. I have had success with 2″ thick foam taped together at the seams with foil tape. You can make a box with one open face and set it down over another sheet that has your item to be cooked on it. You’ll want to prop your parts up off the bottom of the oven so they are surrounded by warm air. The easiest way to heat such a box is to cut a hole in one side, near a corner and line it with some metal duct (or a tomato can with the bottom cut off!) and place a hot air blower pointing through the hole. Placing the hole in one corner makes the air swirl around the oven in a circle instead of having a less predictable flow pattern. You can put multiple heaters in opposing corners of the oven, blowing “around” the outside.
Make sure that any heaters are not pointing at your parts or at the walls of the oven! Because fire.
You’ll need holes for vacuum fittings and thermocouples too – and that can be made as simple or complicated as you want.
Heat Source(s)
Once you have a tight insulated oven envelope, you’re going to need to blast some hot air in there. But how much? I’m going to do this in feet and Fahrenheit – but similar calculators and equations are easy to find for correct units. This is for probably one of the simplest ovens there is, and it doesn’t take into account the air leakage. Caution: oversimplification!
Heat Loss (BTU/hr) = Area (sf) * Temperature Difference (F) / R-Value
So, imagine a 8’x4’x4′ box made of 2″ foam panel with an R-value of 12. Say our room temperature is 70F and the oven temperature is 200F. Our total area of the six sides of the box is: 32+32+32+32+16+16 = 160 square feet. The temperature difference is 200F-70F = 130F. So our heat loss looks like:
1733 = (160*130)/12
So to keep this oven at 200F in a 70F room will take 1733 BTU per hour. To convert BTU to watts, divide by 3.41. So…
1733 (BTU/hr) / 3.41 = 508 watts
Now 508 watts isn’t much – an average hair dryer could pull that off – but holding the temperature isn’t the game – we’ve got to ramp it up to that temperature in a reasonable time frame and then hold it there even if somebody opens the lid to have a look or if there’s 300lbs of room temperature tooling block (or other – see below) to heat up. So we’re going to need much more, but that’s a good number to have for reference. At an absolute minimum, you could get by with double that in a small well-sealed oven, but it would ramp very slowly. For practical purposes, four to six times the heat loss is a reasonable amount of power for a low temperature oven. For reference, the small Grieve oven I had could supply 6,600 watts of power to a 3’x3’x5′ box – and it ramped up like crazy!
For an idea how much energy (in theory) it takes to heat objects:
- 500 lbs of aluminum from 70F to 200F at 1 degree per minute takes 2110 watts
- 500 lbs of Invar from 70F to 200F at 1 degree per minute takes only 1108 watts
- 500 lbs of epoxy/carbon laminate from 70F to 200F at 1 degree per minute takes 2088 watts
So now that you have an idea how much power you’ll need, lets discuss where to get it. The image below shows three levels of heat source. On the left is a “super hairdryer” type of heat blower that typically runs on standard wall-outlet power. These can deliver up to 2000 watts or so and have built in fans to blow the heat out the metal barrel. The ones I use are from Masterflow. There is a Swiss company called Leister that makes larger higher performance ones but I haven’t owned one – I hear they’re good. The middle heater is the gas-powered type that is often used for temporary heat in construction sites. They have an electric fan and ignition system and use compressed gas (propane, LNG, etc.) from a bottle or from built-in gas plumbing. On the right is a much larger recirculating blower with an electric heating system. This is a specific product made by ElectroHeat in Sweden that has power in the 20-30 kW range and requires an industrial-scale power supply.

Of course there are a very broad range of heater options that can be used to warm up air. These are ones I have seen used for user-constructed ovens across all price ranges. If gas heat is an option it can be economical compared to electric heat, but it has the two major drawbacks of flames and exhaust gasses being blown into your oven volume. The flames can be mitigated by careful aiming and by using metal “blast-plates” to deflect the jet of super hot air away from flammable stuff. A built-in system can make use of a heat exchanger to solve these problems completely. The main benefit of electric heat is the degree to which it can be controlled and the fact that electricity is significantly less dangerous and complicated to pipe around your facility.
Ovens need watching. For all but the best and most well designed “DIY” ovens, it is always wise to have somebody around when things are hot. I have had close calls with fires myself, and it’s super scary! All of the large boatbuilding shops I have worked in make sure that two people are present for any large part cooks – both to monitor the process and to make sure things stay safe. You may be tired or just want to run out for some supper, but don’t! There are so many potential problems and unless you have engineered your oven very carefully and built with fire-proof materials – and tested tons – you never know what will come up. That’s one thing nice about autoclaves – the problems are inside a thick metal shell – but autoclaves have other sources of drama!
Exhaust gasses from combustion are a serious danger. Gas heaters need to be operated in a well ventilated area to prevent build up of carbon monoxide – because it can kill you. A quick bit of research suggests that a quarter of all propane-related deaths are from carbon monoxide poisoning. You can buy smoke and carbon monoxide detectors – and you should!
Controls
The goal of an oven control is to apply enough heat to keep things just the right temperature, and to do it without any unnecessary variability. You need a way to monitor the temperature and then control the heaters so that they make a stable (ideally controllable) internal temperature. The simplest control of all is a “chimney” – you know, like a hole in the top of the oven! If you have a steady heat input like an electric heat gun or a propane blower then you can just vary the size of your chimney to let heat out as you blow it in, leaving just enough in the oven. This is surprisingly effective if you are going to be paying attention – and you have to pay attention! The chimney can be as simple as a hole with a board laid across it – that you can slide to cover more or less of the hole. You just balance “heat in” with “heat out” so it is stable at the desired temperature.
Now if you’re doing this for a living or think that somebody might see you, you’re going to want a real electronic programmable controller with a little screen and buttons. It is best to buy this as a unit from somebody who knows how to engineer electrical stuff. You can buy simple controllers that are used in lots of industries where people control temperature – from beer brewing to ceramics kilns. If you are setting out to build your own controller – and I can’t talk you out of it – there are some things you should know. I’m not an engineer or an electrician so take this for what it is – the ramblings of a clueless amateur! So here’s how a digital controller for an oven works:
First you have a thermometer – it’ll be thermocouple probably – that reads the temperature. If it is too cold, it cranks up the heat. If it is too hot, it does nothing, or ideally it looks back at what it just did and makes a plan to do it less-so in the future. Then it waits a little and reads the temperature again – and repeats. You can get a simple temperature controller that just reads the temperature every few seconds and if it’s below a threshold it turns on the heater and runs until it gets hot enough and then shuts off – and repeats. These can be mechanical – just a dial, or digital with a “set point” and a deviation at which it kicks on. You could set it for 200F and say that the maximum error is 3F, so when it gets a reading of 196F it kicks on until it says 200F again. This works fine in many cases and because your parts and molds have mass, they stabilize the heat that your materials “feel” – but if you log the temperature, you’ll see it looks very spiky – because it is!
The ideal temperature controller has a few nice features: first it’s programmable, and second it has a plan for when things get out of hand. Safety first: your controller needs to have an over-temperature alarm and a means of shutting down the heaters. Things malfunction and relays can fail and your heat can get stuck on. When this happens you need a SEPARATE system for saying “oh crap, oh crap its getting way to hot – pull the plug!”
On the programmable side, you are in luck – there’s a thing called a PID algorithm – which you’ll find all packed up in a “proportional–integral–derivative” controller that you can buy. It’s a little computer that takes readings and applies error correction to stabilize both the temperature and the rate of change of the temperature. Many of these can handle what are called “ramp and soak” profiles – a graph of temperature over time that can be programmed in.
You can think of a PID controller as “cruise control” for your heating system. In a car the cruise control can vary how hard it hits the gas and the breaks – which makes it really effective. The simplest ovens use a control system where there is only a gas pedal – and its either 100% or nothing. It would be hard to drive at a steady speed if the gas pedal were an all-or-nothing operation – but fortunately this binary option can work much better for a heating system than it would for a car!
Some of the PID controllers you can buy are great but they are a huge pain to program. You really need the manual and it takes lots of time to figure it out. Mistakes are bad. There are nice touch-screen options with much better interfaces (Watlow makes one) that will make the programming and operation way easier. These things are improving all the time so if you’re hiring other people to run your oven and are cooking high-value stuff, it might be good to get an easy-to-use controller!
Your temperature control thermocouple ALWAYS needs to be in the air part of the oven – never on a part or inside one! The air will heat up fast and the rest of the solid stuff will take a long time to heat up. If you try to use a hard-to-heat part to control your oven, the heater will keep pumping heat into it and the air will get way too hot. Use the heaters to heat the air, and let the hot air heat the parts. You can make really bad stuff happen if you don’t do this! Be careful!
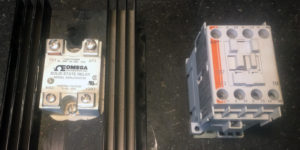
The PID controller has an input thermocouple that tells it the temperature of the air in the oven, and an output that controls a relay that switches the heater on or off. A relay is just an electronic switch that can handle the high current loads associated with electric heaters. There are two types of relays you’ll see in ovens – mechanical contactors which go on and off with a thunk, and solid state relays which don’t do anything but flash a little light when they switch the power on.
Contactors are suitable for switching that happens less often – like once a minute, solid state relays can switch on and off every few seconds. Depending on which type you use, you will have to adjust the way your PID does its switching. The nice thing about a solid state relay is that it can switch so fast that it acts like it is variable – the PID can vary how much it keeps the heat on vs. how much it keeps it off over time to effectively work the gas pedal on the heating system. Combined with the PID algorithm, an oven controlled by a solid state relay can maintain much smoother temperature over time.
So the overall picture is a nested set of control loops. The “outside” one is an over-temperature alarm. It can shut off everything if things get too hot – but normally it stays on. Inside, the control loop runs a second relay that does the control – but only as long as the safety loop is happy. This all needs to be inside further loops that have an on/off switch for the whole system. And fuses – you need fuses. Really though – find an electrician or buy a pre-made control box!
Monitoring
If you’re doing pre-preg cooking or even post-curing of a large high value part, you’ll want to be sure you are getting the part temperature that you want. To do this you need to put a “thermometer” on the part itself – probably a bunch of them! The solution to your problem is the thermocouple!
For a more detailed look at setting up thermocouple logging, check out this post: MEASURING TEMPERATURE WITH THERMOCOUPLES
A thermocouple is a junction of two different metals that make a very small voltage that changes depending on temperature – the “thermoelectric effect” is what’s going on here for you scientists. So there are standard combinations of metals that are used to make the junction in thermocouples and they are designated by a letter value. A very common thermocouple type is “J” (also called type “L” in Europe according to Wikipedia) which is a junction of iron and constantan (a nickel alloy). J type thermocouples are useful between −40 °C and +750 °C – perfect for oven monitoring! You’ll also see K-type (chromel-alumel) which has a slightly different range but is also very common.
One problem with thermocouples is that they need a reference temperature, called a “cold junction” to provide a stable voltage to compare with the voltages that are fluctuating with the changing junction temperature. This is basically just a different kind of thermocouple that is housed outside the hot space. Here’s a picture that shows the effect of a cold junction on the logged temperature of a cook:
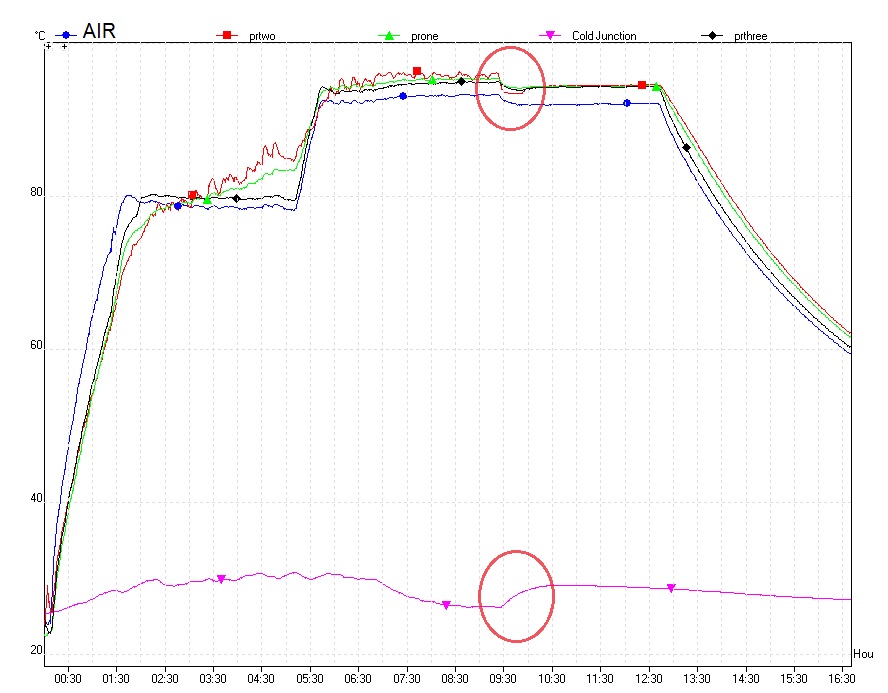
See that line on the bottom – the pink one – that’s the cold junction being monitored alongside the temperature of a few parts in an oven. The blue trace is the air temperature – just a thermocouple hanging in the oven above the part. This cook had a “ramp” to 80C (the steep initial leg – it looks steep but actually took 2.5 hours for the parts to get to 80C) followed by a “soak” at 80C for 3 hours. This was a low temperature pre-preg in a thick section so the cook profile was designed to discourage the exothermic curing reaction from getting out of hand and spiking the cure temperature. You can see how the part temperatures (green and red) “pass” the air and the outside of the tooling at about 3 hours in. This is the “exotherm” that the curing generates and it can be bad for tooling and part stability if things cure too fast. Here we kept the temperature low and then ramped it up to 95C for 6 hours just to be sure the cure was complete – even in thinner areas of the part that may not have generated much of their own heat.
So about that cold junction – it tells a story too. This was cooked on a warm day and the shop door was open with some air blowing through. We started the cook in the morning and you can see the ambient “cold junction” temperature went up and then came back down over the course of the day. By about 9:30 into the cook, it got late in the day and was cooling off – so somebody closed the door. The control box got thrown off as the inside temperature jumped back up in the area around the hot oven without the breeze to cool things off. You can see how the instability in the cold junction effects the “temperature” as read by the thermocouples! You can also bet the actual oven and part temperatures didn’t fluctuate that much between 9:30 and 10:30h into the cook. With the day’s instability in the ambient temperature over, the rest of the cook was smooth sailing. Keep this in mind as you monitor and control temperature with thermocouples – they are a relative measurement tool and only work as well as their cold junction and calibration allow.
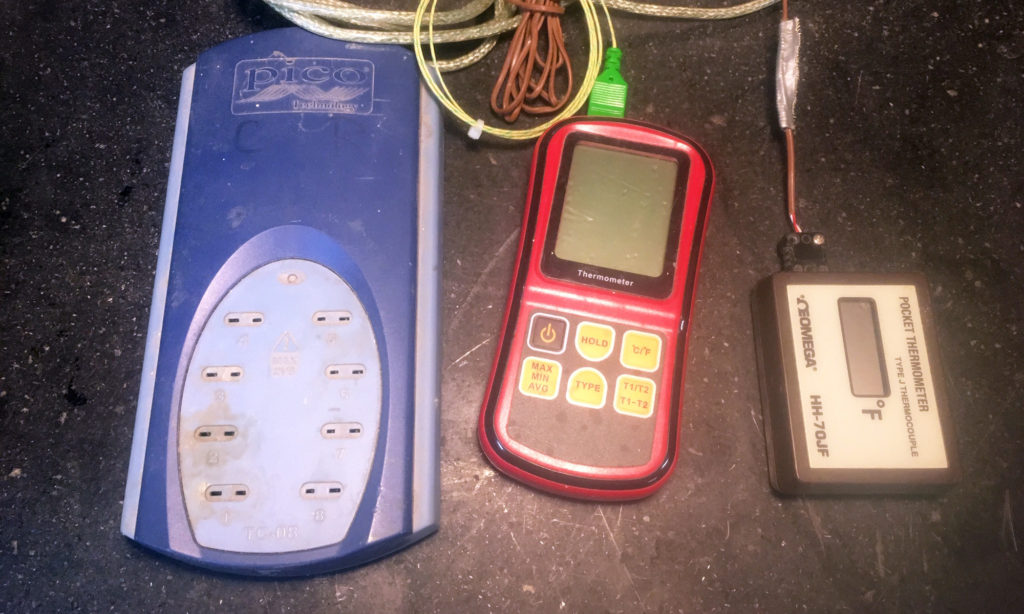
So how do you use thermcouples? Well there’s lots of ways! The simplest is to buy a hand-held “reader” that you plug a thermocouple “probe” into and it displays the temperature. You can dangle one of these thermocouples into your oven and monitor the temperature of the air inside. Just remember the cold junction and don’t leave the reader on the top of the oven! One step up from here is the multi-channel logger. These are readily available from many manufacturers and can log to internal memory, a computer or even to paper tape. The one I have had for a long time was made by Pico and has 8 input channels and plugs into a USB port on a laptop. You can buy loggers with any number of channels and logging options if you want to spend some money – but its getting cheaper and easier all the time. I’ll list some links to these types of products in Appendix B at the end of this article.
So once you have some thermocouples made up with plugs on one end and a junction on the other, you will need to attach them to your parts. Most of the time you can just stick them to the outside of your vacuum bag and that will be fine. I like to use a few inches of tacky tape (bag mastic) wrapped around the end so it doesn’t damage the bag. Many tapes don’t hold up well with heat but I have found that nice thick clear (not the brown thin stuff) packing tape works really well – you just tape over the thermocouple embedded in the tacky tape – you can do an X-with two pieces of tape if you’re fancy. If you need to bury a thermocouple in your part, you need to make sure that is doesn’t leak where you bring it through the bag. Some of the thermocouple wire styles can leak through the wire insulation – but not very much.
Because the voltage is generated at the junction – where the two wires connect – it is important to make sure that they do connect where you want (at the end) and not where you don’t want (at the plug, somewhere in the middle where the insulation is damaged, etc). Test them out by holding the ends in your fingers and watching the temperature go up on the logger. Thermocouples do wear out over time and the voltage diminishes or becomes less reliable – but you’ll probably mangle them first. I like to buy lengths of thermocouple wire and make up my own at the right lengths. You just cut to length and attach a thermocouple fitting/plug to one end and strip and twist the wires tightly together at the junction end. You can zap them with a TIG welder too if that’s how you roll. Coil them up carefully when you’re done with them and don’t let the wires get kinked or you may end up with a rogue junction somewhere unhelpful.
If you are interested in logging vacuum too, check out this article: HOW TO LOG VACUUM
Conclusions
This is definitely not all you need to know to make or use a composite parts oven. There are so many variables and ways to get things done that it will be a continuous learning experience… forever. But the fundamentals are pretty simple. People have been making ovens for a long time and for basic composites use, you’re really taking more about a well insulated room with the heat cranked up than an “oven” in the cook-your-supper sense. I have tried to point out where things can go wrong in a bad way and I hope you will use an abundance of caution. Good luck, have fun, and when in doubt – don’t do it!
If you have made an awesome oven and would like me to include it for reference in this article, I’d love to show a variety of solutions. Get in touch and send some pictures – I’ll give you a link!
Appendix A: Oven Manufacturers
This is a list of companies that sell ovens suitable for composites processing. Look around Ebay, Craigslist and surplus sites for used ones if new ones are too expensive! If you know of brands that should be added to this list, please let me know.
Appendix B: Thermocouple Logging
These are some companies that make thermocouple logging stuff. There are many more but these are ones I’ve used. Let me know if you have one that should be added to this list!
Note:
This article contains information that reflects my opinions – I make no promises about its usefulness! Your use of this information is entirely your own responsibility and EC! and the article author(s) will not be liable for any injury, damage or other unwelcome outcomes. This stuff can be dangerous and you should be super careful and get professional assistance with anything you aren’t qualified to do.
These articles may contain mistakes (please let me know if you find some!) and will include prejudices based on my / the author’s limited experience. If you disagree with anything here, please get in touch. This is not just for me to share what I know, but to learn from others. I will gladly insert additional information and differing opinions so readers are more aware of the diversity of “right” answers!