NOTE: This is new-ish (ok, I’ve just been slacking) and needs proof-reading and some edits.
This article is about mixing common thermoset resins: polyesters, vinyl-esters and epoxies. There’s a little bit of theory and a lot of practice. When in doubt, consult the technical datasheets provided by your resin manufacturer!
Safety Rant:
None of these materials are safe. They are all bad for you. Don’t breathe their vapors and don’t get them on your skin or in your eyes. Wear the right PPE (gloves and respirator for sure, Tyvek suit or similar if needed) and don’t rely on it to keep you clean. Most disposable suits will allow resin to soak through, but you can get disposable plastic aprons that are excellent and cheap.
And acetone isn’t for cleaning resin off your skin. Check out this article – Epoxy Sensitization and You – there’s a bit at the bottom about cleanup and barrier creams. But mostly: gloves, always gloves!
Resin Types: Differences and Similarities
Thermoset resins are cured by mixing two or more components that rearrange themselves chemically into a new molecular structure – a process called “polymerization”. The ratio of one component to the other is important and the mixing needs to be complete. You – the user – are the one who has got to do the measuring and mixing.
Epoxies are typically supplied as two components: “A” and “B” or “resin” and “hardener”. These individual components are stable and will not change their properties until they are mixed. Because the two components are designed to combine at a specific ratio of resin molecules to hardener molecules, the “mix ratio” needs to be very accurate. Any excess resin or hardener that doesn’t meet up with a molecular “dance partner” will remain floating around unreacted – getting in the way of cured resin and reducing the mechanical performance of the polymer. Changing the ratio of epoxy resin to hardener will not change the speed of the reaction – it’ll just mess things up!
Polyesters and vinyl-esters work differently. The “resin” part already contains most of what will become the cured polymer: molecules with their potential reactive sites and also styrene. If left alone, these resins will slowly (kinda) cure into a not-ideal but still hard-ish form – this takes months or years. To initiate the reaction in a useful way, another chemical is needed to open up the reactive sites on the long resin molecules so the styrene can come in all at once and connect the longer chains together. This reaction starting chemical is called a “catalyst” – or more properly an “initiator” – because it gets used up in the curing reaction. By varying the ratio of catalyst to resin, the speed of the reaction can be controlled. More catalyst = faster!
So these two categories of thermoset resins have very different cure mechanisms and different mixing requirements but a lot of functional similarities. Both are a “one-way street” thermoset type of reaction and can’t be un-done. Both speed up with more heat and slow down with less. They are both “exothermic” – which means that they create their own heat as a byproduct of the curing process. And both types are great for laminating!
Mixing Polyester and Vinyl-ester
With resin systems that are catalyzed (initiated) – the proportion of the catalyst to the resin is typically small – less than 5% – so being off by just a little can make a big difference. The two big variables that affect gel time – the time from mixing to when the resin becomes sticky and unworkable – are temperature and catalyst ratio. To get 20 minutes of working time (before the resin starts to gel) you might need 2% catalyst on a cool day and 1% on a warm one. This lends a “black art” quality to catalyzing polyester and vinyl-ester resins which can be no fun – or too much fun – depending on your perspective!
Catalysts (or Initiators)
Before we get into actual ratios and mixing, a bit about catalysts – we’re going to call them that instead of the more proper “initiators” because everybody else does. Besides the catalyst ratio, there are lots of options to choose from for the catalyst itself.
The most common catalyst is MEKP – methyl ethyl ketone peroxide. There are different subsets of MEKP too – with varying ratios of peroxide and monomeric and dimeric MEKP. By varying the ratios, manufacturers are able to modify the gel time and other properties of the curing reaction.
Besides MEKP, there are CHP and AAP, two other types of catalyst chemistry that are also often blended with MEKP. Generally CHP slows down the cure and makes it more “gentle” than straight MEKP. Sometimes people use MEKP/CHP combinations as a “summer blend” for working in hot weather. AAP does the opposite – it speeds up the cure without shortening the gel time too much. The cure itself is faster so parts can be demolded more quickly. Some resins require certain catalysts to cure right. Ask your resin supplier for information on the best options for curing your resin in your situation. And any resin system that you should be using will have a technical data sheet (TDS) with specific curing guidance.
Catalysts are also available with “QC” (quality control) color additives. You can even buy the colored pigment and add your own. The typical color is red, and this is great for general purpose lamination. Manufacturers will be able to supply common catalysts in either clear or with QC tint.
Catalyst Ratio
Your manufacturer should provide some guidance for catalyst ratios and temperatures – but in reality you may be on your own to experiment because there are lots of variables. Your goal is to select a ratio that gives you enough working time but also enough catalyst to cure the resin quickly and completely. As a general rule, don’t use a catalyst ratio below 1% – and ideally not even as low as 1%. For most standard materials, you should avoid ratios over 3%. The ideal ratio will depend on the catalyst used and the temperature of your resin and workpiece – and how much working time you need.
And when it comes to temperature, avoid using polyester or vinyl-ester resins below 18C/65F. The risk of incomplete cure, especially in thin sections is very real – and if you don’t get it nailed on the first try, no amount of heat later on will get you back to the mechanical properties you would have if you had done the initial gel at a higher temperature.
Catalyst is best measured in milliliters (mL – same as cubic centimeters – “cc’s”) even if you’re an ounce, cup and gallon kind of person. For larger volumes you can use a larger unit of measure, but metric scales nicely. So if you’re in the US you’ll have milliliters per gallon or some other mixed unit measure – which isn’t a big deal. The great thing about milliliters is that they are small – so you won’t be worrying much about fractions. The best way to keep track of these things is with a chart. Many suppliers will have them available. A chart will show the volume of your resin, the catalyst ratio and how many milliliters (aka CCs) of catalyst to add.
Here are some example charts:
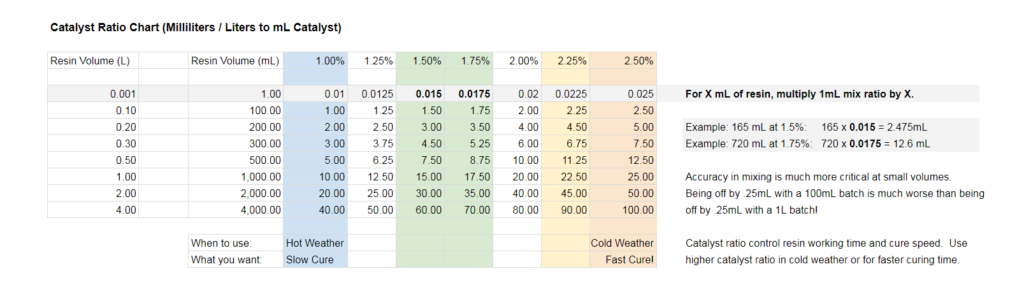
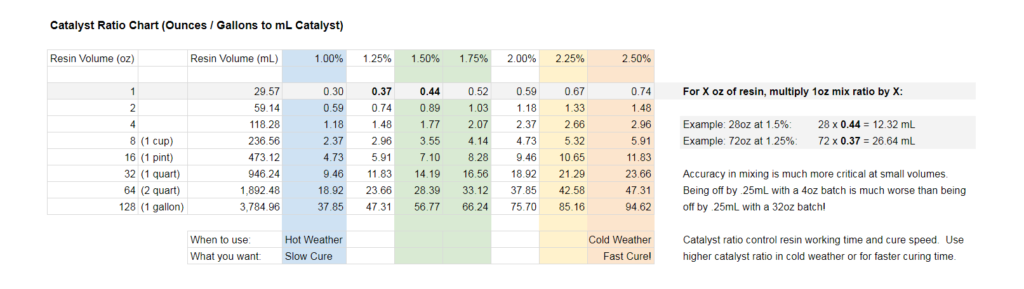
Obviously doing this in your head is much easier with the metric system. C’mon – everything is easier in the metric system!
Gelcoats
Please note that because gelcoats have additional volumes of pigments, the catalyst ratio may need to be different for a given volume of resin. This will depend on the type and color of gelcoat. Check your manufacturers data sheets to see if this will be an issue. You may be fine just using the same catalyst you would use for resin.
You should also avoid using QC-tinted catalyst with colored gelcoats. It can subtly change the color making repair or patching difficult. For orange tooling gelcoats it probably doesn’t matter!
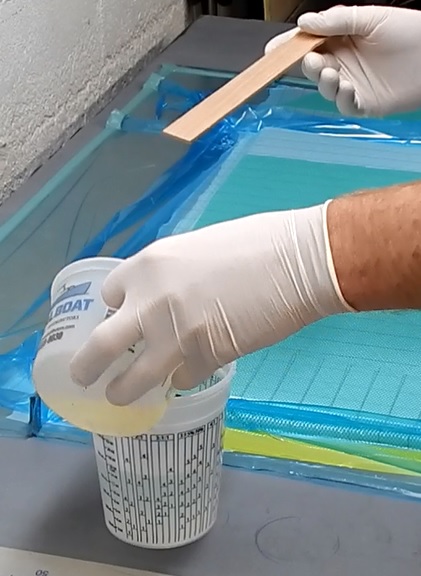
Measuring Catalyst
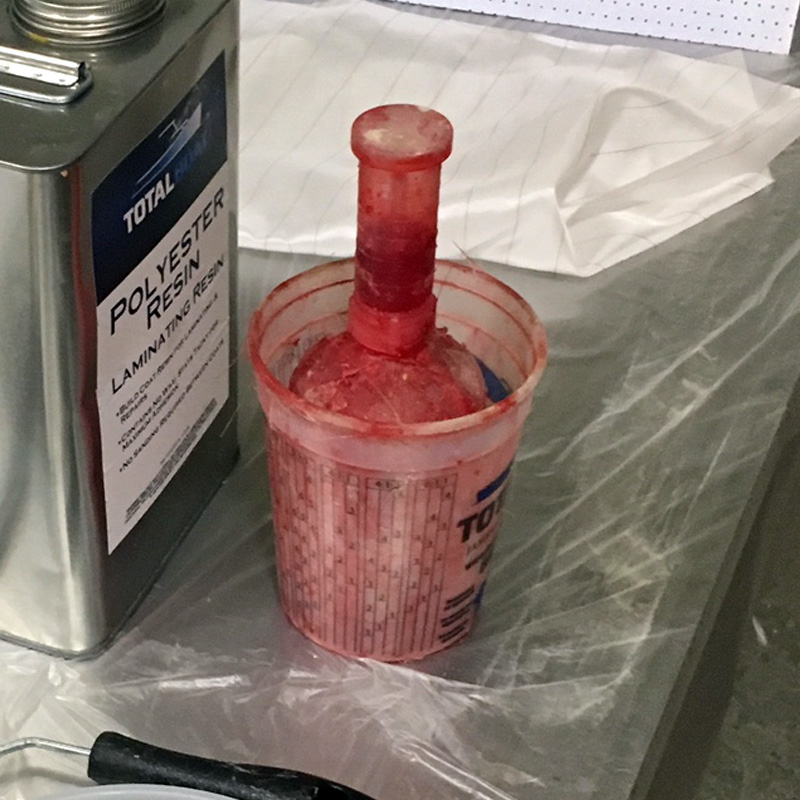
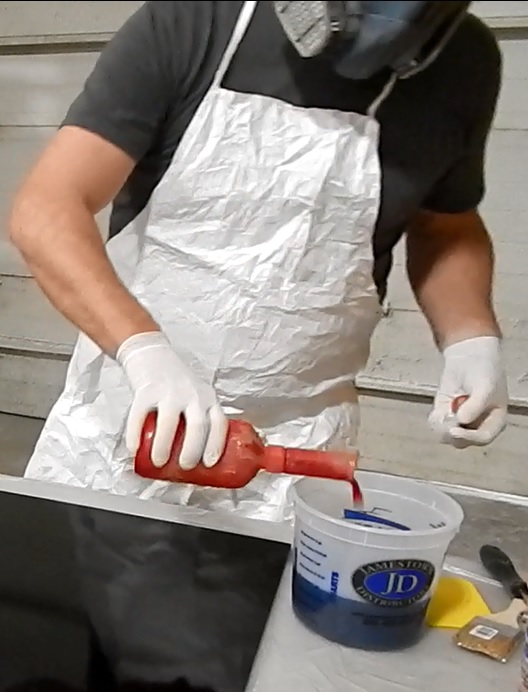
For medium sized quantities of resin – under a few liters or a gallon – the best way to meter your catalyst is with a special catalyst measuring bottle. This is just a plastic jug with a second smaller graduated cup that is part of the cap. A small tube runs from the main bottle up into the smaller cup. As you squeeze the big bottle, a small amount of catalyst comes up the little tube and into the graduated cup. You just squeeze until the graduated cup on top is filled to the right level and then dump your catalyst into your pot of resin.
With larger volumes, once you have decided on a catalyst ratio and know your resin volume, you can calculate the volume of catalyst you will need to add. Use a graduated cup or a catalyst bottle to measure it out just so. Before you mix them, be sure you have everything ready to go – you don’t get much time for laminating and you don’t want to spend that “pot life” getting organized!
Mixing
So you just poured the right amount of catalyst into your bucket of resin…
If you were to fold an imaginary piece of paper in half 28 times the folded paper would be more than a mile high. You can’t really test that, but the idea applies to mixing. Mixing is like folding. Each time you pass a stirring stick through the pot of resin, you are effectively splitting and folding the resin back against itself. By mixing and folding the resin you divide and divide again the pool of hardener or catalyst that you added to the resin. Enough dividing and folding and it becomes thoroughly mixed almost down to the molecular level. But you have to mix enough!
When you mix polyester or vinylester resin, your goal is to disperse the catalyst evenly throughout the resin. The general consensus is that this takes a minute or two of mixing. Different people mix faster or slower. You don’t want to whip air into the resin by mixing too fast. You’ve got to be sure to scrape the sides and bottom of the pot of resin too – so there aren’t thick films of un-mixed resin stuck to the walls of the mixing pail.
If you are mixing large volumes in large containers, a mixer on an electric (or better: pneumatic – because fire) drill is very helpful. Make sure you don’t run it too fast or you will froth the mix up with air – air that will be hard to remove from your part later as you roll or vacuum bag the laminate. A Jiffy-type mixer that scraped the sides and doesn’t draw air down is good.
Many polyester and vinyl-ester resins will change color slightly when they are mixed. This is a good indicator that you have the right components in the bucket, but time is a better way to gauge your mixing. QC-tinted (red) catalyst will also help. For some resins, too much mixing will lower the viscosity temporarily. I can’t say this has ever been a problem for me, but I have heard people say that it is important not to over-mix polyester resins. Let me know if you have experience with this and can explain why it is an issue!
Generally speaking, epoxy requires more complete, thorough mixing than polyester or VE. The catalyst starts the reaction that then perpetuates itself while the A and B components of the epoxy need to be in more immediate physical proximity to cross-link effectively. I wouldn’t recommend it, but in many professional shops, I have seen laminators do only 10 or 15 seconds or so of vigorous mixing and pot scraping with polyester resin before starting to laminate… and it seems to work. Time spent mixing is time lost laminating when the gel time is very short – but it is probably wiser to adjust your catalyst ratio rather than cut corners mixing.
Mixing Epoxies
The mix ratio for epoxies is not so much “how hard do you hit the gas?” as it is “does this chemical equation balance?” You are actually adding the two reactive materials together so that they can react – rather than pushing the already-present components over the edge with an initiator. So there is only one “correct” mix ratio. Your job is to get as close to that ratio as possible.
Temperature will still play a big part in the time it takes an epoxy to cure. Take note of differences between your working temperature and the standard temperature used for the “gel time” (or “open time”, or “working time”) from the resin data sheet. Generally the time for an epoxy to gel will halve with every 10C (about 20F) increase in temperature. Epoxy that has a specified gel time of 30 minutes at 77F (25C) will start to harden in only 15 minutes at 95F (35C). A resin is considered to be “gelling” when the viscosity starts to rapidly increase. This is the effective end to the “working time” of the resin. The time is takes to go from initial mixing to when the resin starts to noticeably thicken is the gel time.
Besides temperature, if you want to vary the cure speed of an epoxy resin system you have to do it by choosing from a range of hardeners supplied by the material manufacturer. Most epoxy systems offer a variety of hardeners with different cure speeds. Some systems encourage you to blend the hardeners to get a full range of cure speed options. Check your manufacturer’s data sheets though because this is not universal!
When you look at the datasheet for your epoxy system you may see a note that shows the acceptable range of error for your mixing. This is usually either a footnote or a ratio range. If you’re within that range you can expect results consistent with the published performance data. Deviate from it and you’ll get less.
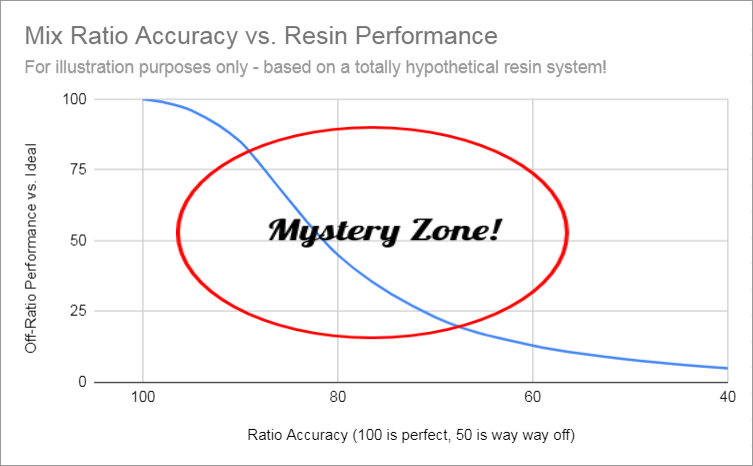
As you deviate from this perfect ratio, the performance of the resin system (by most desirable metrics) will decrease. There is a “mystery zone” where the resin will feel hard after cure but will not have adequate mechanical properties – or will feel a little gummy. This is why careful measuring is key – you may not be able to tell if something is wrong unless its really “the stuff is still sticky” wrong! Resin manufacturers will always tell you that if something feels “off” you should discard the part – or grind/chisel/wipe the suspect batch off and start over.
Many resin systems are available with QC-tint – which is just a strong color added to (usually) the hardener that creates a very uniform mixed color. If you see streaks of color or the color is wrong – watch out!
So for an example – with WEST System 105/205, the ideal mix ratio is 5.19:1 by weight – so about 16% hardener. The upper bound of the resin ratio is 4.83:1 – or a little more than 17% hardener. The lower bound is 6.2:1 – or a bit less than 14% – so you have a 3.5% band slightly weighted towards the “more resin than ideal” side of things in which the cured resin should give you the results you see in the data sheet. If you’re starting with a 500g cup of resin, your “band” of hardener weights giving adequate results is from 81g on the low end to 103g on the high end, with an ideal weight of 96g. So, a pretty wide range if you’re measuring with a scale in grams – but what about by volume? Or if the jug pump sputters out some air mid-stroke?
Resin manufacturers don’t typically tell you how much better it is to be spot on, but from what I have seen in high performance projects – it is worth attempting to get close! Check your resin datasheets and see what the manufacturers give for an acceptable range. See the data sheet for the WEST System resin here: https://www.westsystem.com/wp-content/uploads/105-205-Epoxy-Resin.pdf
My recommendation is to come up with some good reliable ways to mix your resin and stick with them. Try to “mistake proof” them as much as possible. Here are some options:
By Volume
In my opinion, for small quantities of resin, mixing by volume is the least reliable method. Especially with 5:1 ratio epoxies, where the hardener volumes can be small and hard to measure accurately. But it totally works and is a fine way to do it if you don’t have calibrated pumps or an accurate scale.
When mixing by volume, you calculate the correct quantities by volume of resin (A) and hardener (B) and then use a graduated cup or bucket to measure out the right volumes. Most epoxies will have the mix ratio by both volume and weight listed on the datasheet. The reason these are different is that resin and hardener are usually different densities because they’re made of different stuff.
To calculate the volume of a resin and hardener, let’s keep using the WEST System 105/205 for this example. It is a very common 5:1 room temperature cure epoxy system that is good for general purpose bonding and laminating – and there are many similar systems from other manufacturers. The mix ratio by volume is 5 to 1. So five parts of resin to one part of epoxy – six total parts. Your mix is 1/6th hardener and 5/6ths resin.
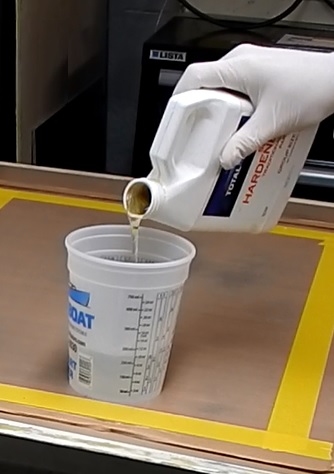
If you want to mix 30oz of WEST 105/205 epoxy, you’ll need 25 oz of resin and 5 oz of hardener. For 720mL or mixed epoxy, use 600mL of resin and 120mL of hardener. It is better to add the hardener to the resin than the other way around.
So you pour your resin out in a cup with graduated volume marking on the side up to the volume of resin you have calculated that you will need. Many of the mixing cups sold by composites suppliers have graduations marked on for common ratios. So you have poured out 600mL from the example above. You know the matching quantity of hardener is 120mL, so you grab your resin jug and carefully pour in hardener until it reaches 720mL. Depending on the cup and the markings, you may have to eye-ball this – and here is the problem with by-volume mixing!
You could of course, measure out your resin and hardener into separate graduated cups and then pour them together in a new cup or bucket where they can be mixed. If you have a spatula or scraper stick to clean out the measuring cups and keep the two materials from getting cross-contaminated this can be a good way to do careful mixing. Using a smaller container with tighter graduations may be a good idea for high-ratio resin system. Doing it by weight is more reliable though!
For very small quantities of resin, it can be hard to use volume as a measure. One technique is to use a syringe to measure the hardener out so you can read the volume in very small amounts as you squeeze the plunger down. I’d rather use the syringe into a cup on a scale.
If you typically get resin in drums or big jugs it can be easier to decant into smaller containers for mixing. You can buy small capped containers to work from. Pitchers with air-tight tops (just remember it’s not lemonade!) are great. Well-cleaned laundry detergent containers are ideal because they re-catch their drips! Especially for hardeners, air tight containers are important – they keep the hardeners from sucking up moisture from the air.
By Weight
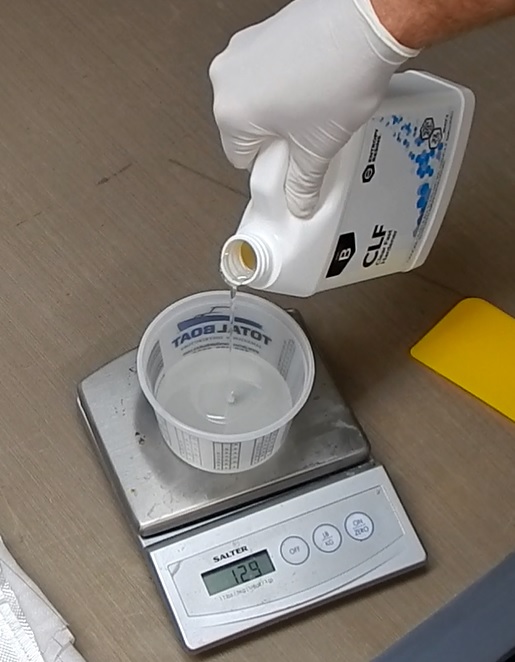
Weight is my favorite way to measure resin and hardener. I find that if you use a small unit (grams!) and an accurate scale, you can totally nail your mix ratio with very little effort. To make this easy, I like to make resin-specific “cheat sheets” for common ratios. If you have production parts or repeat jobs you can make specific mix sheets for those jobs that give the exact resin and hardener weights to mix.
You’ll want to specify the resin weight, hardener weight and then the added weight – because when you’re using a scale you’ll pour in resin up to the desired resin weight, and then add hardener on top – so the end number you’re trying to hit will be the total resin+hardener weight. You can do this by tare-ing the scale mid-mix, but that can throw off your mixing if you have an overshoot on the hardener and have to go back and add more resin.
Some people like to add the hardener first and then the resin because the errors in adding resin are less critical the way the ratio works. I see the merit but don’t do it this way myself – habit mostly.
Here’s a picture of my mix-sheet for some Proset epoxy:
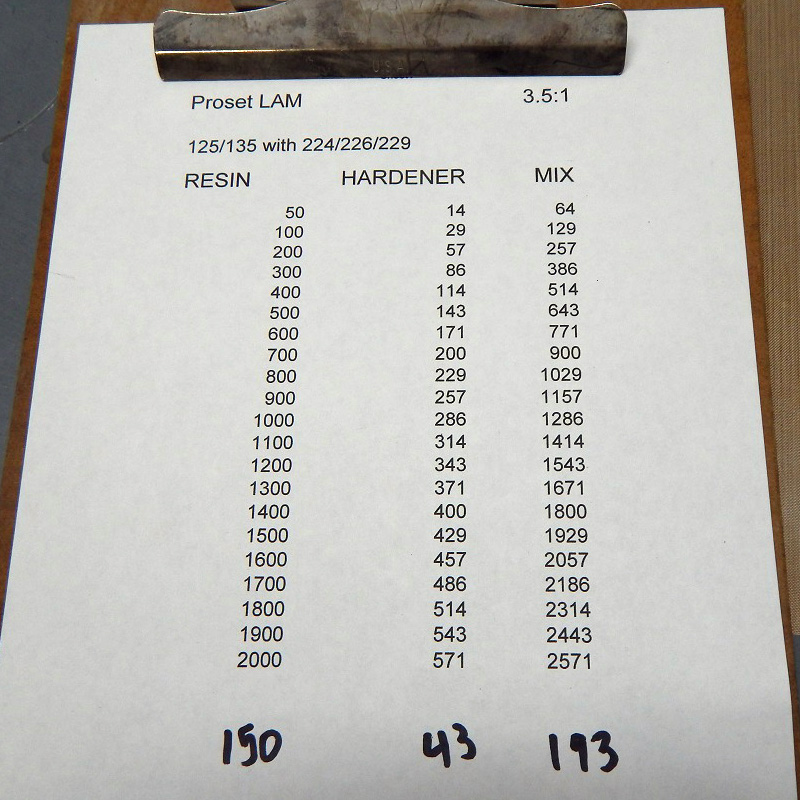
This is good for general purpose small batches. You pretty much round to the nearest 100g and make the mix. When I get a new resin system to deal with, it means taking the time to make a new spreadsheet and check twice to make sure the ratios are correct. If you use the sheet for the wrong resin – that’s bad news! Maybe color code or something. You can see I added a 150g batch at the bottom in marker – just the 100 added to the 50 – but it’s easier to do before the resin starts to fly.
This saves using a calculator in gloves – and also the risk of fat-fingering your calculation and making some mystery-brew of maybe-gonna-cure resin.
Standard batches quickly become second nature and you just learn the numbers – even if you still have to look at the sheet. Common batch sizes will sound familiar and you’ll develop a mental error correction “feeling.”
For larger batches, the need for a scale that can handle many kg/lbs of material means some ergonomic challenges – and maybe a floor scale. You can weigh out buckets of resin and hardener into pre-measured pairs. If you’re doing a large infusion or a big wet-layup job, having 5-gallon (or larger) pails of resin pre-measured with smaller buckets of matching hardener ready to mix on demand can be really helpful. Measure-by-weight means that you don’t need to rely on volumetric scales on larger containers – which usually don’t have them! As you mix batches, be sure to scrape out the hardener pails well and then mix thoroughly with a low-speed drill mixer or large stir stick.
Manual Pumps
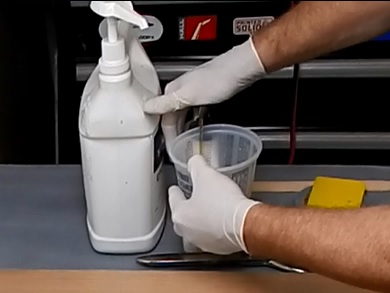
Most manufacturers selling smaller volumes of resin and hardener will offer manual hand pumps – like little ketchup dispensers that screw into the tops of the material jugs. These are great for small volumes of material. If you’re trying to dispense a liter or so – it’ll get old with all that pumping!
The pumps are calibrated so one stroke of resin matches one stroke of hardener. I have a strategy for pumping that eliminates the counting of strokes (avoid that!) but sometimes causes drips. I like to alternate one pump resin, one pump hardener. If you always do this you’ll never lose count! It gives the pumps time to slowly pop back up between strokes. If you’re mixing more than 10 or 20 pumps, it is probably best to use the volume or weight methods described above.
The main drawbacks of the hand pumps are that they sometimes get jammed up or suck air. This results in an off-ratio mix. In cold weather they can be very sticky with the thicker cold resin. Try to keep the materials warm enough and never run the jugs down to completely empty. You can switch to new jugs and usually the remaining material in the bottoms of the empty (almost!) jugs can be poured into the tops of the new ones without overflowing. Keep in mind that when you put in the pumps, resin will be displaced by the pump volume and so the level will rise. It is easy to overflow resin or hardener all over your bench if you don’t leave enough room.
There are some great manual metering pumps available that bridge the gap between jug pumps and industrial metered-mix equipment. These let you dispense matched quantities of hardener and resin at the same time by pumping a handle or turning a crank. I’ve used these and they’re nice: Rook Metering Manual Pumps.
Metered Mix Options and Automation
Now if you’re a serious resin user there are machines that will accurately meter out the resin and the hardener and even mix them together with mixing attachment. This is great if you are using large volumes of material or need very repeatable processes without the variability of manual measuring and mixing.
Most of these machines have removable mixing heads with static mixers that can be taken off and cleaned. Static mixers are tubes with internal dividers that split the flow of resin again and again forcing it to divide and then swirl back together. After a couple of dozen splits and folds the resin emerges from the end fully mixed! It’s neat to watch, especially with QC-tinted material. Because they are full of mixed resin, they have to be flushed or removed and cleaned before the resin starts to gel. Plenty of options exist for disposable mixers made of plastic that are cheap enough to discard and replace after each use.
For polyester and vinyl-ester, metered-mix machines typically have a large pneumatic resin “piston pump” and a small catalyst pump “slaved” to an arm off the main ram. By making adjustments to where the catalyst pump is pinned, the stroke – and thus the catalyst ratio – can be adjusted. It’s a pretty bullet proof system and these machines are running in factories all over the world spraying gelcoat and mixing resins and putty. They require maintenance and cleaning and skilled operators – it’s pretty easy to spray a mold full of uncatalyzed gelcoat if you aren’t well trained or paying attention. They save a ton of time and are the only good option for building large parts.
If you are spraying production gelcoat, a “gelcoat system” with a spray gun is probably the most useful / necessary – and common – piece of metered mix equipment. Next up are resin pumps to feed chop-systems or supply for open molding with resin-fed rollers. For production infusion, LRTM or (higher pressure) RTM, a metered mix machine will be valuable to dispense accurate “shots” of material. Many can be programmed to provide specific mixes for specific jobs – even interfacing with barcode scanners or RFID tags.
With epoxies, both the resin (A) and hardener (B) need to be accurately metered. For less expensive pumps, the usual system is pneumatically-driven piston pumps ganged together and driven so that they make the desired ratio. Ratios can usually be adjusted between a given range or pumps can be changed for larger or smaller units. More expensive pumps use positive-displacement gear pumps or lobe-pumps driven by air motors or electric servos. These deliver less variable pressure and are easier to start, stop and throttle. The corrosive properties of epoxy hardeners can require specially designed hoses and gaskets to hold up without problems.
If you are looking at a production thermoset resin situation, it is very worth your time to look into metered-mix dispensing options to help automate and standardize your process!
Separated Resin, Crystallization and Moisture
And last – not mixing related but it comes up a lot – crystalized resin and epoxy shelf life. Epoxies are pretty stable and manufacturers typically give you a year or two to use them. I’ve used 10 year old epoxy to coat molds and make (not delivered to customer) tooling and it has worked fine. The main problems are hygroscopic hardeners and resin crystallization.
Epoxy hardeners love to suck up moisture from the atmosphere. The solution – screw the caps back on tight when you’re done. Some hardeners will turn darker as they absorb water. There isn’t much you can do besides just kick it off with some old resin and get rid of it – or use it for something low-risk – like coating molds or painting your wood shed.
Epoxy resins can crystallize if they are allowed to sit too long or if they get too cold. This is just components of the resin chemistry taking a crystalline solid form – like sugar-water turning to rock candy. The solution is usually to gently heat (using a drum heater or bucket of warm water) the resin and stir gently with a mixer. Your resin manufacturer can advise on the specific process. So if you go to get some resin and it has chunks in it – this may be your problem – and there is a solution!
Conclusions
So the big take-away here is to come up with good systems and make sure they are easy and comfortable to use. It is probably a good idea to dedicate some effort to choosing a few standard thermoset materials for the bulk of your day-to-day work and then making the measuring and mixing process hard to mess up. Charts, instructions and well-labeled materials will all save you lots of trouble in the long run – even if it is just you using the materials.
You have lots of choices – and used carefully, any of these methods will give you good results!
Note:
This article is for educational purposes. It is meant to explain the resin mixing methods commonly used in the composites industry! I am not a chemist and not a sales-rep for a resin manufacturer – so this is based on experience and research – but is not necessarily fact. If you are an expert at any of this and would be willing to explain things, I would love to edit this to make it better. I am happy to include your insights (with a link to your company or personal work) if you can help me make this a more useful resource.
I have used WEST System and Proset Epoxies as examples because I am very familiar with them and as an American boatbuilder they are the original epoxy home team! There are many great products from many excellent manufacturers world wide. The Jamestown Distributors/ Totalboat brand mixing cups and GP polyester resin are used because they are what I have on hand. All of the materials were purchased by me and do not represent or imply any type of sponsorship or special deal. In my experience they are good products – that’s all.