EC! Home: Articles: Lamination: Slip-Joints and Why You Need Them!
Updated: 6/10/20
By: Chris Rogers
It took me a long time to recognize the importance of the composite-tailoring detail that many people call the “slip-joint.” I am going to attempt to answer some basic questions about tailoring reinforcement material that comes in sheet (like, on a roll) form to fit different types of part geometry:
- When you are laying reinforcement material (fiberglass, carbon, etc) into a mold and you come to a corner, what do you do?
- What order should you put different pieces of a layer of material when laying up composite parts?
- How do you avoid voids and extra resin on outside (of the part) corners?
- How do you avoid wrinkles on inside (of the part ) corners?
Imagine, for the sake of simplicity, that you are making a part with one layer of 12oz (400gsm) fiberglass. You are laying it into that pretty mold on the left below. You could just take one big strip and drop it across the whole thing – but you would regret it! The three small pictures below show the idea of “slip joints” and one way of laying this material into the mold in a particular order to avoid some major problems. The key is that you should cut the fiber and overlap it in the outside corners of the mold.
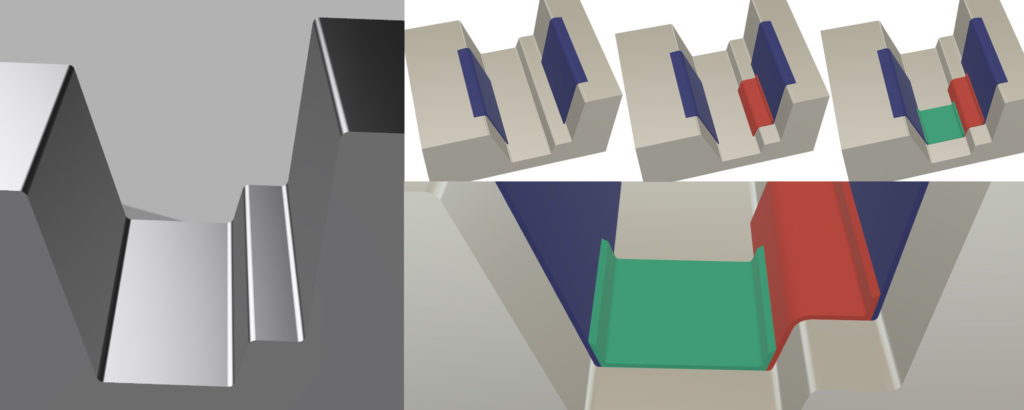
If you look closely to the lower right-hand part of the image, you can see the overlaps on the outside corners. The inside corner (middle of the red panel) is continuous. This is because as you consolidate (roller, vacuum bag, press, etc.) the laminate over the outside corner, it will tend to bunch up. The other corners where we have a lap are areas where the fiber would try to stretch – missing the corner altogether. It doesn’t like to stretch! This is a big problem that is often called “bridging.” The lap allows the two pieces of material to slide by each-other and fit tightly into the corner.
Bridging is Bad
Bridging is what happens when a ply of fiber reinforcement doesn’t quite make it into a corner. This can cause voids (real bad), and resin rich areas (pretty bad) and extra weight (not great) and it pretty much makes everybody cranky. You see bridging a lot – it may be the most common mistake in composites!
The problem comes from a property of circles. The main thing about circles is that bigger ones are further around! If you think about outside corners of your parts as segments of circles, it makes sense that as you push material further into the mold, it will have to get longer. Vacuum bags and autoclaves are good at pushing material into corners – unless the material is too short to fit. If you have a contest between a vacuum bag and some reinforcement fiber – my money is on the fiber! Not stretchy.
A slip joint lets the fiber “stretch” by replacing a continuous ply with two pieces cut near the corner and overlapped enough to carry the load from one piece to the next. You add some extra work and a little area of overlapped material (extra weight and thickness) and in trade you get a part that contacts the mold and has the right shape and also carries the load that it is designed to carry. The sharper the corner, the more important this is!
I would argue that even relatively shallow corners and radii should be slip-jointed. Can’t hurt right? A tiny bit of extra weight is the only penalty.
How far from the corner can the slip-joint be?
Not very far. You should probably keep your laps within 1”/25mm of the corner. Closer is better. If you are using dry fiber for infusion or laying things up wet, you will have a chance for the laps to slide by each-other better. It’s also harder to cut dry or resin-soaked material with the same type of precision that you can get with pre-preg.
Also, if you are doing autoclave stuff you can get away with pushing the joints further away from corners. This is because the autoclave puts a lot of pressure on things and will just make it happen. It can also mess things up very comprehensively if you aren’t careful!
How much to lap?
Composites fail in a lot of different ways. One way that is easy to avoid is the “two plies met but didn’t lap and the whole part tore in half like a zipper.” We need to lap plies of laminate by an appropriate amount to transfer any load from one set of fibers to the next. Generally there is a fixed average lap distance for any given material where below that average lap, it is weaker and above is strong enough. The key is “average” because any time plies are overlapped, the width of the lap will vary by a tolerance above and below the intended distance. We want to make sure that our average is well above the minimum necessary lap, but not so much that there is extra weight or the plies are unable to slip by each-other!
This is something you will need to test if you are doing high risk parts with complicated engineering. For a rough look at reasonable laps for common materials here are some guides:
- 6 oz cloth, lap ⅝”-¾”
- 12 oz biaxial, lap 3/4-1”
- 12 oz unidirectional e-glass, lap 1-1.25”
- 300gsm carbon uni, lap 15-20mm – say 6mm per 100g
For unidirectional material, you only need to lap layers that are not running next to each-other. If two pieces of material have parallel fibers, you don’t need what is in effect a double layer where they meet. Laps are only necessary if load is being carried from one set of fibers to the next.
My radius is gone!
When you are laminating a part with multiple layers of material (plies of prepreg, dry stack for infusion or wet laminate) you have to be careful to not stack all the slip joints on top of each-other. On inside corners, each layer of material offsets the mold corner radius by its thickness. If you have a relatively tight radius, very quickly lapped plies will force the radius smaller and smaller until is becomes a corner. Then – worse of all – as more plies pile on, it becomes a wrinkly mess as the thickness of the laminate exceeds the radius of the mold surface! This is often overlooked by engineers designing thick laminates into tight corners. It is good to always ask (your friendly designer or engineer) for a larger radius if the laminate thickness exceeds the radius of the corner!
Here’s a small radius, the same as the laminate thickness:
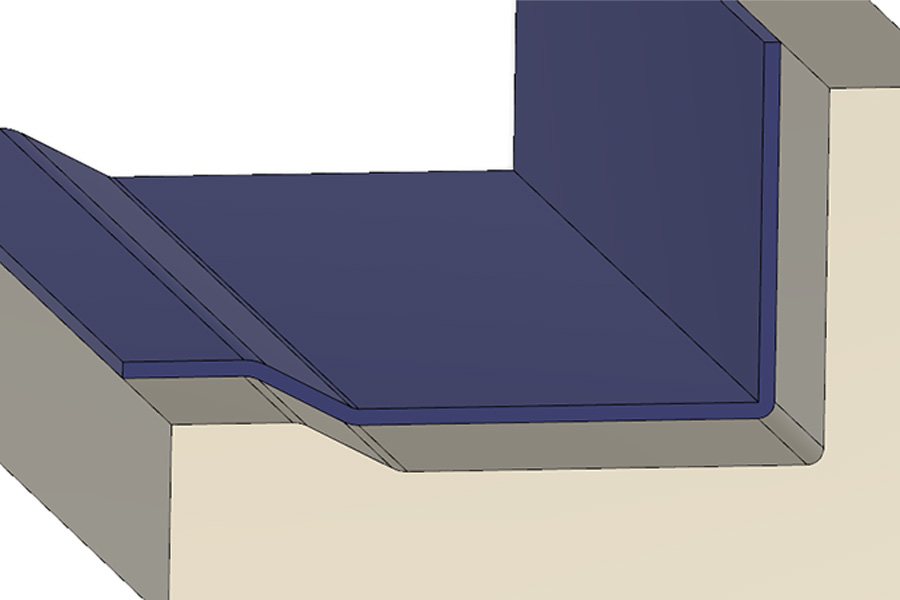
See how the inside of the laminate stack comes to a sharp corner? This is bad news! Here is what happens when you double the radius in the mold:
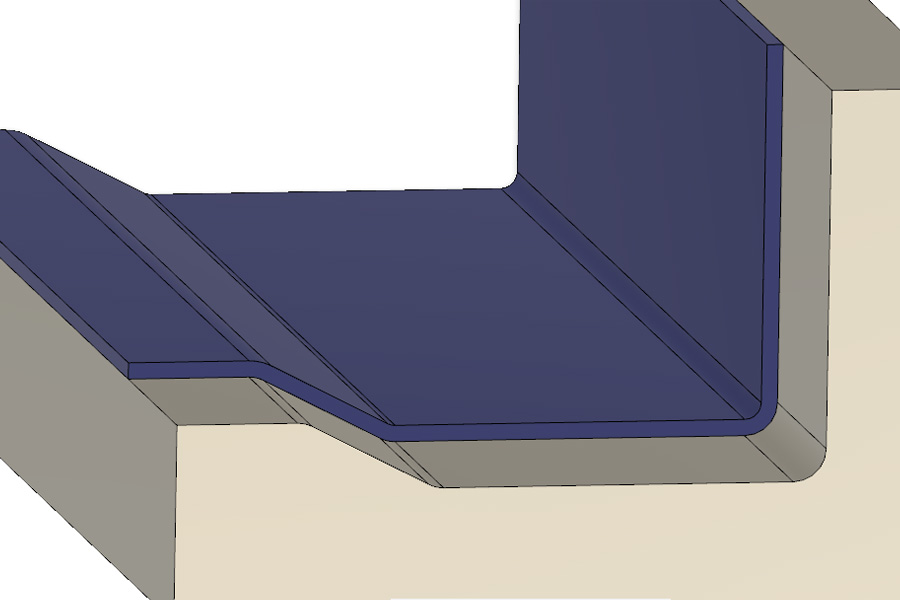
When you take slip joints into account, the radius really should be more than twice the laminate thickness:
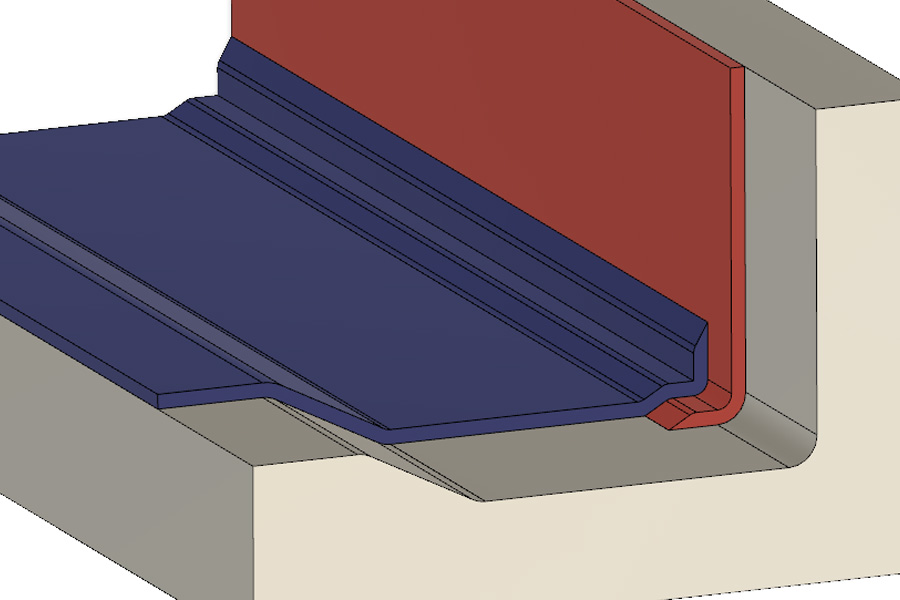
Here we’re simplifying the situation and showing only one ply of super thick material – and a big fat slip joint in the corner. Now that nice double size radius is all used up, and we have a sharp corner inside. If you have built things like this, you know the corner will bunch up and form all kinds of ugly kinks and in-turned wrinkles. It is also totally legit, especially with pre-preg, to pad inside corners with strips of unidirectional material to make a “fillet” between layers so that the effective inside radius gets bigger. Ask your engineer though to be sure…
Organizing Multiple Plies
One thing that is important when slip joints are needed in multiple plies is to stagger the slip joints relative to the corner. This should be systematic and planned out beforehand. You could define several slip joint “zones” depending on the material thickness, cutting accuracy and number of plies.
It is totally a good idea to make a lap/slip joint chart for large or complicated layups. For example, have lap type A go on one side of the corner, B on the other side, and C across the middle. Put it on your drawings and checklist and be super clear about how to do it. It may seem like an overly fussy thing to do, but when your corners come out of the mold looking awesome, nobody will be complaining about all those slip joints!
Here is a simple layout with three zones:
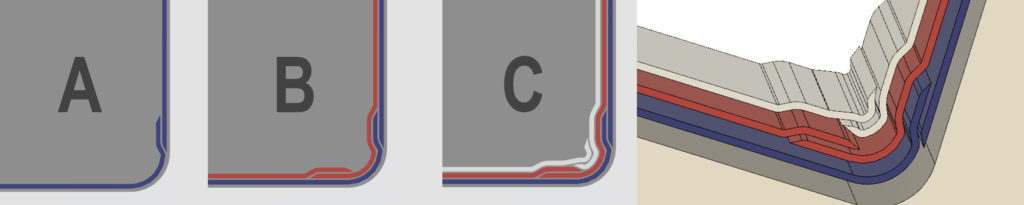
We have one “A”, one “B” and one ”C” joint zone.
Remember that you only need to slip joint plies where the actual fiber direction crosses the corner with a chance of bridging. If you have a unidirectional ply that is parallel to the corner axis, there is no need to slip joint it because no load bearing fiber actually bridges the joint. You can just butt these plies up to each-other without overlap. In tight corners, it is often good to cut back these plies away from the corner to leave room for the doubled layers of off-axis plies to pile up.
When you don’t need them
Never!!!
Well, ok… there are some cases where you can get away without slip joints. With light woven fabrics, the fact that each tow of fiber goes over and under each opposing tow creates a bit of extra length and slack in the individual fibers. When a vacuum bag presses this “crimp” down you get fibers that have some extra length to burn. If you bridge gentle corners, this can take up the slack. You have to be careful and I am not going to say it is totally always going to work, but if you know what you are about this can be a labor saving option.
The other time you might try to not slip-joint an outside corner is if you are doing something where cosmetics are of great importance. If you can debulk a layer of woven (again – the crimp will help you) tightly against your mold you can get a pretty and continuous layer of material without fussing over joints. Be careful though! This tends to work only with things that are contoured in one axis.
And one more case would be if you have an outside corner and an inside corner close to each other – like 50mm/2″ or less. In this case, the potential wrinkle or excess material formed on the outside corner will provide slack for the inside corner. More than 50mm/2″ and the pressure of the vacuum bag on the fiber will prevent it from slipping.
Oh and non-woven or stitched stuff like chopped strand mat or some of the compressible closed molding core/reinforcements hybrids like Chomarat Rovicore – no need to slip-joint those because they don’t have continuous fibers. Short fiber mats are practically all slip-joint all over!
Conclusions
My conclusion is to use slip joints early and often! Use them in your laminating and also use them with any process stack materials you are using, like peel ply, perforated film and breather fabrics. Do this and you will be happy and your parts will (hopefully) look real nice – especially in the corners!
Note
This article contains information that reflects my opinions – I make no promises about its usefulness! It may contain mistakes (please let me know if you find some!) and will include prejudices based on my limited experience. If you disagree with anything here, please get in touch. This is not just for me to share what I know, but to learn from others. I will gladly insert additional information and differing opinions so readers are more aware of the diversity of “right” answers!
Changes and Updates
Updated: 6/10/20 – Edits, formatting and details