PLEASE NOTE: This is not finished! I just put it here so I’d be sure to get to it…
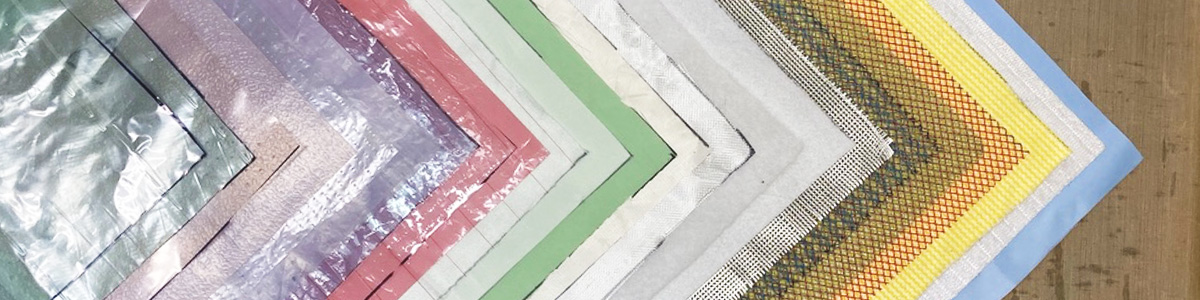
Vacuum bagging is one of the key processes used in composite manufacturing, especially for lower volume higher performance parts. This is an index of common consumables used in a range of processes, and a discussion of when and how they are used.
- For specifics about actually using these to vacuum bag stuff: Introduction to Vacuum Bagging
- And if you need to choose a vacuum pump: How to Choose a Vacuum Pump for Composites
Please check out the video (coming!) for moving pictures of this stuff. The content is largely the same, but this written reference is more detailed.
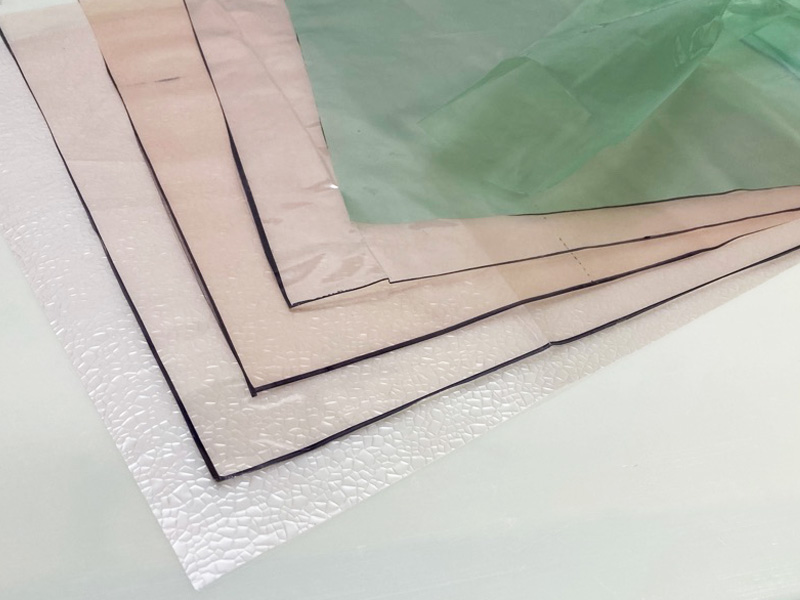
Bag Stack Overview
Let’s look at three very typical types of “stacks” of process materials for vacuum bagging. A stack is specific to the process being used and tailored to meet the needs of the part. There are a wide variety of options and the specific materials and their arrangement can be configured to meet specific goals.
Bagged Wet Layup
With wet-layup you apply the resin to the fabric with a squeegee, roller – or machine. Vacuum bagging serves to press materials into the mold, to remove trapped air bubbles, and also to compact the laminate and bleed off excess resin. There are lots of variables with bagged wet layup!
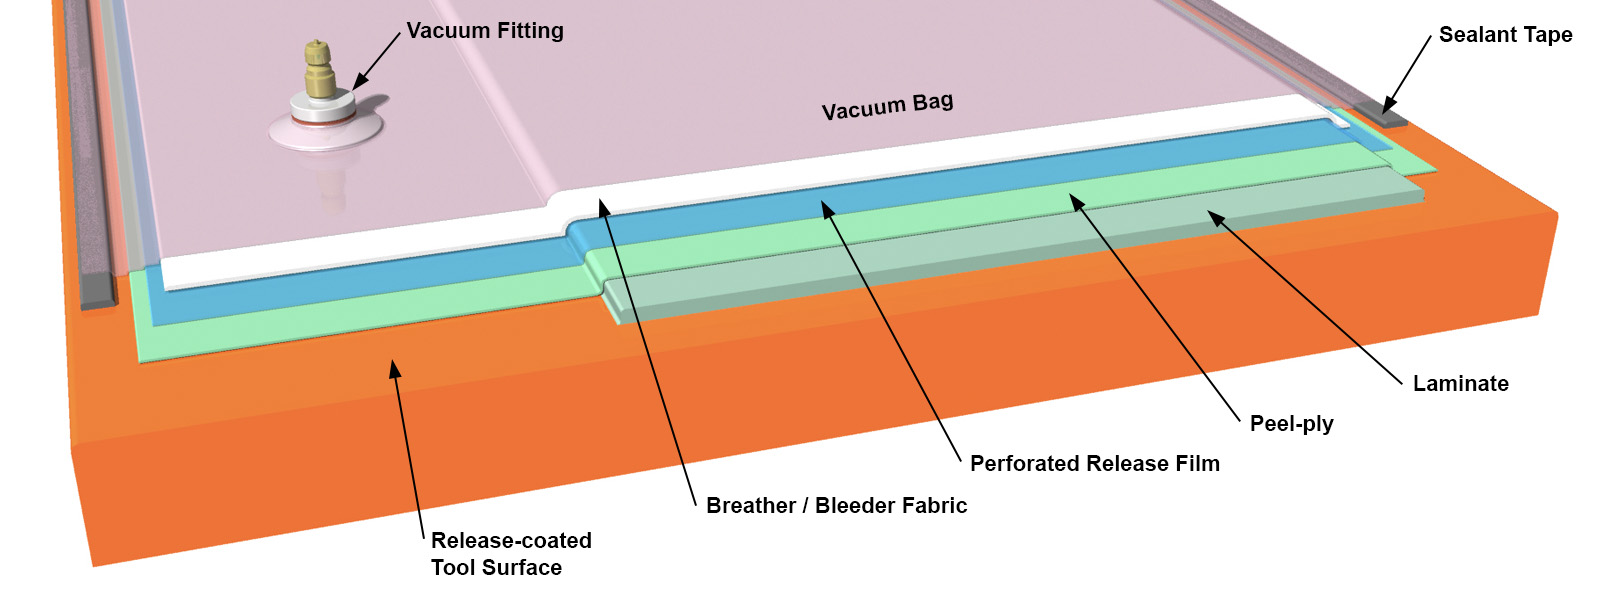
The “bagging stack” – or system of consumables here starts with peel ply over the final ply of laminate, followed by a perforated release film and then a layer of breather fabric – which will absorb any excess resin. This will be topped off by a low-temperature vacuum bag and sealant tape. Always keep your vacuum fittings well clear of the wet resin!
Pre-preg
With pre-pregs, where the resin is already combined with the reinforcement, vacuum bagging is key to compaction during cure. You can either cure without bleeding off resin using non-perforated release film, or allow some of the resin to bleed off and also make it easier for air and volatile materials to escape the part.
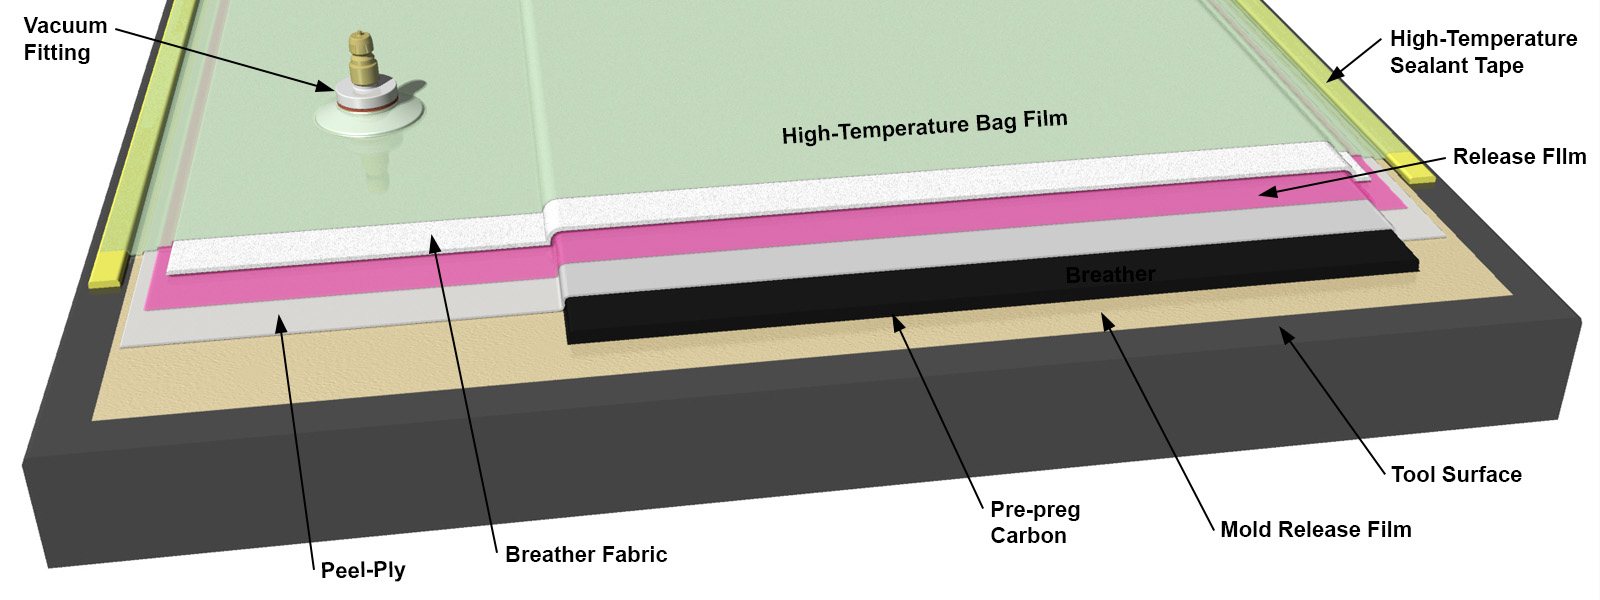
This bag stack is very similar to the one used for wet layup, but the release film has no holes, and the bag and sealant tape are rated for the cook-temperature of the pre-preg so things will stay stuck in the oven or autoclave. Depending on the situation, it is often possible to use solid unperforated release film with pre-pregs – especially well-debulked layups, and especially in an autoclave.
Vacuum bagging is also an ideal way to debulk prepregs during layup – consolidating plies as they are applied to a tool and removing trapped air. Debulking is key to good prepreg parts in almost all situations!
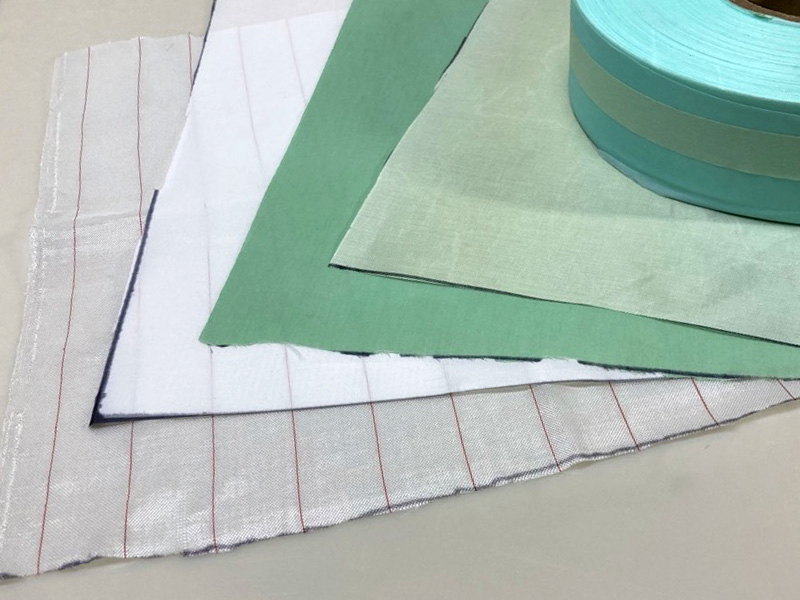
Vacuum Infusion
Vacuum infusion is fundamentally based on the pressure differential that a bag creates – so you really need a vacuum “bag” of some kind to infuse. Infusion requires process material to allow resin to be introduced to the part, and conveyed through the laminate. Some of the bagging materials are shared, like peel ply and the bag itself, but infusion requires very different things of the bagging “stack.”
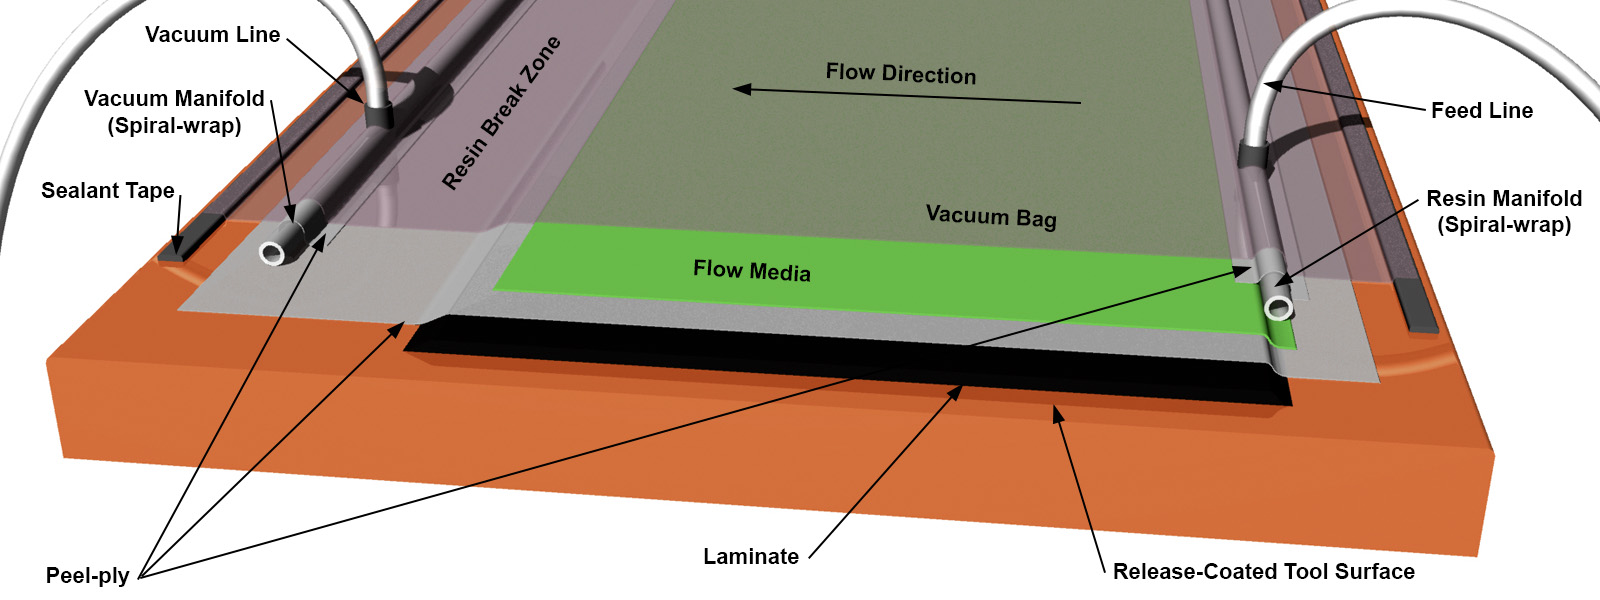
In this example the surface flow media (green) is used over peel ply to allow resin to more easily feed across the part. Spiral wrap is used to feed resin into the part and again at the vacuum side to pull the air out of the part and create the necessary pressure differential.
Vacuum Bag Film
Bagging films form the actual barrier that keeps the air out and the vacuum in. The goal here is no leaks!
Material choice depends on how hot you need it to go and how stretchy you want it. Generally this isn’t a place to cheap out because if your bag fails – you lose. Most of the time a nylon bag fit will be the best option.
Polyethylene Film
The most basic vacuum bag is a polyethylene film around 3-4 mils thick. For wet-bagging core or low-stakes low-vacuum parts it is ok. Because it is not really made for vacuum bagging it may have contaminants on it and quality control is not as good. Your sealant tape may not stick reliably. It’s cheap – for things you care about, the vacuum bag isn’t the place to save money!
Nylon and Modified Nylon Films
This is pretty much the standard type of film and has good elongation to failure (300%+) and can handle heat. Thickness is usually around 2mils. Some nylon films are stiff and tear easily when too dry (like the Wrightlon) and others are rubberier (like the Ipplon) and less likely to tear. You can buy nylon films to handle heat up to around 400F/200C – which is plenty for most people.
Nylon films are compatible with everything but phenolic resins. They are your best all-around choice for 95% of what people are likely to do with disposable bags. Start here!
Stretchy Film
Stretchy bags look like a great idea. They’re like using a thin rubber sheet to vacuum bag – the stuff just conforms perfectly and you look like a hero. You still need to pleat stretchy-bag just like a non-stretchy bag! It’s not a “get out of good bag hygiene free” card – and in general I’m not a fan.
Stretchy bag is handy for bagging tapes where you have long strips of bag and keeping pleats symmetrical requires attention. With wet layup, your bag pressure will remain the same throughout the cure and once the bag is in place it shouldn’t shrink back until you remove it. For “male” shaped parts with no or few inside corners, stretchy bag can be a great option because it is thin and doesn’t wrinkle as much – and the wrinkles are less likely to print onto the part.
Avoid stretchy-bag for infusion! What seems like a perfect bag actually has stresses built in, and once the resin has filled the part, the bag tends to relax and cause thick spots on inside corners. It also sucks into your surface flow media and keeps it from working.
A third place where stretch bag is nice is for debulking prepregs. It can even be used without sealant tape because it will suck down to bare laminate or a table making it own (very imperfect!) gasket.
It does strange stuff with styrenated resins too… so avoid polyester and vinylester unless you do enough tests to satisfy yourself it’ll be fine.
Embossed Film
Vacuum bag film is available with an “embossed” surface that allows it to function as a breather as well as the bag. These films can be used for debulking prepregs as well as wet-bagging with cores, bonding operations or parts that are ok with a “crinkled” surface finish. Its pretty amazing stuff and works better than you’d think. Films like this are typically stiffer and more rugged than plain film – so also less conformable – so better for parts with less detail and more flat open areas.
Bag Shapes
Most vacuum bag comes in sheet form on a roll. The standard width is around 60” / 1.5m but it comes much wider. It is common to find bag twice the normal width in “V-sheet” form where it is folded once with one open edge and one closed edge.
Very wide bag is available and is usually folded in a more complicated way so that it is easy to unfold without damage. Wide bag can save lots of labor and complications with unnecessary seams but handling it is non-trivial! Best to go right from the roll to the mold – the more handling the more problems.
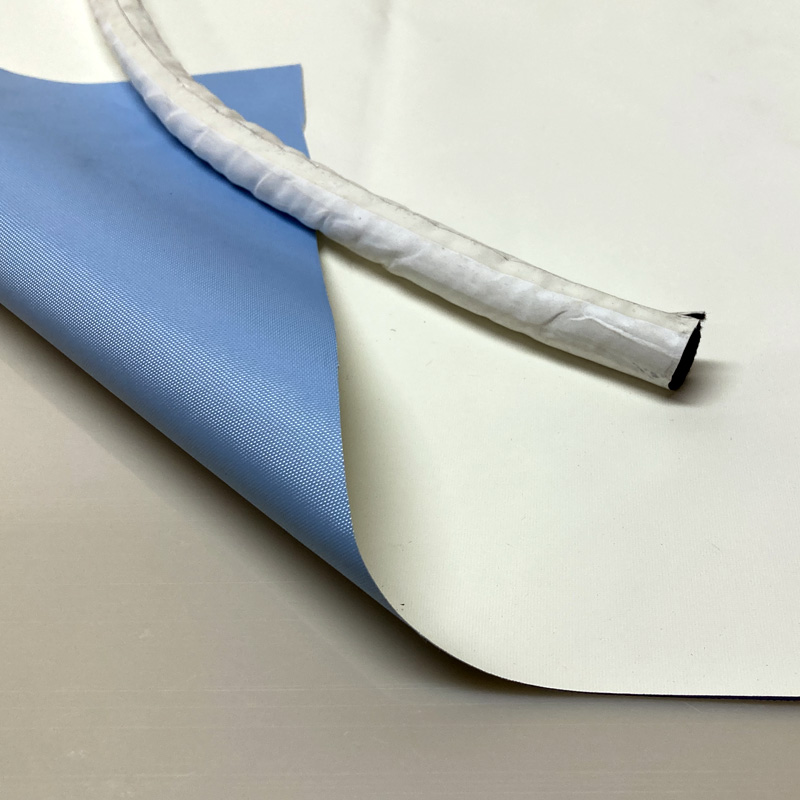
There’s also bag that’s a tube – also called “lay flat tubing” because it comes flat on a roll. It’s great! Tubes are ideal for long skinny things when you can slide the bag over. Also great for fatter things in envelope bags. Typical widths are from 2in / 50mm to 3ft / 1m.
For internal bags for tubular parts, tube bag is perfect because there is no need to put a seam inside. It can be bought in a range of materials, some quite flexible which adds extra safety to a bag buried in a hole.
Peel Ply
Peel ply serves a few purposes. First, it allows the part surface to remain un-stuck to the vacuum consumables. Second, it leaves a consistent textured surface on the part that is good for secondary bonding or painting. It can also be left on the part after demolding as a protective layer while the part is trimmed or assembled. It can be removed selectively for bonding operations but otherwise left in place as long as possible.
You don’t need peel ply, but it is a good idea in most cases. For parts that won’t be finished or bonded, placing a release film right over the laminate is ok. You can also selectively apply peel ply to either the mold side or the bag side of a part where you will want a bond-ready area.
Obvious colors or stripes make it clear that peel ply is on a surface and reduce the likelihood that it will be left in place and bonded over – which would be bad!
Peel-plies tend to be slippery and somewhat difficult to cut compared to other materials here. Often a (sharp) razor knife and a cutting mat (and safety ruler!) will be as effective as scissors for cutting strips. Some people like to use hot knives but keep in mind that melted edges will not be flexible and can restrict movement of the weave to a degree. Scissors cut it fine but it will catch on even the smallest nick in your blades. Cutting peel ply will test your scissors sharpening skills!
Uncoated Nylon
The most basic peel ply is uncoated nylon. It is usually a rough textured white fabric often with a red or black thread every inch or so. This is often the most economical and is also least likely to leave contaminants on a surface. It can be hard to remove, especially if used directly under breather or infusion mesh without a release film!
This is my preferred “default” peel ply. It handles well, stretches a little and because of the coarse weave it is more conformable without wrinkling. With the exception of infusion, where it can be a monster to remove, this is probably your best place to start.
Polyester
Perhaps the least expensive, polyester peel ply is usually a plain white fabric, but often with a finer weave. It is somewhat more conformable and easier to remove than nylon but is pretty much interchangeable – though nylon is probably a better choice for higher temperatures. The resulting surface has less texture but is similarly bond-ready to nylon.
Coated Peel Plies
Probably the most versatile – suppliers offer a wide range of coated peel plies. These are usually nylon, but with a coating – which is often silicone – to help make them easier to remove. Coated peel plies can be removed easily even when infusion flow media is stuck to them and so make a good choice for infusion. Bagged wet layup should (pretty much) always be done with a perforated release film – so in that case there is less value to coated peel plies.
The coatings that make them release easily can also leave contaminants behind. On surfaces that will be secondary-bonded, using a layer of uncoated peel ply under the coated peel ply is a good solution. Mechanical preparation (you know – grinding or sanding) of surfaces is also a good idea. In general coated peel plies are used without much fuss over contamination – but if you’re building something important it is good to do tests and consult with your material manufacturers.
Teflon
Teflon coated peel plies are really not sticky! They practically jump off a surface. A teflon peel-ply may leave contamination and the resulting texture isn’t ideal for secondary bonding. It is ideal though for going under infusion feed features but over a standard peel ply – things like Enkafusion, spiral wrap or omega flow channels pop right off.
It is also good for making slip-sheets in a layup – like between rebate formers and the part, or between a pre-cured door or plant in a mold. Air and resin can go through freely but no way will things stick! The picture on the right shows teflon peel ply covering sacrificial strips of pre-preg that have been laid up to form a rebate in a part. The strips will cure with the part, and will leave a perfectly sized rebate for secondary bonding laminates.
Roll, Bias Cut, etc.
Peel ply comes standard on rolls about 60” /1.5m wide. You can buy it slit into thinner rolls for use in wrapping tubes or for simpler tailoring of complex shapes. It is usually best to buy pre-slit from the manufacturer because it is somewhat hard to cut neatly without very sharp tools and it’s easy to make a huge mess.
Cutting peel ply strips “on the bias” or so the fiber is at +/-45 dregees to the strip axis is a really helpful way to make peel ply more conformable. It’s more work, but because the fibers aren’t running for long distances in the strip-axis, there is less likelihood of wrinkles and it conforms better to edges and corners. See the chainplate image just below showing bias-cut peel-ply – both pre-preg and dry.
Also, strips of bias-cut peel-ply on epoxy bonding fillets are great if you’re going to laminate over them! Apply them with a dry chip-brush over the wet epoxy and watch your fillet sanding worries disappear.
Pre-preg Peel Ply
If you are using pre-preg reinforcements, they come with about the ideal resin ratio from the factory. You can use normal dry peel ply but it will steal some resin from the reinforcements. My rule of thumb is that dry nylon peel ply will take about 50g per square meter of resin out of the laminate. For thick parts this is probably fine. If you’re making a part with two plies of 200g, it will take a big bite out of your resin volume – potentially leaving the surface pin-holey and reducing the mechanical properties.
Enter pre-preg peel ply! This is just normal peel ply that has been through the pre-pregging process just like any reinforcement. It is the perfect way to put peel ply on your pre-preg laminates – but if you’re buying small volumes of material retail – good luck finding it!
Pre-preg manufacturers should be able to supply rolls of peel ply pre-pregged with the resin you’re using if you are ordering large-is quantities of material. It isn’t necessary and unless you’re doing large scale or demanding work it it probably not worth it.
I have read some science that suggests the using pre-preg peel ply will results in a significantly better surface for secondary-bonding than using dry peel ply and having it suck resin out of the laminate. For things where secondary-bonding will be critical, check into this!
Release Film
Release film serves to isolate the part from the breather and to control the amount of resin bleed. It has small perforations in a known pattern that allow both trapped air and excess resin to squeeze out of the laminate.
For prepreg parts in an autoclave (or very thin well debulked ones in an oven) unperforated release film is often used. By keeping all the resin in the part, weight and fiber volume fraction are very well controlled and predictable. This only works where no trapped air or volatile gasses need to be extracted. In an autoclave situation, the pressure keeps these potentially volatile materials in liquid form or compresses them into much smaller volumes.
Release film can be used for infusions where the main benefit is that it keeps resin supply very uniform and makes removing flow media from thin or delicate laminates easier. It does extend the distance between the flow front and the fully wet laminate stack, so it can cause you trouble if you don’t attend to resin breaks!
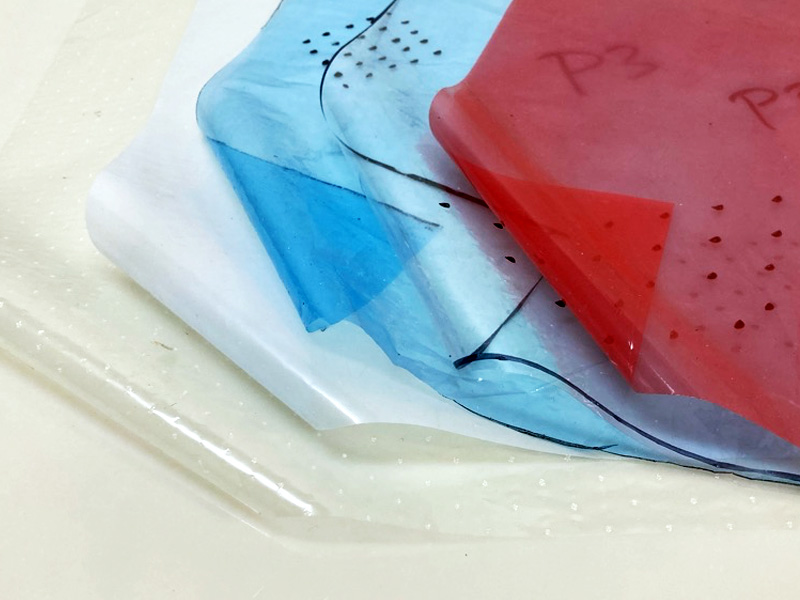
Perforations
There are standard perforations for release films. These describe both hole diameter and spacing – and give a standard percentage of hole for a given film area. The most common is “P3” which is good for wet bagging and pre-preg where you’re not concerned about over-bleed.
Generally you want larger perforations more closely spaced to bleed off more resin – and fewer small ones further apart to bleed off less.
Here’s a chart of common perforations from most porous to least:
- P31: 0.6mm holes in a rectangular spacing 7mm by 5mm but with an additional hole in the middle of the square
- P3: 0.4mm holes in square pattern on 12.7mm centers
- P90: 0.4mm holes in a rectangular spacing 15mm by 30mm
- P6: 0.4mm holes in square pattern on 50mm centers
There are a bunch more that you won’t see as often and to be super helpful, different manufacturers call different stuff by different names. Confirm that what you’re being actually has a hole pattern that you cause. P3 is one that they all seem to agree on (as far as I can tell) and it is the most common and universally useful.
Materials
Release film can be as simple as a plastic sheet with holes punched in it – you can make your own from painters plastic and a push-pin in a pinch. Perforated plastic “bread bag” film is available and makes a good cheap option for bagging cores or less critical bagged wet layups.
There are cheaper thin (0.001”) release bag products that stretch ok but don’t have high temperature tolerance or high elongation. These are ideal for bagged wet layup and low temperature prepregs. Another option is clear Mylar-like film that doesn’t stretch at all.
The more expensive films, usually used with prepregs are flexible fluoropolymer films that have very high elongation and hold up well at high temperatures.
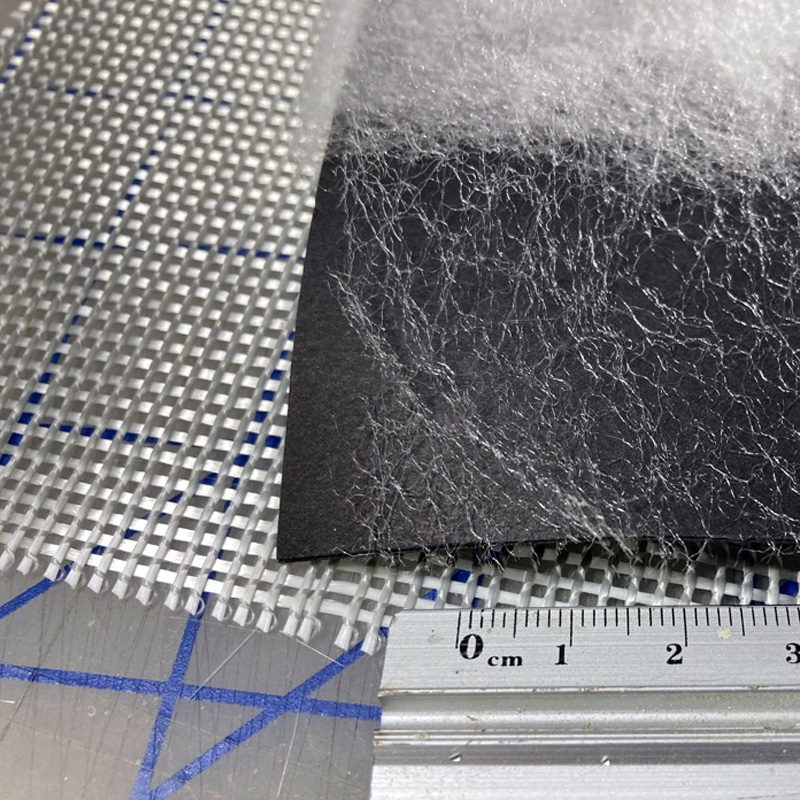
Breather and Bleeder
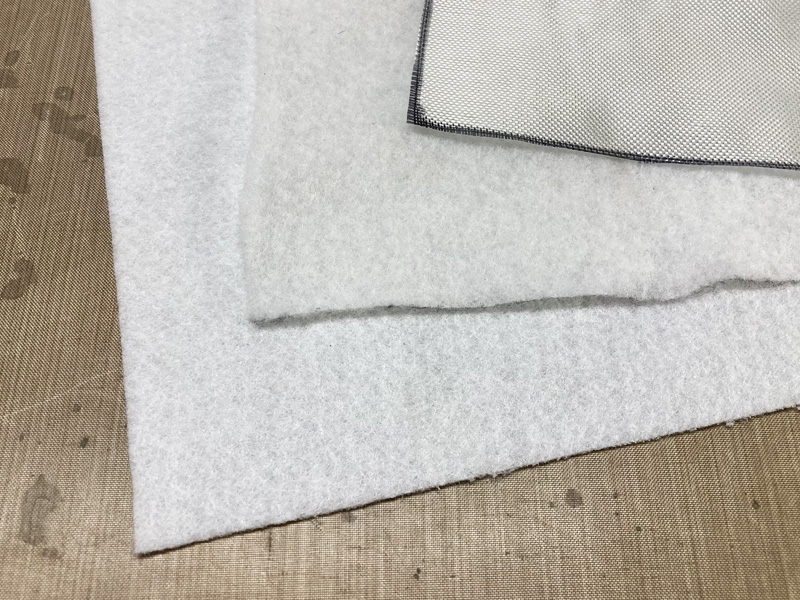
Breather and bleeder materials do two separate jobs – but often at the same time. The bleeder part involves sucking up excess resin that has been “bled” off the layup through perforated release film or sometimes just peel ply. The “breather” part is about distributing vacuum across the surface, allowing air to fully escape from between the bag and the part.
Thick vs. Thin
Standard polyester breather material comes in weights between 4oz/150g and 10oz/350g per square yard/meter. Thicker material absorbs more but is less conformable and more bunchy. Thinner breather is easier to handle and good for jobs where heavy laps could print into the part and there isn’t going to be much resin bled off anyway.
I like thinner breather as a standard material – you can always double it up or add a strip of infusion mesh if you are afraid that excess resin will choke it off and it won’t be able to do the “breathing” part of its job.
E-glass as Bleeder
E-glass cloth can be an excellent bleeder (or bleeder/breather) material for fussy wet layups or pre-preg parts. It is more controllable, thinner and can be cut on the bias for more flexibility. Because it is woven, the resin uptake is very predictable.
Separate Breather and Bleeder
It is common to use separate plies for the bleeder and the breather, separating them with a non-perforated release film. This can be good for parts where you want to limit the amount of resin bleed but still have a path for trapped air or volatiles to leave the laminate.
Thin e-glass cloth can make a goed bleeder layer here separated from the peel ply or laminate by a perforated release film. A second non-perforated release film goed over, with the normal fluffy breather on top just below the bag.
Combination Materials
Sometimes it makes sense to use or make “combination” plies that combine several of these consumable layers into one. Several material manufacturers sell pre-stacked and adhered process materials and this can save lots of time and reduce the likelihood of mistakes.
Compoflex

An example of this is a product called Compoflex. There are several kinds: for wet layup and for infusion. They combine peel ply, release film and breather into one ply. It’s kind of stiff and can make tailoring more complicated for curvy things, but it is great for flat panels.
Home-made “Combo”
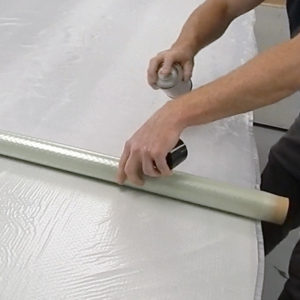
One of my favorite vacuum consumable shortcuts is to pre-stick the release film and the breather together with spray adhesive. This can be patterned or applied over peel ply, saving time and making sure that there is release film under ALL the breather.
The best way to do this is to lay the breather fabric out (or unroll the roll partially) on a table and then spray a strip across the end with a spray adhesive. Unroll the release film over the breather while applying a steady coat of spray adhesive ahead of the release film roll. You end up with two plies in one ready to roll up and apply together. Sometimes it helps to rub the release film down onto the breather behind the roll to make sure they’re really suck. A rag or scrap of slippery peel-ply works great for this.
I don’t like going the additional step of gluing the peel ply too and applying all three at once. Unless you’re doing large flat panels, the slip joints can expose breather directly to the laminate and this can leave ridges of stuck breather.
Infusion Flow Media
Infusion is often done with a surface flow media to allow resin to readily travel across the top of the laminate rather than fighting its way through all those fibers. The resin only has to fill “down” through the laminate plies from the surface. It makes things go faster and allows feed lines to be spaced much further apart.
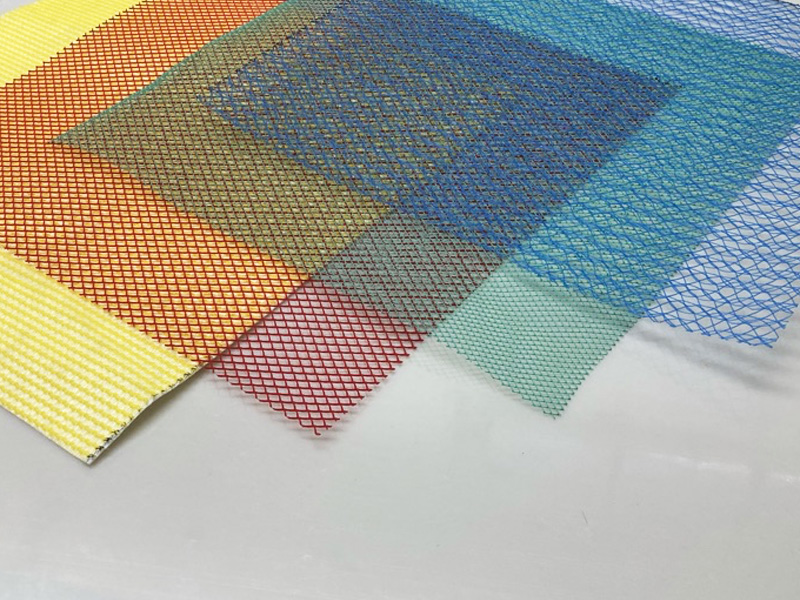
Types of Flow Media
The varieties of flow media reflect a range in flow volume and surface conformability. It is common to use “shade cloth” for flow media and it works fine but tends to waste more resin than purpose-designed products and may have manufacturing contamination if not intended for composites work. My advice is to stick to products designed and marketed for the process.
Many manufacturers make plastic diamond mesh products in a variety of thickness and flexibilities. These products work by creating little bridges in the bag over the mesh that allow resin to flow. Orientation matters – usually the roll direction will flow 2x faster so make sure it is pointing the way you want the resin to flow.
More random mesh products don’t have the same directionality of the diamond mesh, but work similarly by creating little bridges in the bag that work like tubes for resin.
These flow media products stick to the part if a peel ply isn’t used. You will probably want to use a coated peel ply for easier release. Sometimes a perforated release film can be used too.
Infusion Combo Products
There are combination products for infusion too. This yellow Compoflex RF-3 (see also Aerovac Infuply and Airtech Flowlease) has peel ply and a flow media in one. These are good options but do take up a bit of waste resin – but save time. These types of products help with air evacuation and seem to allow trapped vapor or air behind the flow front to escape better than plain mesh and peel ply. I’m a fan!
Interlaminar Flow Media
The flow products we just looked at are removed after the laminate is cured, but there are flow-enhancing products that are designed to stay in the part. These work by creating little channels for the resin to flow through the dense packed fibers of the compressed laminate. This is unusually only a thing for solid laminate or “single skin” areas.
The products shown here are Chomorat G-Flow, which is a thicker fiberglass mesh that goes in as a ply in your laminate. The bundles create paths for resin flow. Other fiberglass scrim (looks like window screen) products can work well too. The fine veil pictured is a nylon non-woven made by Spunfab (thanks to Bravolab for the sample!) that can be used to support un-stitched unidirectional and improve flow in heavy unidirectional stacks or other dense laminates. This is also a great material to spray-glue (or heat-bond) to easily-distorted cloths and spread-tow reinforcements to help make nice edges and keep it from falling apart.
It is also common to use continuous strand mat as an inter-laminar flow media. This is just like chopped strand mat but the fibers are really long and often loop around. Especially for Light-RTM or silicone-bagged parts where surface flow isn’t an option, continuous-strand mat can really help.
Cores are also commonly used for this – either grooved foams where resin flows in the core cuts, or infusion specific thin cores like Soric, that provide a network of flow channels that remain full of resin and provide the core structure.
See the “Infusion Cores” section here: Core Material Reference
Spray Adhesive
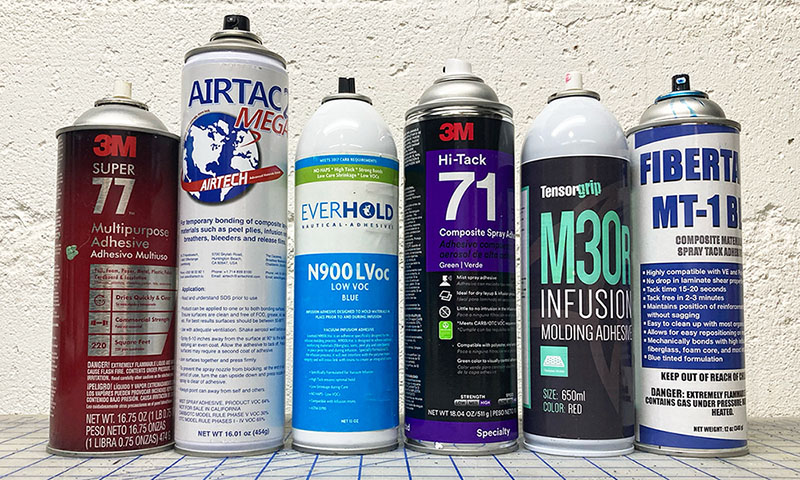
It is very common to use a spray contact adhesive to hold bagging materials together. Use it to hold layers of process material together, before (combo-style) or as the bag stack is assembled on the part.
For infusion it is very common to assemble the dry plies of reinforcement in the tool with spray adhesive. The is a variety of stickiness levels and general behaviors of different brands of adhesive. Some types will leave minor contamination in your part – which is often not a problem. Some are resin soluble and will flow out with the resin front – which is an important consideration for infusion. Many brands have the option of a “QC tint” – a color added to the adhesive that allows you to see where you’ve sprayed and avoid over-application.
You can buy many spray adhesives in industrial-size canisters with reusable hoses and applicator guns. This is great for large parts in a production environment – the cost of the material is less, and the larger canisters are recyclable.
Infusion Flow Stuff
Feed lines bring resin into the part, and manifolds or distribution channels allow it to spread under the bag. These are all critical to the infusion process and you have lots of options to choose from.
The most common is spiral wrap. It’s cheap, versatile and can be used for inlet or vacuum side manifolds. Because the bag can get stuck or sucked into the cuts it is best to cover it in peel ply. Spiral wrap is available in many sizes. It is best to buy it from a composites-oriented supplier even though it is also available for holding bundles of wires too – the composites-oriented stuff is more likely to be free of oils and contaminants.
Specialized products like Enkafusion, silicone Omega Channel and MTI hose make improvements on the basic spiral wrap. Enkafusion and Silicone channel allow for faster resin feed manifolds. MTI hose for the vacuum perimeter is made from spiral wrap with a semipermiable jacket material that lets air through but not resin. Many materials suppliers offer similar and useful products just for infusion – it’s worth checking them out.
Semi-permiables
There are some products available that let air through but not resin. This is pretty neat and it helps solve some problems around resin control that you really can’t handle any other way.
This example is Airtech Dahltexx SP which has a peel ply bonded to a semi-permeable membrane. It will allow air to escape without bleeding resin, so can be used in the place of a release film. It doesn’t need to let some resin out to let the air out. It also works for infusion by allowing air out even after a flow front has passed. Used over the whole laminate or just under vacuum features, it is an interesting option.
Products: Diatex Vacuoplex MP, Airtech Dahltexx SP
Sealant Tape
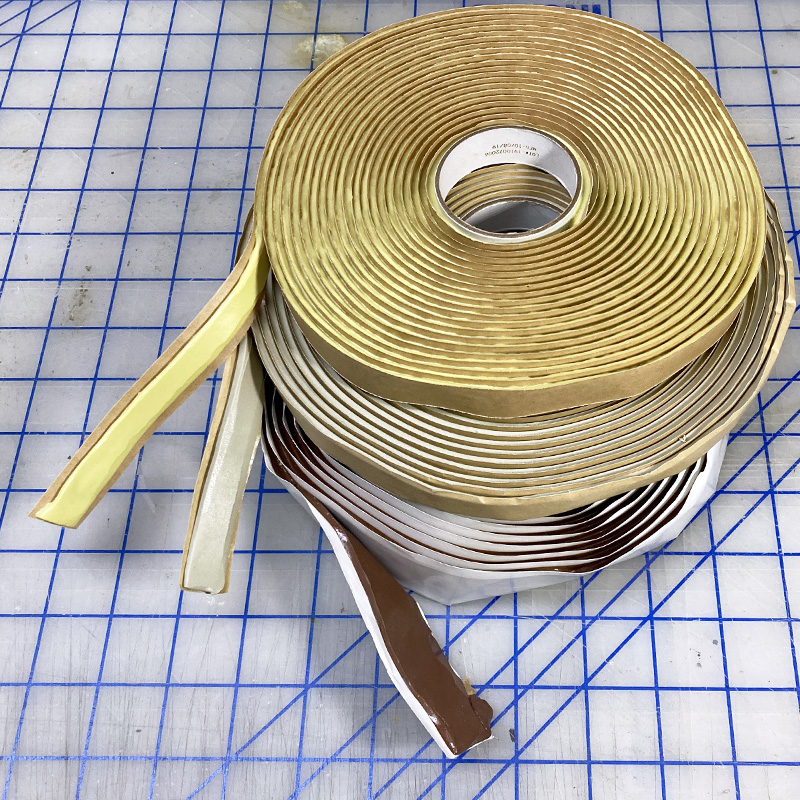
Disposable vacuum bags are almost always sealed with a kind of rubbery thick mastic sealant tape which you will find called by many names! The main feature is that it is thick enough to seal bag to mold and bag to bag even where there are small wrinkles. It should be sticky enough to attach completely to the bag film and tool surface, but not so sticky that it can’t be removed.
The cross section of the sealant tape is usually about ⅛” / 3mm by ½” / 12mm but some are available in 1” /25mm width. There’s also thinner 1/16” /1.5mm tape but my advice is to avoid it. It’s cheaper but it doesn’t work as well!
Temperature
The main differentiator besides tape size is the maximum service temperature. This is really only an issue for pre-preg processing. If you heat a tape too hot it gets liquidy and things slide around – potentially causing catastrophic leaks. Also, post-curing can be an issue, but at that point at least things are cured for the most part – still good to leave parts under bag for post-cure though!
Pleats, Tailoring
Sealant tape can be applied to the mold perimeter before layup, which is good for infusion because it keeps loose fibers from causing leaks. More commonly you’ll put the sealant on after layup, making sure that there isn’t any wet resin where you need to stick the tape – because it won’t stick. You’ll have to form the pleats as you go in a nice symmetrical way, making sure you have plenty of bag. Too small a bag is a very common bagging mistake!
For smaller parts or long skinny bonding tape laminating, it is really handy to pre-tape the bag by applying sealant tape to the perimeter of a right-sized bag on a table before bringing the bag to the part. This is very fast and handy and makes pleat forming way easier. Try it – you might like it!
Double Tape
Sometimes people will use a double row of sealant tape. This is usually a waste unless you are bagging something of extreme value and importance. There are cases where double bagging can be useful but that’s very rare!
Tapes
Like spray adhesive, tape is super handy in the vacuum bagging of composites. Different process requirements can benefit from different types of tape!
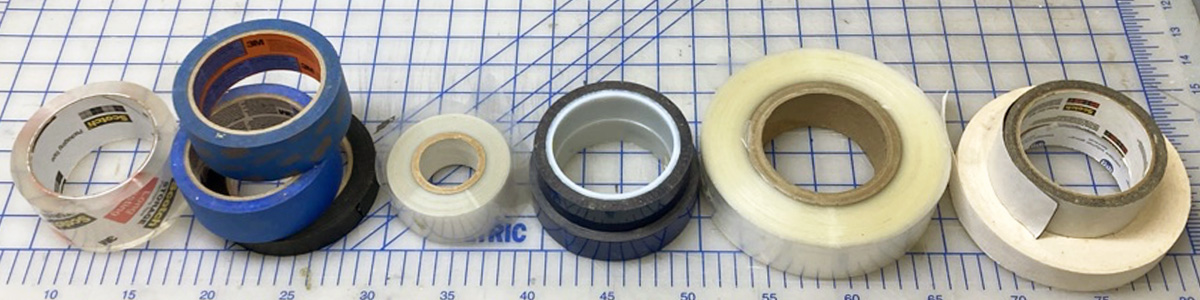
Masking Tape
Plain old masking tape or painters tape is great for holding things together in low temperature situations, especially where the tape will be discarded with the process materials. The down side is that vacuum bags press really hard and heat makes adhesives get more sticky – so removing bagged or cooked-on masking tape from stuff is a huge pain.
Flashbreaker
Flashbreaker tape is made to stick and then come off – so it can be used directly on parts. You could use it… say for masking off before a bonding operation so that your “flash” or excess adhesive would just “break” off the surface you were masking. And then the tape would pull up without leaving a sticky mess.
It can also be used for holding down vacuum consumables or making a releasable surface on small plants or rebate formers in a tool.
Flashbreaker comes with either silicone or non-silicone rubber adhesive – and while it is designed not to leave residue or contaminants… you know silicone. Also, it’s expensive.
Shrink Tape
Shrink tape is a handy tool for consolidating parts and can be used with or instead of a vacuum bag in some cases. This is ideal for prepreg parts where you want to compact around a mandrel or keep wrinkles from forming at corners. Be careful though – it really shrinks!
Pull Tape
Imagine shrink tape but without the shrink – just a little stretch. Pull tape is used for compacting and controlling mandrel wound prepregs during debulking and curing. You know how pre-preg tube has little ridges in it – that’s pull tape. You generally use it with a vacuum bag and it acts as a release film – air and excess resin can escape out between the layers of tape. It is generally applied with a large – 90% or more overlap and as consistent and advance as possible!
Conclusions
So there’s a quick look at industry-specific consumables used in composites manufacturing. There are lots of suppliers and products and it is worth looking at options and getting samples. The right process materials make a big difference!