NOTE: This is new material and is still being proof-read and checked. Definitely WIP!
This article is about the basics of thermoset resins commonly used in composites. It covers epoxy, vinyl-ester and polyester resins – their components, catalysts, chemistry and relative properties. There’s a lot going on here and this just scratches the surface!
In fiber reinforced composites you have your thermosets and your thermoplastics – those are the two broadest categories of resin matrix. Thermoplastics get soft when you heat ’em and hard when you cool them off – over and over – that’s what they do. Thermosets are a one way trip. Some chemicals get mixed up, they react and their molecular makeup is changed forever in a non-reversible transformation. Thermoplastic resins are key to injection molding, thermoforming and 3D printing – resins like Nylon, ABS, PLA, PEI, and many, many more. They are becoming more and more common in high volume production composites with small parts. Thermoset resins are far and away the most commonly used in industrial composites. When somebody says “carbon fiber”, “fiberglass”, “GRP” or “FRP” – chances are they’re talking about reinforcement fibers mixed with a thermoset resin matrix.
Thermosets can be divided by resin chemistry into specific types. In each type, there are a near-infinite variety of specific chemical recipes and combinations that chemical engineers tweak to provide specific performance characteristics. Here are some examples of thermoset polymers:
- Polyester
- Vinyl-ester
- Epoxy
- Silicone
- Polyurethane
- Phenolic
- Bismaleimide
- Cyanate ester
- Polyimide
Each of these is a broad category with thousands of potential specific chemical subsets. I’m not going to get too much into chemistry because I am not qualified to explain that stuff – it has been 20+ years since I did any (and it was basic) chemistry studies! If you are an expert and want to contribute something more to this or point out my mistakes, please get in touch!
The three big thermoset resins for the composites industry are Polyester (PE), Vinyl-ester (VE) and Epoxy. Many others are used in special cases – like high temperature aerospace stuff that I don’t know anything about. So for the purposes of this article, we’re going to stick to the big three – and discuss how, why and when each makes sense.
Cross Linking
The big thing with thermoset resins is that the chemistry is a one-way trip from unreacted to reacted. When you add your catalyst to a polyester resin or mix part A and part B of your epoxy, you are causing a chemical reaction to take place. Previously un-bound chains of molecules are attached together by chemical bonds at “reactive sites” along the molecules. In an ideal situation, all of the available reactive sites along each molecule chain will be “cross linked” to other molecules. This process creates a network of connections among molecules – called “polymerization” – that forms the “cured” state of the resin. The extent to which the potential reactive sites are cross linked is called the “cross-linking density” of the cure. Higher cross-linking densities yield improved mechanical properties of the “polymerized” resin matrix.
While thermosets will never reverse their curing reaction, they will get floppy if you heat them up too much. Each resin system has a “glass transition temperature” – typically called the Tg (pronounced “tee sub gee”) – that is the temperature at which the resin will start to soften. Above the Tg for a given resin, the structure becomes less crystalline and more amorphous – and mechanical properties drop off fast. You want to avoid putting resins in service above their Tg – no good comes of this. You can often maximize a resin’s potential Tg with additional heat after the initial cure – in a process called “postcuring.”
As a resin gels, the cross linking reactions are taking place at a high rate, creating heat and perpetuating the reaction. As the resin matrix hardens, it becomes less possible for molecules to rearrange themselves to create cross-linking opportunities. The cross-linking continues as a resin is exposed to heat (postcure) but at a much reduced rate – it’s really about more completely cross-linking molecules that are already close together. The big take-away here is that you get one shot at cross-linking your resin. If the right components aren’t mixed up at the rate ratios, in the presence of the right amount of heat – you’ll have problems. And more heat or time won’t fix them.
Most of the long-term changes you see in cured laminates (print through, shrinkage) are the result two options: With polyester and vinylester, there may be styrene slowly continuing to leave the laminate, causing it to shrink. With epoxies, print through happens with the relaxing of stresses and softening of the resin matrix as the resin approaches it’s Tg. Epoxy parts tend to get over their print-through problems if they are post-cured at elevated temperatures. The resulting higher Tg means that the resin stays harder at higher temperatures so the softening doesn’t happen at normal service temperatures.
Different thermoset resin systems cure to different molecular geometries – with different mechanical properties. Some cured structures are more brittle – like polyester – because the molecules are linked more closely alongside each-other. Others – like epoxies – are typically linked end-to end and offer more flexibility and a “tougher” structure that can absorb more energy without cracking. Different types of thermoset resins cure with different rates of shrinkage – depending on the required rearrangement of the molecular structure – and of volatile components exiting during cure. Generally those that shrink more (polyester) will have more built-in stresses and be more prone to cracking. They can also show the fiber weave printed through on the surface as the thicker volumes of resin between fiber bundles shrink from continued evaporation of un-reacted styrene..
Temperature is a very effective way to control the cure speed of thermoset resins. Independent of the specific formulation, more temperature makes for a fast cure. Generally speaking, increasing the temperature 10C / 18F will halve the gel time. So temperature at the time of lamination is important – but also temperature after the resin has gelled has a major impact. Increasing the temperature of a postcure (up to a point) will increase the mechanical properties of the resin because all the potential cross-linking opportunities will be used.
Here’s a look at the three most common thermoset resin types and how they work:
Polyester (PE)
Polyester resin is the most common thermoset used in the composite industry – by far! Boats, campers, bathtubs, pilings, giant pipes – the list could go one for pages. The reason is that polyester resins are cheap. They’re also easy to process and have a good mix of structural, chemical, UV and moisture resisting properties. Gelcoats can give shiny durable surfaces over and over out of a mold (composites superpower #3!) and are almost always based on polyester or vinyl-ester chemistry.
You’ll often hear resins described as “unsaturated.” This just means that they are ready for action in a chemical reaction – ready to react with the addition of the right new materials. In our case this means they start liquid and then things get mixed up and then they cure and get hard. Alternatively, a “saturated” polyester would be something like the polyester fibers in cloth that are not in a potentially reactive form.
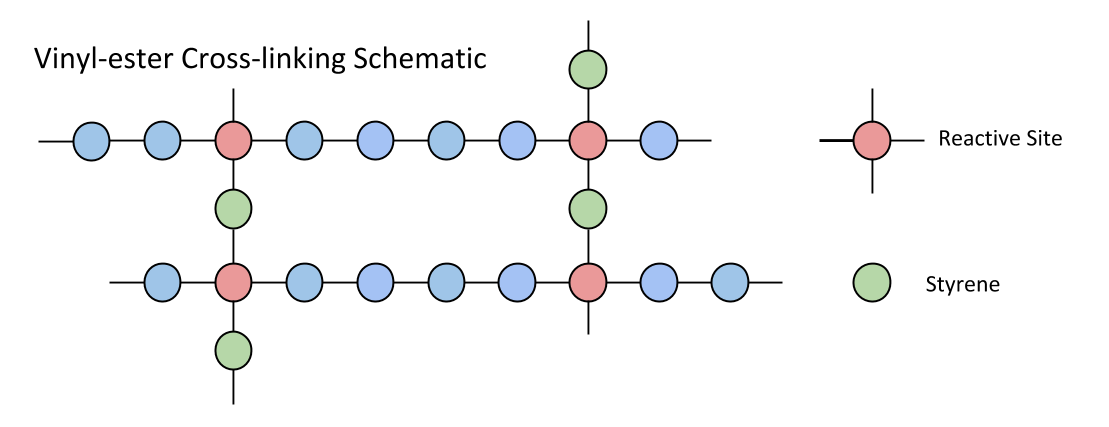
Polyester resin is made (in the simplest terms) by reacting specific alcohols with di-basic acids and then adding saturated di-basic acids and a cross-linking monomer – usually styrene. The resulting chemical structure has multiple “ester groups” with reactive sites between – so: “poly-ester”. The styrene typically makes up 20-50% by volume and is what gives polyester resin it’s delightful smell! Styrene will be the molecule to “cross-link” the polyester resin molecules once an “initiator” (aka catalyst) is added. The initiator breaks up and becomes multiple free radicals (go read up on “radical polymerization”) which allow the styrene to bond with reactive sites on the long-chain molecules. Each cross-linking event initiates another so the reaction is self-perpetuatuating until it runs out of reactive possibilities. The styrene does double duty as a thinner – reducing the viscosity of the resin.

Here’s a look at the basic schematic of a cured polyester polymer. The reactive sites (red) are close together along the molecule chain (left to right) with all the non-reactive stuff (blue) distributed between. Some of the styrene molecules cross-link between the reactive sites, bonding multiple molecules together. The unused styrene is released into the air as a volatile byproduct of the reaction.
A defining characteristic of polyester resins is that they are cured using an initiator – which we’re going to keep calling a “catalyst.” This is usually only mixed with the resin at a ratio below 3% by volume – so really very little compared to even 5:1 epoxy. Catalysts are most often a type of MEKP (methyl ethyl ketone peroxide) or for putties and pastes – a BPO (benzoyl peroxide). More on catalysts below. These initiate the cross-linking reaction that locks together long chains of polyester molecules with styrene. Here’s a good video.
Orthophatlic “Ortho” Polyester
The most basic and inexpensive polyester resin is usually called “General Purpose” (GP) – and is typically orthophthalic (“ortho”) polyester resin. It offers adequate structural performance for many applications. It doesn’t have great chemical resistance and will absorb moisture – leading to lost mechanical properties. It also cures pretty completely at room temperature – and can be made to cure fast with the right catalyst ratio. The best thing though is that it’s cheap! A lot of times that’s the most important thing – so this is a very common resin in many industrial applications.
DCPD Polyester / Blends
A slightly less common resin type is DCPD (dicyclopentadiene – obviously!) which substitutes that D-word stuff for some of the styrene. DCPD resin has better thermal performance and better cured stability than standard Ortho or Iso-polyester. It doesn’t shrink as much due to the lower level of volatile styrene – so cosmetics of finished parts are better. Because it has low viscosity without extra styrene, the styrene levels emitted during cure are much lower – so it isn’t as stinky!
DCPD is often blended with Ortho-polyester to deliver lower styrene emissions and easier handling. Some resins in the “General Purpose” category are actually DCPD/Ortho blends. This can be confusing and it is a good idea to discuss with your material suppliers and learn what is available, and how it will perform in your application.
Isophthalic (Iso) Polyester
Stepping up a notch, you get isophthalic (“iso”) polyester – which is more expensive but is based on an isophthalic-acid and typically has a higher styrene content. Iso-polyester resin has much better chemical, corrosion and temperature handling properties and is much less likely to absorb moisture. It is often used for tooling resin and is the basis of many gelcoats. To make a rash generalization, ortho-polyester resin is typically more flexible than iso-polyester though it is more prone to shrinkage during cure. Many parameters impact shrinkage, elongation and print-through of reinforcements – so do tests!
Vinyl-ester
Vinyl-ester (VE) resin is (in the most basic terms) like a hybrid of epoxy and polyester. It’s still catalyzed with MEKP or a similar catalyst but the resulting combination of molecules is tougher and stronger. The reactive sites are at the ends of the molecular chain – leaving the longer unconstrained molecule to better absorb energy. There are fewer ester groups than in a polyester so VE resins are less prone to hydrolysis – degradation from water intrusion. Vinyl-ester resin is often more than double the cost of polyester resin though – so you only want to use it when it helps you get what you want.
So places you may want VE resin… first off, because it is less prone to water absorption than polyester it makes a great skin coat for things that will be under water – like the hulls of boats and insides of pipes and tanks. Often a VE gelcoat and skincoat (first layer of reinforcement right behind the gelcoat) can provide a barrier against moisture or chemical intrusion so the rest of the laminate can be made with cheaper general purpose resin. “Osmotic blistering” happens when water migrates through (usually ortho-polyester) gelcoat and degrades the underlying laminate – and pops off the gelcoat. This is a problem with old boats made before people understood this problem – and before iso-polyester and VE resin were readily available. You can prevent this from happening now with the right choice of gel and skin-coats! Epoxy barrier coats are an option too – but you’ll want to apply them once your part is out of the mold and can be mechanically abraded for good adhesion.
Because it is stronger and bonds better to fiber and cores, VE is a good intermediate step between polyester and epoxy in terms of laminate performance. Because of low bond strength, laminates designed for polyester resins use lots of chopped strand mat to create resin-rich core bonding and surfacing layers. With vinyl-ester resins, improved bond strength and toughness often means you can eliminate these layers of chopped strand mat – saving weight while improving laminate performance.
One down side of VE resins can be the high shrinkage rate during curing. Depending on catalyst choices, there are lots of ways to mitigate this and resin formulators often offer a less zippy version (using different promoter mixes) of their VE resin for infusing larger or thicker parts. Lower hydrogen peroxide-content catalysts can help lower the speed of resin gel and reduce both exotherm heat and shrinkage. CHP and blended catalysts help too. And then you could always use a print-blocker layer or a pre-laminated skin-coat – but it’ll cost you weight-wise. Vinyl-ester resins also benefit from elevated temperature post-cure more than polyester, so you may need to add that extra step to fully take advantage of increased mechanical properties.
Be careful to read your datasheets, because some vinyl-ester resins are only compatible with one type of catalyst!
Vinyl-ester resin is also chemically compatible with polyester (or VE) gelcoats – so you get “shiny” and “strong” without worrying about how to glue the two together. Epoxy gelcoat struggles with UV and polyester gelcoat can be tricky to keep stuck to epoxy laminates. There are ways to do it but it adds a layer of complexity. If you can get the laminate performance you need with VE resin AND the easy use of conventional gelcoats this can be a big reason to use VE over epoxy.
Laminating vs. Finishing Resins
For any type of “esterified” resin system, be aware that so-called “laminating” resins will not cure fully on their surface if exposed to air – they stay unreacted and sticky. Something about oxygen snapping up the free radicals on the surface that would otherwise react to cure the resin… not a chemist – can you tell? This is very useful because in open molding situations, multiple applications of material and resin are needed to build thickness. If you build it up too quickly, the curing reaction will generate too much heat and cause shrinkage – warping the part and potentially demolding it before you’re ready – aka “pre-release.” As each layer cures, the surface remains chemically “open” to bonding to subsequent layers of reinforcement and resin. When laminating a part in a mold, the process will be divided into separate curing steps: first gelcoat, then once that cures perhaps a skincoat with vinyl-ester resin or direct layup of the main reinforcements. Core can be bedded once the outer skin cures, and then a top skin can be laminated onto the core – all with “primary” (chemical rather than mechanical) bonds. Avoid open molding more than ⅛” – 3/16″ of laminate at a time – warning: rule of thumb/generalization – test in your situation!
Finally, to “close” the finished surface, a layer of something is needed to protect the resin from air and allow it to cure fully. Often this is a layer of “finishing resin” which has been mixed with wax (yeah, sounds crazy I know) which will float to the surface of the resin and block contact with air – letting the resin cure fully. Peel ply or a coat of PVA (polyvinyl alcohol) can seal a surface off from the atmosphere allowing for complete cure of “air inhibited” resin. You could also apply “air cure” gelcoat (which has wax in it too) to finish the inside surface. If you’re just doing a repair or a single skin part, you could use finishing resin directly – but you’ll have to remove the wax for secondary operations.
Check out this laminate sample video for a basic panel laid up using gelcoat, laminating resin and finishing resin:
Catalysts
For polyester or vinyl-ester resins, a catalyst is needed to initiate the cure. This is the material that causes the un-bound chemical chains in the resin to bust open and link up with other molecules – locking together in a new (and solid) polymer matrix. I’m going to keep calling it “catalyst” here because that is how it is commonly described – even though it is technically an “initiator” because it is used up in the subsequent curing reaction. There are a few different general types of catalyst you’ll find – and each of these has a bunch of subsets chemically “tuned” for different situations.
The two things a catalyst controls are the “gel time” – how long it takes for the resin to start the curing process – and the cure speed. The cure speed is how fast – or “hard” – the resin cures once the “gelation” process – the cross-linking – has begun. Generally, if things happen fast they’ll make lots of heat and risk distortion and shrinkage. If they happen slowly – they make less heat and have fewer of these problems – but they take longer! If a resin is under catalyzed it can fail to get to a full cure – and nothing you do will fix it – it just missed the boat and you’ll need to re-do the part. Longer gel times are needed for working (laminating, infusing, injecting, etc.) the resin. The cure speed determines how fast the part can be demolded once it starts to gel – and how the resin develops hardness as it cures.
Confusing? Why yes it is! Your resin supplier will probably be able to recommend a catalyst that will work ok for your specific situation. If you are having trouble with things or want to look into tuning your catalyst choice to better suit your situation, a technical sales representative from your resin supplier can help.
MEKP
The most common is MEKP – which is short for “methyl ethyl ketone peroxide” – which is a mouthful to say. This is nasty stuff and needs to be stored safely because it can catch fire on its own. It can explode if it is mixed with the wrong stuff – especially promoters like cobolt! Read the MSDS and make sure you keep MEKP isolated and stored in closed containers. There are three main active components in MEKP that contribute to the cure properties it enables – and to make it more interesting, manufacturers each seem to have their own naming conventions!
MEKP catalyst contains three main active ingredients – the ratios of which are adjusted to meet cure requirements. First, there is hydrogen peroxide – which is responsible for initiating the gel of the resin – it’s the one to break up into those free radicals we need. Higher ratios of hydrogen peroxide will initiate gel sooner and resin viscosity will increase earlier relative to the onset of cure. Second and third are the monomeric and dimeric forms of MEKP. There are lots of other inactive ingredients in most formulations that keep the mixture safe enough to handle and provide minor contributions to the cure process. The relative quantities of dimeric to monomeric MEKP affect the properties of the cure process – and of the resulting cured material.
In general, higher monomer catalysts (like Luperox® DHD 9, and Norox® MEKP 925 H) have slower more “gentle” gel times because of lower hydrogen peroxide content. These catalysts allow for longer times before the resin viscosity starts to go up and so improve flow in closed molded applications. Some GP and DHCP polyesters will cure with only monomer-form MEKP, while Iso-polyesters and vinyl-esters need both monomeric and dimeric-form MEKP to cure. Higher dimer content catalysts like Norox MEKP 9, Luperox DDM-9 have faster gel times, higher exotherm and result in a greater hardness of the cured resin.
See article: Optimizing Peroxide Performance for Vacuum Infusion (https://www.compositesworld.com/cdn/cms/uploadedFiles/United%20Initiators-Optimizing-Peroxide-Performance-for-Vacuum-Infusion-Norox.pdf)
AAP
AAP (Acetyl Acetone Peroxide – also: 2,4-Pentanedione Peroxide) is an initiator that can give very fast cure times without dramatically shortening gel times. It is suitable for curing thin parts fast at room temperature – but results in higher exotherm. It is often blended with MEKP to speed things up without shortening the gel time. Norox® AZOX is an example of this type of catalyst. For some closed-molding applications this can be a good combination to speed cycle time. Note that some resins will simply not cure with AAP – so ready your datasheets!
CHP and MEKP/CHP Blends
CHP (Cumyl Hydroperoxide) is another catalyst that offers advantages over MEKP in certain situations. Generally it makes for a more gentle cure with lower “exotherm” temperatures. This is helpful with very thick laminates that might otherwise crack or warp from excess heat. It also helps with cures performed at elevated temperatures. One additional factor with vacuum infusion is that CHP “boils” at a significantly higher temperature/vacuum level than MEKP and is less prone to forming bubbles in the laminate at high vacuum. Some vinyl-ester infusion resins require CHP catalyst.
MEKP/CHP blends are useful for situations where the faster cure of MEKP is useful, but it needs to be toned down a bit to prevent excess exothermic heat. It is often used as a “summer blend” in hot weather to soften the cure profile and give more control over the open time in open molding situations. It also helps with reduced print-through and warping in situations where cosmetic requirements are important. I have also used MEKP/CHP blended catalysts with polyester tooling putties to reduce the shrinkage and cracking from the thick beads of material. Products like MCP, MCP-75 and HDP-75 are common MEKP/MCP blends.
BPO
BPO (Benzoyl Peroxide) is often used as a catalyst for filled resins and fairing compounds (like Bondo) and is also in a paste form itself. It can be mixed with a liquid (emulsified!) and used to initiate liquid resin curing reactions. Typically this is used for casting resins like fake stone flooring, counter-tops – and potting resins.
Promoters
Promoters and inhibitors are additional chemicals added by the formulator or the end user to adjust the cure properties of the resin. Usually promoters are added by the user to allow for more flexibility and longer shelf life of the un-promoted resin. Typical ones are cobalt-naphthenate (CoNAP) , dimethylaniline (DMA) and diethylaniline (DEA) – which are added or blended to adjust parameters of the curing reaction. This is something that a manufacturer’s technical support services can help you figure out – because it isn’t obvious – or the same across different types of resins. Some of the promoters are really nasty and dangerous – and require special handling and storage. Usually you will only buy un-promoted resins in drums, giving the resin longer shelf life and the user flexibility to promote to suit their needs. Please don’t mess with this unless you are both careful and well-informed!
VE and Polyester Tooling Resins
One special case situation is the constructing of tooling and mold surfaces for production composite parts. Molds have a hard life and surface hardness, stability and toughness is important. Vinyl-ester resin and VE gelcoats are excellent for production mold-making. Traditional tooling laminates have to be laid up in many “drops” cured separately to build thickness without warping. For large areas, core can be used to provide extra stiffness.
Typical tooling resins are made with iso-polyester or an ortho-DCPD blend to get more stability and toughness. This is much better than using general purpose resin for tooling. You can do it, but it won’t hold up as well!
Some relatively new resin systems allow mold builders to lay up much thicker sections in one shot. This can save lots of labor and also produce very stable and low-warp tooling. These systems are often called “low-shrink” or “zero-shrink” tooling resins – and are definitely worth a look. They work by using highly filled resin and taking advantage of micro-cracking, expanding additives – and other secret-sauce methods the manufacturers aren’t totally clear about. These are often described as “phased-cure” resins because they change color from clear to white when they gel. Many people I have talked to about this are big fans of these resin systems because they save labor and allow molds to be demolded from plugs much faster because a complete cure happens quickly.
Examples of “low shrink” tooling systems: Nord-Composites NORESTER 3000 (VE), AOC Moldtru (VE), Polipol 321-ZERO (polyester)
Epoxy
Epoxy is a type of resin chemistry with a lot of awesome properties – but just like polyester resin it is a big umbrella – with lots of different stuff under it! Generally speaking, epoxy offers excellent mechanical properties and holds up better than other resins to chemical and moisture exposure. The chemical reaction is an addition reaction where the two parts – call them “hardener” and “resin” – combine and polymerize in a very predictable way. Unlike polyester or VE, where the reactive components are already present and the catalyst/initiator just pushes them over the edge – individually, epoxy hardeners and resins are very stable and have a long shelf-life.
Epoxy molecules have reactive sites at the end of the molecular chain like vinyl-ester. Instead of ester groups the reactive sites are composed of epoxide groups that react with the (typically) amine groups in the hardener. Often multiple epoxide groups will bond to a single amine group, making a three-dimensional “mesh” of bonded molecules. This results in a very tough and stable polymer matrix. The un-bonded middle of the molecule acts as a shock absorber to help make epoxy resins less brittle than polyester – with its tighter mid-chain bonds.
Most epoxy resin chemistries are based on bispohenol-A bonded to glycidyl groups – together called an epoxide group. A less common alternative called “novolac” (bisphenol-F) epoxies are composed of more than one epoxide group and have higher cross-linking densities. This makes them more temperature and solvent-resistant. Novolac epoxies are often used for potting and coatings where toughness and chemical resistance are important.
Epoxy resin systems are usually supplied as two components: “resin” and “hardener” – which are combined, mixed and react to create the cured polymer. Typically the mixing ratios are 1 part hardener to anything from 1 to 5 parts resin. Manufacturers will give precise (usually whole number) ratios – making it easy to do the math either by volume or by weight. The two components of the epoxy need to be measured carefully so that there is a matching quantity of reactive material. Excess un-reacted resin or hardener will remain floating around in the polymer, compromising the mechanical properties.
There is a lot that epoxy formulators can do to control the specific cure properties of resin formulations. Cure speed, viscosity, toughness, ultimate Tg, and a whole bunch of other properties can be controlled for – so you have lots of choices when you go to buy a resin system.
The cure process of epoxies (and other thermosets) is divided somewhat arbitrarily into three stages: “A”, “B” and “C” – with “B” being the one that most people talk about. “A stage” is what you get when the components have been mixed but nothing really has happened. “B-stage” is when the resin has “gelled” and taken on a hard(ish) consistency. Once the cure is completed by adding heat – or just by waiting with room temperature cure systems – the resin matrix becomes “C-staged” and is hard and fully cured. The tricky thing about B-stage is that it’s a big gray area. Resin that has just gelled and is still sticky but not liquid is in B-stage. Resin that has hardened but requires a post-cure to reach full cure is also called B-stage even though it has more of a glass-like consistency.
For some adhesive applications epoxies can be “toughened” by the addition of reactive or unreactive thermoplastic polymers or rubbers to the mix. These additives increase the ability of the cured resin to absorb energy and transfer it within the resin without cracking. Elongations-to-failure can go way up (well above 10%) while other mechanical properties are reduced. They are used to toughen glue-lines for secondary bonding as well as for core-bonding adhesives – particularly with honeycombs.
Gelcoats
Gelcoats are resins with pigments and fillers added so that they act like paint – but paint that can be molded into parts! This is a big part of composites superpower #3 – curvy shiny surfaces for cheap. Gelcoats are available in a wide variety of resin types, with lots of pigment options as well as UV inhibitors. An ideal gelcoat develops high hardness when cured but also has the flexibility to not crack when the underlying part flexes.
Polyester gelcoats are available based on a variety of resin chemistry. For underwater, or where heat or UV exposure might infiltrate or haze a standard ortho-polyester, an isophthalic/NPG (neopentyl glycol) gelcoat will provide better osmotic protection and surface stability. Vinyl-ester gelcoat provides similar benefits and is often used for repairs or re-gelcoating or in areas that will get rough treatment. VE gelcoat bonds better (and with more toughness) so it holds up well and is a great idea for production tool surfaces.
Compared to conventional paint systems applied to surfaces after a part is demolded, gelcoats have lots of advantages:
- Gelcoats are chemically bonded to the underlying laminate – which makes them less likely to peel off.
- Gelcoat is fast! This is huge for parts made rapidly in a production situation.
- Gelcoats can be repaired easily with the same materials so color matching is easy. This can be done at mold joints or secondary bonds as part of production – or later in a parts life.
- Gelcoats can be polished and wet-sanded – and because of their thickness this can be done many times – giving a service life measured in decades.
- The gloss surface comes from the mold, instead of from an open surface, so dust and spray technique aren’t as critical to a perfect surface.
- Two-part paints are even stinkier and less healthy than gelcoat!
- Gelcoat surfaces can always be primed and painted later on.
Depending on the type of service your parts will see, many different types of gelcoats are available. For tooling you have tooling gelcoat, and for chemical exposure or fire retardant requirements – there’s gelcoat for that. You’ll have to do some shopping and discussion with material vendors to help focus on something that is ideal for your application.
An alternative to gelcoats are “in-mold primers” – which are paints that are applied into the mold but that rely on a different chemistry to bond. They behave like gelcoats, but there is no expectation that they will provide a finished surface – just a substrate that can be more easily painted later on. Often this strategy is used with epoxy laminates – because epoxy compatible gelcoats are a trickier business than ones based on polyester resins. Epoxy is often used for more weight and finish sensitive high value parts, where the cost of finish painting fits better into the cost structure of the part or product.
Choices
So now that we’ve got the types or resins covered with a look at the most common variants, lets see how they compare. The important reason to know this stuff is so that you can make the best decision about what to use. It will almost never be obvious – and there will be trade-offs all over the place. Here’s a look at eight performance parameters for some of the most common types of resins used in composites manufacturing:
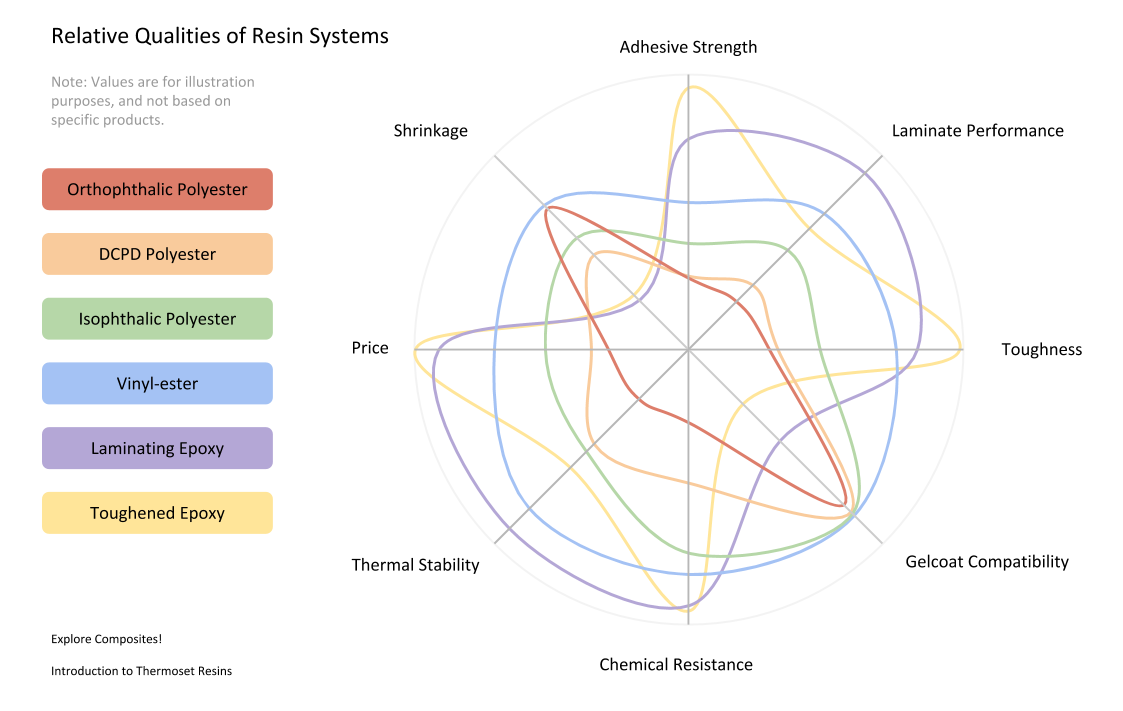
The hard part here is that you’ve got a lot of things to balance. Probably pretty quickly you’ll be able to say if your project should be done with epoxy or polyester. You may need osmosis-resistance or resistance to corrosion – so that will move options off the table. Generally weight and performance targets will eliminate lower performing materials and cost constraints will eliminate more expensive ones.
When looking at datasheets it is important to know if the measurements are for a resin sample or for a standard laminate (with fiber). Material manufacturers use different standards for their tests and give you different sets of measurements – in different units – so it is a bit of a chore to tease out what you want. Keep in mind that published data is just a place to start. If you have a high-stakes project please budget the time and money to make test panels and have laminate samples tested.
Also keep in mind that these are all generalizations. There are toughened polyesters and novalac vinyl-esters that outperform basic epoxies – and there are epoxies that won’t cure at all unless you cook them at 100C – but have incredible mechanical properties. The variety of options is staggering!
Adhesive Strength
A key reason that epoxy (and vinyl-ester to an extent) is a much better adhesive is that it exhibits a higher elongation-to-failure – it’s more elastic. Epoxies form polar bonds with other materials that make for more grippy adhesion to already-cured substrates. This chemical difference combined with more elastic chemistry make epoxies the top choice for secondary bonds. This is even more-so for toughened epoxies that sacrifice some strength for even more “give” and ability to absorb energy. The “elongation to failure” is around 4-8% for laminating epoxies and way higher for toughened formulations. For vinyl-ester it can be around 3-6% and for most polyesters it is around 1-3%.
In adhesive applications, shrinkage can reduce bond strength and limit the value of polyester and vinylester resins. Manufactures have many ways to mitigate this shrinkage for adhesives and there are options that work fine. In production situations where gap filling and speed are important, many manufacturers use methacrylate adhesives like Plexus or acrylic adhesives like Crestomer instead of traditional polyester or vinylester bonding putties.
Laminate Performance
The least expensive polyester resins also offer the lowest specific mechanical performance properties. This is mostly due to the brittle nature of polyester resins that comes from the bonding sites on the molecules being closer together – and more numerous. While vinyl-ester resins and epoxies have bonding sites at the end of the molecule chains, polyester resin molecules cross-link in a side-by-side kind of way. The connection is tighter and stiffer – and can absorb less energy before failing. So polyester resin is hard – but also brittle.
Reinforcement fibers in a polyester resin matrix (especially glass) have more ability to absorb energy than the resin has to transmit it between fibers. Imagine using rubber bands to reinforce concrete – it’s like that but not as much! The result is a brittle laminate that can’t take advantage of the fiber – so no need to worry about higher fiber content of your laminate when the resin can’t handle it. This type of laminate is typically made with lots of chopped short-fiber reinforcement. If weight isn’t an issue, it is fine. Most of the composites out there are built (and work great) with polyester resin.
The ability to stretch more before breaking means that epoxy and vinyl-ester can better transfer load between fibers – which themselves have a degree of stretchability. Epoxy provides the best ability to both adhere to fibers and to transmit loads between them – and is better at bonding cores. It is worth noting that epoxies often require an elevated temperature post-cure to actually get the improved performance that is possible – especially with regard to ‘toughness’ measures like tensile elongation. But not always – sometimes post-curing makes resins more brittle. Generally though, post-curing any thermoset will improve it’s overall mechanical performance when all the parameters are taken into consideration.
Toughness
Toughness is the ability to resist damage from impacts – and come through with deformation or destruction! So it’s a combination of strength and flexibility, combined to absorb and transmit energy. Two measures tell you a lot about the toughness of a resin: the elongation to failure and the results of an impact test.
Generally, epoxies have the highest elongation to failure (5% or more for standard laminating systems) and polyesters have the lowest (2%-ish). Like many of the properties above, this ability to spread out loads through the resin matrix makes tougher laminates less prone to cracking, delaminating and generally coming apart when impacted.
In terms of impact tests, the Izod is a standard one you’ll see a lot on datasheets – it’s done by swinging a pendulum-like hammer “through” a notched sample. The amount that the pendulum follows through vs. how high it started allows the amount of energy absorbed by the sample to be measured. Something like glass would just snap off absorbing little of the pendulum’s energy while a block or steel (which is ductile) would bend and absorb lots of energy before finally cracking off.
Gelcoat Compatibility
The best gelcoat compatibility comes with polyester and vinyl-ester resins. Not to say you can’t find epoxy compatible gelcoat – many products are available and work fine – it’s just more complicated!
The reason that polyesters and vinyl-esters work well with gelcoats of a similar chemistry is that in curing, gelcoats remain tacky on their surface. The reactive sites in their outermost molecules aren’t grabbed onto anything and so are ready to do chemical bonding with the next layer of resin. So there’s a primary chemical bond! This is good.
With epoxies, the chemical reaction doesn’t leave much in the way of “open” molecules on the surface. Many epoxy hardeners will actually “choose” to react with the atmosphere instead of the other resin component – and will leave a troublesome surface contamination often called “amine blush.” Humidity, temperature and resin chemistry play into the extent of these problems. The upshot is that the epoxy has to form a secondary bond with the in-mold coating unless it is carefully timed. The only way around this is to apply the in-mold coating and then apply subsequent layers (skin coat, laminate, etc.) before the surface coating is fully cured. Epoxy has a relatively long window between initial gellation (getting hard) and complete cure (maximum cross-linking) so there are hours or even days when you can take advantage of this partially cured phase.
Chemical (and Water) Resistance
A cured resin is always somewhat permeable at the chemical level and this can be a problem. The primary issue is that other chemicals can infiltrate the laminate and break down the resin. Generally speaking, epoxies have the best chemical resistance followed by vinyl-esters and then polyesters. In practice, there are numerous formulations of each type (and overlapping types) that are specifically designed for certain demanding applications. If you have a specific chemical in mind, do some research with your resin supplier (or shop around) and find a product that is known to work well.
The ester groups in polyester (and vinyl-ester – on a lesser scale) are susceptible to break-down especially in water. The water infiltrates the laminate and creates pockets of broken-down resin that then expand and cause “osmotic blistering.” This is a big problem with submerged items like tanks and boats and pipes. There are many resin sub-types that have better resistance to water and these are often used as a surface layer.
Continuous submersion in water also reduces the mechanical properties of most resins (more for polyesters, less for epoxies) as water is absorbed and as degradation takes place. They get heavier too with the absorbed water riding along.
Epoxy doesn’t have ester groups and is much less susceptible to chemical (or moisture) transmission or breakdown. For long term chemical or water resistance, epoxy will provide the best solution – but it may be best to apply it as a barrier coat or a skin-coat without the need to build your whole structure from epoxy. Vinyl-ester may be totally adequate – and in most cases this is considered just fine for submerged laminates.
Thermal Stability
All thermosets get more stable as their density of cross-linking reaches its ultimate potential. To get there, you’ll usually need to post-cure your laminate. There is a limit though to the heat that even a fully cured resin can take before it starts to soften. As they are heated, cured thermosets make a shift from hard crystalline structures to a more amorphous polymer – they get rubbery! The temperature at which this shift starts is called the “glass transition temperature” – aka the “Tg” – pronounced “Tee sub gee.”
At and above the Tg, pretty much all the desirable properties of thermosets start to drop off and they won’t be back until the polymer cools off and becomes crystalline again. Unlike with thermoplastics, this softening can’t be used to change the shape of parts – they’ll just break.
The Tg of a thermoset is determined by the type of chemistry and by the degree to which the resin is fully cured. A post-cure is just a slow and deliberate way of pushing up the completeness of the cure so that the resin’s “ultimate Tg” – the best case thermal performance – can be reached. If a part that is not completely cured is subjected to increasing temperatures, it will have a lower Tg than if it were fully cured.
Resin data sheets will often show a “first heat Tg” as well as an “ultimate Tg” and something else called a “heat deflection temperature” (HDT). While Tg is a measure of the chemical “freezing” and “thawing” point of the resin, the HDT is a measure of when the resin actually physically gets softer by some specific mechanical measure. They are usually pretty close unless you’re using a filled resin system where the filler affects the actual performance at some point. The HDT measure is probably a better measure of when you’ll actually see the resin become softer. You should avoid getting close to that in service!
In very general terms, polyester is less thermally stable, while vinyl-ester and epoxy are better. This isn’t the whole picture. There are plenty of polyester resin systems (and associated catalysts) that deliver high Tg/HTD laminates. At the same time many epoxies (especially general purpose 5:1 systems) offer relatively low thermal performance and ultimate Tg’s in the 150F (65C) – which is enough to soften in the sun if painted a dark color.
Epoxies (especially pre-preg or tooling systems) can have Tg’s up in the 300F (150C) range – and higher. These require careful cure cycles (or postcures) and can remain very stable. Beyond that, BMI (bismaleimides ) and CE (cyanate ester) resins offer incredible temperature performance – but at some added processing complexity. So if you’re building rockets or jet engine ducts – look into those!
Price
Epoxy is expensive – but you get better performance. Polyester is cheaper but heavier and weaker. Vinyl-ester is in the middle. Imagine that you have a continuous line with spray-up ortho-polyester on one end and pre-preg epoxy laminate cured in an autoclave on the other. There’s a huge range in price and performance. And sometimes the required manufacturing method is much more of a cost-concern than the material themselves.
Your goal in evaluating (or reevaluating) a resin system is to spend your money right up to the point where you don’t want to pay for the next little bit of performance. Economists call this “the margin” – where you look at the next little step and see if you like it. There will be a point as you work along the price curve where you’ll say “Enough!” – we can’t go any weaker, more expensive, [other metrics], etc. You will find that the curve isn’t a straight line for whatever job you are doing. You won’t weigh all the parameters the same – and you shouldn’t!
Here’s a graph of average retail prices for thermoset resins taken from five different US vendors in 2020. The range is huge – with some vendors charging double the price others charge for similar materials. The products are not the same formulations but they are similar enough that I have divided them into these categories. The prices themselves may be lower at industrial quantities, but relative to each other this should provide a useful reference:

Shrinkage
Finally – shinkage – or how much smaller the resin gets when it cures. Shrinkage rates for epoxy resins are around or below 2% – effectively zero with pre-pregs or post-cured laminates. Shrinkage is usually higher – 4-8% for polyester or vinyl-ester resins because of continued exit of un-reacted styrene. Reduced shrinkage helps eliminate print-through in cosmetic situations. Most importantly it contributes to the much better adhesive properties of epoxy resins. You can do things to make polyester and vinylester resins shrink less – additives, blending and controlling exotherm… but it requires trade-offs and a well controlled process. The trouble comes when you have to weigh the complexities of epoxy-compatible gelcoat and possible post-painting vs. higher shrinkage but fully in-mold gelcoat.
There are specialty resin systems that allow you to get very good part performance and cosmetics from polyester and vinyl-ester resin systems – but not with general purpose resins. If you have a look at a boat (or RV) show at all the expensive shiny surfaces, you’ll see lots of gelcoat without much of the waviness or print-through that is so easy to get. People have figured this out. You have options – talk to your resin supplier and do some test panels to subject to thermal cycles and testing.
Conclusions
So there you go – all decided! I hope this article has provided some background information to help you make your thermoset resin choices. My best advice is to see what other people use in similar situations and then to ask resin suppliers for advice. They want you to have success and will be able to help you steer clear of major problems.
Lots of these questions are almost impossible to answer. For example:
- How much will you be willing to pay to have slightly better cosmetics on a part where shrinkage is an issue?
- Can our moisture-intrusion concerns be satisfied with an iso-polyester or do we need to go to vinyl-ester? And if we need epoxy then we have to re-design the whole process!
- Is it worth making the part in epoxy over vinyl-ester to increase strength if we have to post-paint instead of gelcoat in the mold?
And on and on forever! The best thing is that you can be more aware of the options and more open to looking around for solutions to problems that may come up. It’ll never be obvious, but the more you know about the options – the better your questions will be when you face new manufacturing challenges!
Additional Resources
This is just some tabs I didn’t want to lose that are relevant – needs way more work. Please let me know if you have any additional resources that should be linked here. Thanks!
- MULTI-COMPONENT PEROXIDES FOR IMPROVED CURE (PDF)
- Optimizing Peroxide Performance for Vacuum Infusion (PDF)
- A 15-Year Study of the Effective Use of Permeation Barriers in Marine Composites to Prevent Corrosion and Blistering (PDF)
Note:
This article is for educational purposes. It is meant to explain the diverse world of thermosets commonly used in the composites industry! I am not a chemist and not a sales-rep for a resin manufacturer – so this is based on experience and research but not necessarily fact. If you are an expert at any of this and would be willing to explain things, I would love to edit this to make it better. I am happy to include your insights (with a link to your company or personal work) if you can help me make this a more useful resource.