There are lots of different ways to build with composite materials! The variety can make it really confusing to choose what path to go down with your project. Adding to the complexity is the fact that two very different techniques can produce what looks like the same outcome. This article is an overview of the most commonly used methods of manufacturing composite parts – with a focus on thermosets. Where possible I will supply links to my series of videos showing the construction of flat panel laminate samples – because watching a guy make a sheet of something is a great way to strip away lots of distracting variables.
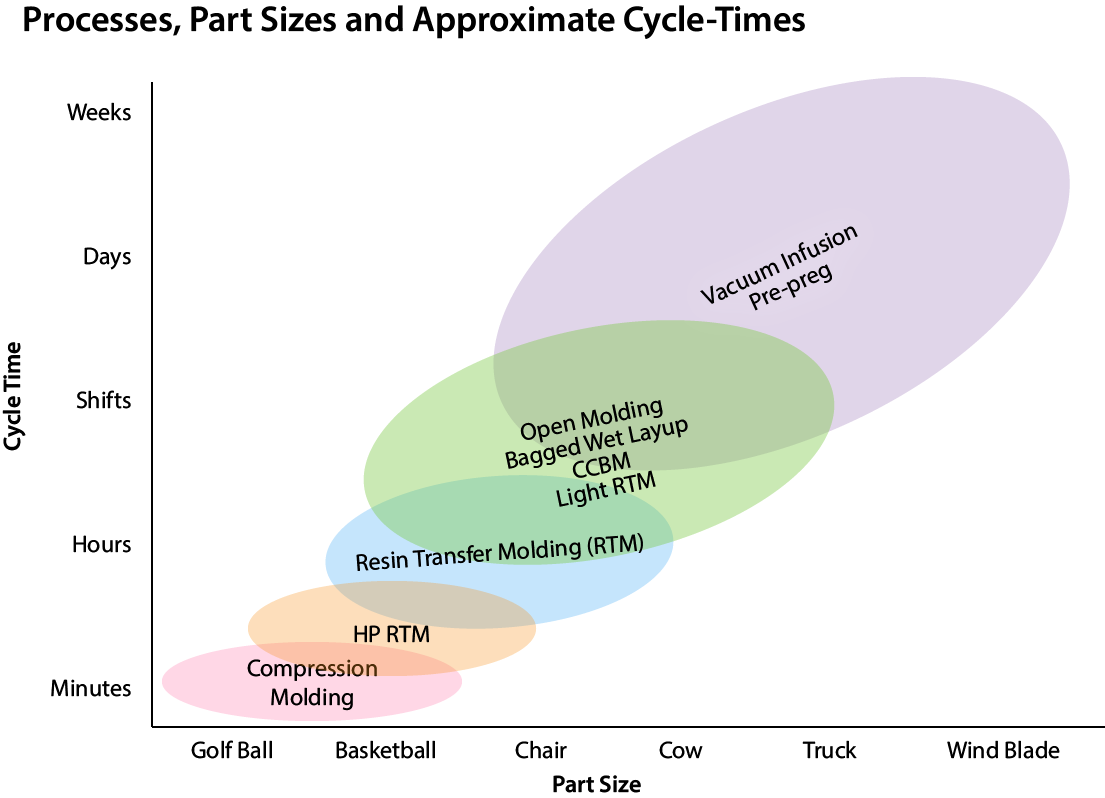
Because the processes are so different and suited to such a wide variety of part sizes and types, here is a quick chart to give an idea of methods by part size and required cycle time:
Hand/Wet Layup
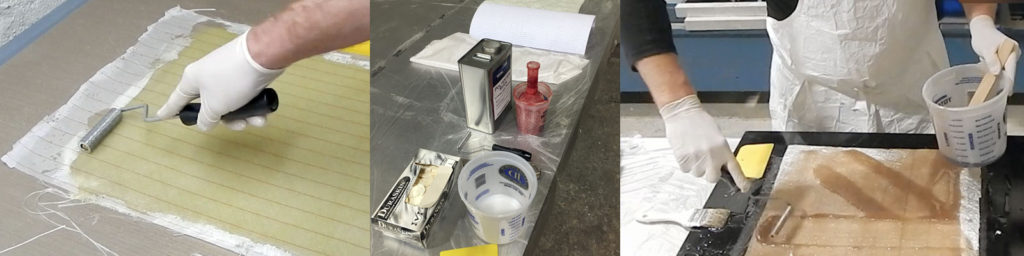
Hand layup (or wet layup) is any process where a human laminator manually applies the resin and the reinforcement. From there it can be rolled out and left to cure, or vacuum bagged. Hand layup requires that all the details and laminating features be accomplished before the resin starts to cure. This can really limit the amount of tailoring and detail that is possible. In general, wet-layup can range from among the cheapest methods – using a chopper gun and a roller – to a very expensive relatively high-performance option with vacuum bags and epoxy.
Spray Up
There are machines that mix resin and spray it out of a gun along with little, short (12-100mm / 0.5-4″) strands of fiberglass roving. Generally called “chopper guns” or “spray-up” equipment, these machines combined with a skilled operator can laminate really fast – and depending on the attention paid to rolling the laminate – potentially neatly. The resulting laminate is not high performance. It is resin rich: easily 60% resin by weight – and thickness is variable and often hard to control.
For parts where weight isn’t a big issue, but gelcoated surfaces and complex geometry are – it can be ideal. Machinery housings, vehicle panels, shower enclosures, tanks… there are many applications where spray-up laminating is a great option. It can be miserable work through and requires good personal protection equipment and a good air circulation system. The output is highly worker-dependent and poor attention to detail can result in voids, porosity and surface distortion. Expect a fair amount of patch “rework” especially on radii and detailed areas unless you have an excellent team – and even then…
Open Molding
Open molding is the process of “wetting-out” dry reinforcements with resin in a mold without using any additional consolidation step or pressure. The reinforcements can be wet-out in place or on a table or even run through a fabric impregnator – a machine used to wet out large volumes of reinforcement at a time. The results are highly dependent on the skill of the team doing the work, and like spray-up, rolling the laminate to remove air is a critical step. Because reinforcements are cut off rolls and placed in the mold, the thickness is much more consistent. Laminators must be aware of slip joints in corners and be careful to orient plies correctly. All this happens under the constant ticking clock of the resin’s gel time. Once the resin starts to cure, times up!
Here are a few Laminate Samples showing examples of open molding:
- Laminate Sample #6: Open Molded E-glass / Polyester with Coremat
- Laminate Sample #8: Open-Molded E-glass / Polyester with Gelcoat
- Laminate Sample #10: Open Molded E-glass / Epoxy Sheet
- Laminate Sample #29: Thin Open Molded Chopped Strand Mat / Polyester Resin
Open molding is suitable for projects that need the strength of continuous fibers in addition to complex geometry and gelcoat surface finish. Parts can have variable thickness and additional reinforcement as needed and can make use of cores like Coremat, foam and balsa. Resins are usually polyester or vinyl-ester though epoxy can be a good option for certain types of work. Generally, because of viscosity and cost, it will make sense to vacuum bag epoxy laminates to take advantage of higher performance laminates that don’t make extensive use of chopped strand mat.
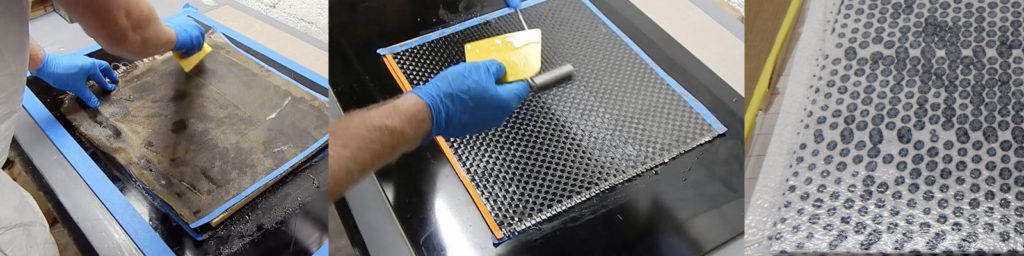
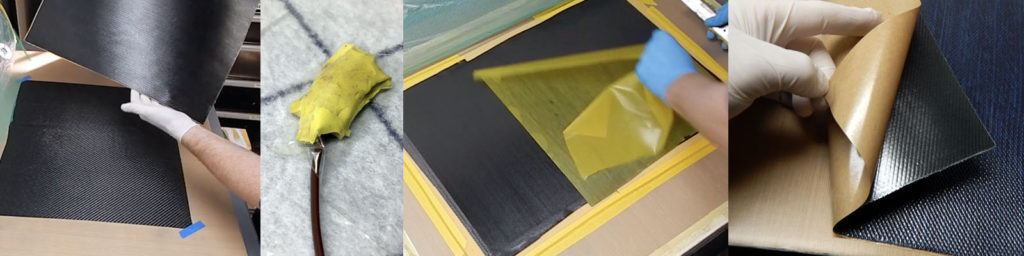
Vacuum Bagged Wet Layup
Bagged wet layup is just like “open molding” up to the point that all the reinforcement and resin are laminated in the mold – except with less resin. Instead of just moving along and letting the resin cure, a vacuum bag and associated bagging consumables are applied to cover the part and vacuum is used to consolidate the laminate and remove excess resin before the resin starts to cure. Vacuum bagging is labor and material-intensive, but it can make a huge difference in laminate performance. Especially with cored laminates, the vacuum bag pressure makes for much better core bonding and helps eliminate voids in the laminate itself. You can, however, overdo it and suck out too much resin – like this: Laminate Sample #5: Vacuum Bagged Epoxy Wet-layup Carbon/Glass on Corecell!
Bagged wet layup is probably best used for low volume parts on tooling that is either not 100% vacuum tight (for infusion) or not up to high temperature service (pre-preg). For foam or balsa on contoured surfaces, bagging the core is a great idea even if the skins are open molded with only manual consolidation – aka. rolling and bubble-popping. So, if you are only going to bag one thing – make it the core to the mold-side skin. For production purposes, infusion is usually a better and more consistent choice, but it can be heavier for cored parts. There is just too much variability and reliance on skilled labor – and wet layup puts laminators in contact with resin for long periods of time, so it requires significant protective gear – and is miserable work.
This process can be very tidy and can make for excellent laminate quality when carefully done. Core bonding can be a big problem on large parts – resin application and core fit is just too variable. Check out Laminate Sample #15 below to see it done by wetting out the fiber on plastic – like a half-step toward pre-preg – though the resin gel time is still a limiting factor on layup time.
Here are some Laminate Samples showing bagged wet layup:
- Laminate Sample #15: Vacuum Bagged Wet-Layup Carbon with Foam Core
- Laminate Sample #22: Vacuum-Bagged Kevlar / Epoxy with Aluminum Honeycomb Core
- Laminate Sample #24: Spread-Tow Carbon / Epoxy with Foam Core
One situation where bagged wet layup is a best answer is with laminating secondary bonds to assemble components of a structure. Often parts molded separately are assembled and bonded with fillets of filled resin – then the two parts are “taped” or “tabbed” together with wet-laid material. Generally, “tabbing” implies open molded “mat, biax and polyester” secondary bonding, where “taping” implies bagged wet layup typically with epoxy. I’m sure depending on where you live and who you hang out with, there are plenty of totally different terms! While “wet” secondary bonding is an amazing way to connect pieces of a high-performance structure – it is not production friendly unless “one a month” is your rate. You really have to care about minimal weight and tough connections to make it worth the effort over more repeatable flanged and bonded parts.
Infusion
With vacuum infusion, you place a stack of dry fiber reinforcement in the mold followed by a vacuum bag with some fancy plumbing over the top. Then you pull a vacuum on the stuff under the bag and allow the pressure differential between the inside of the bag and the outside to push some resin into the dry laminate. That’s vacuum infusion! It’s not intuitive and you really have to see it to get what’s happening.
Infusion can be done with disposable vacuum bags, re-usable vacuum bags (CCBM) and even hard two-sided tooling – which is sometimes called “vacuum assisted transfer molding” or “VARTM” if you’re an engineer. Because of the potential for careful fiber and core loading, repeatable resin content and re-usable vacuum bags, infusion is a great choice for production. Once the process is dialed in, variability can be low and part quality high – especially because resin fills in any potential voids.
Resin transfer molding (RTM) is similar, but with RTM the resin is forced through the laminate stack using much higher pressure. More on RTM below.
Vacuum Infusion (aka: Resin Infusion, VIP)
This is the standard disposable-bag vacuum infusion process. When people say “Infusion” this is what they mean! It is a very useful and efficient process for building large, complex parts with excellent laminate performance – exceeded only by pre-pregs.

Infusion usually requires some type of “flow media” to allow resin to travel through the part to displace air and wet out the reinforcement and core. This can be a disposable surface flow media, a interlaminar flow media, or a core with flow features. The process requires careful setup and training. Mistakes are often big – on part-scrapping scale! It is still probably the best overall manufacturing method for larger high-ish performance composite parts.
For more on infusion, check out this article: Introduction to Vacuum Infusion
Here are several Laminate Samples from the Library showing vacuum infusion:
- Laminate Sample #3: Epoxy Infused E-glass with Soric Core
- Laminate Sample #20: Infused E-glass / Vinyl-ester with Soric Core
- Laminate Sample #28: Infused Carbon / Epoxy with Corecell Core
- Laminate Sample #30: 6mm (0.25″) Infused Carbon “Tooling” Plate
VARTM (aka: LRTM, Vacuum Molding, Light-RTM)
Vacuum Assisted Resin Transfer Molding (VARTM) can cover a lot of bases, but typically is describes a process like vacuum infusion, but where instead of a bag, there is a second hard or semi-rigid tool. Dry fiber is laminated in one (or both) halves of the tooling and then resin is infused into the cavity using atmospheric pressure only. VARTM is different from RTM in that RTM uses much more pressure – and requires tools to be very heavy duty and well clamped.
Closed-Cavity Bag Molding (CCBM)
CCBM is one name for reusable bag or “soft” B-side tool. Like VARTM or VIP, the resin is infused using vacuum-pressure only through a part cavity. In this case the bag-side is usually a silicone or rubber reusable shaped bag with built-in seal features and often a perimeter vacuum clamp. It is a good process for larger or lower volume parts and produces parts with a smooth but not finished B-side surface. Reusable bags are faster and easier to use, as well as reducing the waste process materials that come with disposable-bag infusion. Generally this is only done with polyester or vinyl-ester resins because epoxy is hard on silicone bags!
Pre-pregs
With pre-pregs, the fabricator gets the resin and the reinforcement pre-combined – suspended in a partially cured state. The manufacturer of the material has applied just the right amount of resin and then partially cured (usually) and frozen the “pre-impregnated” reinforcements, stopping the cure and allowing the pre-pregs to be stored in frozen state for months or years. Fabricators will thaw the pre-preg and laminate it into molds, adding cores and features with high precision and repeatability. To cure the pre-pregs into completed parts, they have to be “cooked” in an oven or autoclave. The elevated temperature starts up the curing reaction and the resin flows and then hardens – leaving a laminate with a very precise resin content.
For more information, here’s my article: Laminating with Prepregs.
Pre-preg is really only a good option if you are building relatively high performance stuff – and if you have the budget for it. Mandrel molding, press molding and layups consisting of heavy unidirectional “spars” are usually best done with pre-pregs. Really light stuff – like airplanes, race-cars, space items and high-end sporting equipment are usually built using pre-preg materials.
Here are a few Laminate Samples showing pre-preg in action:
- Laminate Sample #2: Pre-preg Carbon on 15mm Nomex Core
- Laminate Sample #4: 3mm Balanced QI Epoxy Pre-preg Plate
- Laminate Sample #14: Pre-preg Carbon on Aluminum Honeycomb Core
Resin Transfer Molding (RTM)
Resin Transfer Molding is like infusion, but instead of using the difference between vacuum and atmospheric pressure to drive resin into and through a dry reinforcement stack – RTM uses a pump or a pressure pot to push it in at much higher pressure. RTM “injection pressures” are often around 10-20 bar (150-300psi) but can be as high as 100bar (1500psi) in certain high production methods (High-Pressure RTM, or HP-RTM) with very short cycle times. This is a lot of pressure! Typically RTM molds are either bolted together or clamped in a large hydraulic press with flat platens to keep the molds aligned. Because there is so much pressure, and it is often done at high temperature, resin injection can be very rapid and cycle time very fast. Many resin manufacturers have developed “snap-cure” resins that are meant for RTM and compression molding. Their goal is to reduce cycle time and make composites more competitive with metals and injection molding for automotive and other high-volume applications.
With vacuum infusion, you might have parts every few hours at best. With highly automated HP-RTM it can be every few minutes. Naturally with all this heavy tooling and presses and clamp frames, this is best for huge runs of smaller parts. You’ll pay up front with much higher tooling and equipment costs but for thousands of parts per month, RTM is one of the best options.
Pultrusion
In the pultrusion process, wet fiber is pulled thorough a shaped die that is really hot. The fiber and resin goes in one end all goopy and comes out a fully cured part. Like extrusion (which is a push process), pultrusion (a pull process – can’t push on wet fiberglass!) produces long things with a consistent sectional shape. It produces them very accurately and economically, so pultrusion is a great option for long skinny things that might replace metal extrusions.
The down-side of pultrusion is that setting up can be a lot of work and specialized equipment is needed. Dies that form and cure the finished profile are expensive and must be carefully designed. You aren’t just going to head out to the backyard and do a little hobby-scale pultruding! But you can find a pultrusion specialist or buy already-manufactured stock profiles which are very handy. Railings, tubes, decking, structural profiles – there are lots of uses for composite pultruded parts.
Filament Winding
Like pultrusion, filament winding is a well developed industrial process that is really good for a relatively narrow band of composites products. Filament winding uses a mandrel, which is usually a very long skinny male mold. The part is made by wrapping tows of wet fiber over the mandrel in a pre-designed way. The tows are usually wet with resin before being wrapped around the mandrel. To control the direction and angle of the wrapping, a carriage with a winding guide is moved along the mandrel’s length while the mandrel is rotated. This synchronized motion allows fiber to be laid at a specific angle – kind of like how a lathe can be used to cut threads! Check out this video from Rock West Composites about filament winding.
Filament winding is used in the manufacture of tubular items, and things with a simple revolved shape. Pressure tanks, tapered poles, spars – the most commonly filament-wound parts are loaded in ways that make lots of hoop (around the middle at 90 degrees to the mandrel) fiber and off-axis angled plies. It is possible to apply fiber at zero degrees (along the mandrel axis) but it is more complicated. Filament winding is typically an “open molded” process, with wet fiber wrapped and consolidated only by the pressure of the tension as it is applied. Sometimes a layer of “pull tape” is wrapped over the outside of the part before curing – this acts to compact the material and gives a nice surface finish.
For higher performance parts using carbon fiber and epoxy, a mandrel-wrapped pre-preg manufacturing option would give much lighter and stiffer tubular structures. This is much more expensive in both labor and material, but for thicker and more highly engineered tubular structures, it is a really good option. It’s more of a “manual tape winding” process and can be cured in and oven or autoclave.
Compression Molding
Like RTM, compression molding is excellent for producing small-ish parts with “all-sides” molded geometry. Multiple mold components and inserts create a cavity that is loaded with the material to be molded. Molds are typically loaded in large hydraulic presses and parts are cured under high pressure and temperature. Compression molding can be done with either thermoset or thermoplastic resins and a wide variety of fiber types and lengths. Complex geometries and variable part thickness are possible, making composite parts that can be functionally similar to metal castings.
Compared to RTM, compression molded parts have the resin already in the mold – not just dry fiber. The clamping pressure compacts the laminate and resin and reinforcements and heat complete. Because the pressure consolidates the entire laminate, compression molded parts can have much higher fiber content than most RTM processes. Naturally, there are a range of hybrid processes that bridge the gap – like “gap RTM” – which is like RTM where the resin is injected into a slightly-open mold that is then compressed.
ATL / AFP – Automated Layup
When you get a robot to actually laminate your reinforcement materials – that’s pretty awesome! Automatic fiber placement (AFP) is a process that uses automation equipment (“robots”) to apply individual tows of reinforcement to a mold surface. These tows can be dry or pre-preg and have either a thermoplastic or thermoset resin system. Automatic tape laying (ATL) is a similar process where a robot places wider tapes of (usually pre-preg) material into or onto a mold surface. The difference is in the “tape” vs “tow” distinction. ATL is typically more suited to laminating larger and flatter surfaces, like wing skins or fuselage panels for aircraft. AFP is more suited to smaller and more complex parts, and because individual tows are not very wide, they can be “steered” as they are applied to the mold.
ATL and AFP equipment is very expensive and complicated, so at this point it only makes sense for large-scale projects where the number of parts to produce is huge – and projected to go on for years and years. The other big benefit is that it is very repeatable and has the built-in quality control by being able to record every move. There is no interpretation or potential for miscommunication between human laminators – and machines can work steadily around the clock. The programming has got to be done carefully though, and human inspectors and operators are required to carefully monitor the process and make sure things are going right. So it’s great if you’re Boeing or Airbus but for your composites shop next-door it’s a ways off.
Have a look at some videos of large-scale AFP machines from MTorres and Electroimpact – these show how big and expensive – and awesome – automated composites can be!
Progress is being made to make automated composites a reality at smaller and less expensive scales. Companies like Automated Dynamics (Check out the videos!), Coriolis Composites and ADD Composites build smaller scale machines for AFP – often mounted on industrial robot arms. These are more flexible for smaller runs of components and can be programmed with simpler and less expensive (but probably still expensive!) software. Flat bed tape laying machinery is also used for building pre-forms for compression molding – usually with thermoplastic resins. This can enable very high production rates and is suitable for automotive applications. Check out this video of a Dieffenbacher Tailored Blank Line from ATL pre-form to press molding.
3D Printing
There are maybe half a dozen serious 3D printed composites companies at the start of 2020 – maybe more. These are the beginning of a convergence of automation and composites layup at a much smaller scale than the ATL and AFP technology used for manufacturing aerospace parts. Check out my End of 2019 3D Printed Composites Overview (now very dated – so much happens in 5 years!) for more on the options. It’s 2025 and things are quickly evolving – going to need an update!
How to Choose
With all these options it can be hard to know which way to go for a given project or component. By defining part size and weight requirements and then thinking hard about budget and quantities to be manufactured – both in total and in rate terms – you can narrow it down. The best thing you can do is talk with potential manufacturers as soon as possible in your process. Asking for a menu of options and for feedback on design details and manufacturing process is always worth the time! You may find that reality differs a great deal from your expectations, and that manufacturers will have different strengths and may be able to offer compelling alternatives if you ask for their input.
More on leading up to this here: Questions to Ask First
And more on this coming soon!