[This article is incomplete and would really benefit from some pictures. I am just parking it here for motivation, so I feel bad about not finishing it!]
This article is about how to use a type of tooling called a “mandrel” to form tubular shaped stuff. The focus is on pre-pregs but these methods can be used with wet layup or dry material that will be infused in-place. Pre-preg is easier though! Here we’re just going to discuss pre-preg processing – and mostly with unidirectional reinforcements.
Process Overview
A mandrel is a round-ish convex male mold. Material is wrapped around it and periodically consolidated (debulked) to remove air and reduce the potential for wrinkles. The consolidation method that is most often used is called “pull-tape” debulking – where a tensioned non-adhesive tape is wrapped tightly around the material, applying pressure as it goes. The tape is then removed (unwound or sliced off) and subsequent plies of reinforcement are applied. For a thick-walled tube, debulking can happen dozens of times. Pull-tape is faster than vacuum bag debulking and much more effective at eliminating wrinkles! You can bag too if you want – over the pull tape – but it is debatable if this is worthwhile.
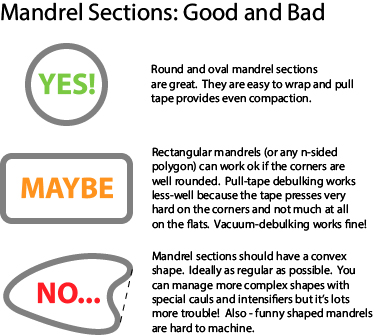
Mandrels need to have either a slight taper or parallel sides, and should be convex in cross section. Generally speaking a circle is the ideal cross section and a square is less good. Because of how pressure is distributed, corners tend to get pressed really thin if using a tape-wrapping method. Any material running the length of the tube is pushed away from the corners – sometimes this is fine, sometimes not.

Mandrels are often aluminum, because the coefficient of thermal expansion (CTE) is especially beneficial. As the part is cured at high temperature, the aluminum expands slightly stretching the fiber tighter (a little) and making the cured part slightly bigger than the mandrel will be when it cools. On de-molding, the mandrel has shrunk down to its room temperature size. The part remains the size of the hot mandrel – so it becomes possible to extract a parallel sided mandrel without draft. You can even put your cooked mandrel and part in the freezer for more shrinking to make the process even easier!
To laminate on a mandrel, first a really good release system is needed. Teflon emulsions are best because they slip like crazy. It’s also super important that the mandrel is geometrically accurate and doesn’t have any thick-spots in the middle or your part may get locked on, even with any expansion that happens during curing.
Tape Wrapping
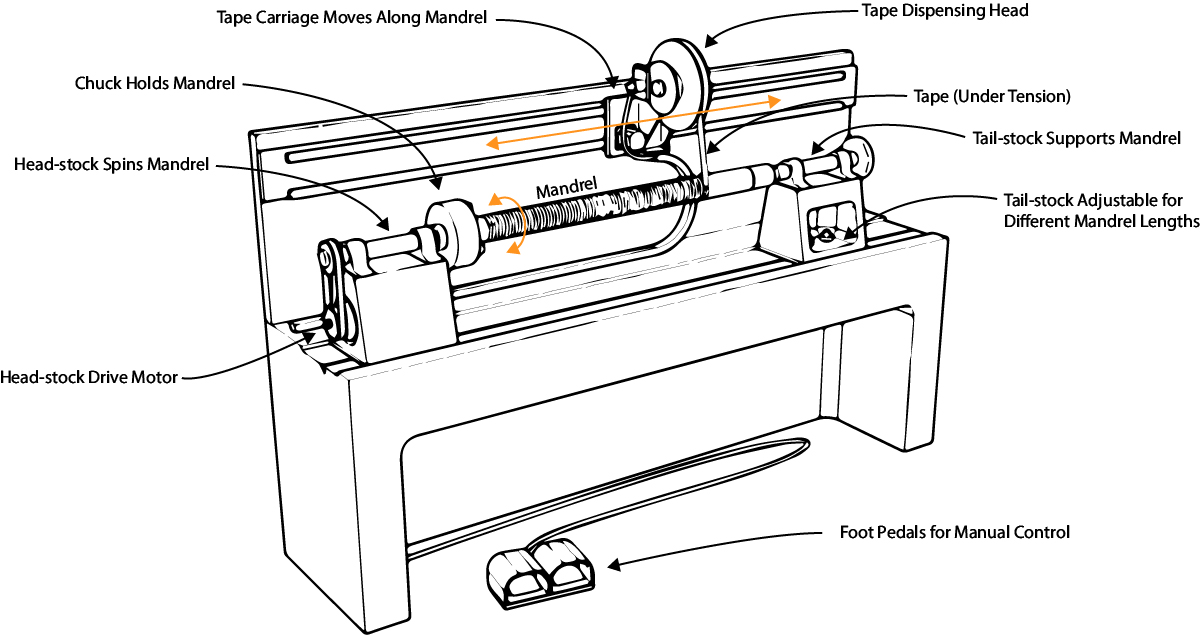
Key to the process described here is the use of a 1-2″ wide roll of non-sticky thin plastic film as a debulking method. The mandrel and laminate are spun while this tape is applied under tension. This is easiest with a somewhat specialized machine – that can be simple or complicated depending on scale and fussiness.
The semi-stretchy tape (“pull-tape”) compacts the pre-preg laminate as it winds down the length of the part slowly advancing. Once the part is fully taped, it can be vacuum debulked too (more on when later) or you can just unroll the tape and apply the next ply.
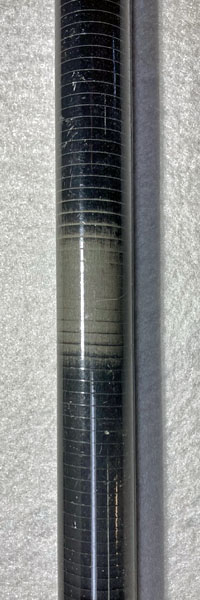
Pull-tape left on during cure is what makes the little rings you see around mandrel-molded parts – from golf-club shafts and fishing rods to huge yacht masts and drive shafts. Most tubes are cured with pull-tape in place, but for structural parts that will be secondary-bonded or heavily primed and painted, it is common to wrap with slit peel-ply instead. Remember that the peel ply will soak up resin!
Layup
The first ply of material is wound on and then either debulked or additional plies go on before debulking. With pull-tape debulking, it is much better to debulk over a zero-degree ply – one that runs the length of the part. As each group of plies is laminated and debulked, the goal is to avoid wrinkles and minimize laps which make a bump for the subsequent plies to go over.
Ply orientation is described relative to the mandrel-axis – which is usually called “0” for the part. Material is wrapped around the mandrel for each ply. “Zeros” or 0-degree plies are easy because you just wrap them around the mandrel and trim off any overlap. You can also carefully plan ahead and pre-cut the plies!

Plies running around the mandrel in the 90 degree are called “hoop” plies. And you can’t really “wind” a genuine 90 degree ply because for a continuous strip to approach 90 degrees to the mandrel axis, the width of the ply approaches zero. Practically a “90” is really more of an 80-85 degree ply! You have to strike a balance between annoyingly thin (and therefore extremely long) strips vs. not actually being 90-degrees to the mandrel. In practice, most 90-ish plies are made of strips several meters long and 6-12mm wide and are butted, scarfed (cut a bevel and but along the bevel) or lapped 10mm or so when one strip runs out and another begins.
Things get more complicated with “off-axis” plies. For a 45-degree ply, there is a specific width of strip that will wrap around a cylinder edge-to-edge at 45 degrees from the mandrel axis. Option one is to lay out your strip dimensions as described below in the “Laminate Details” section and pre-cut a strip to the exact width to force a 45-degree orientation when wrapped without gaps or overlaps. Option two is to position a thinner strip at 45 degrees and wrap it in a spiral leaving a consistent-width gap which you can come back and fill in.
For parallel sided mandrels, the relationship is linear between ply orientation, width and length – it’s just trigonometry. The key idea is that every ply for a given diameter (mandrel plus prior plies) has just one area. If you make a parallelogram-shaped strip that is that area, it will cover at some given angle. Very thin and long strips are closer to 90, strips very nearly the circumference are closer to zero. Practically, it is important to remember that the ends are going to be parallelogram-shaped! It’s no fun to wrap a 45 and come up short.
In many cases tubes (especially round, cheap one’s line golf-club shafts) are often cured with only pull-tape for compaction. For thicker or more demanding parts, pull-tape plus a vacuum bag is an even better option. The gold standard is a cure cycle in an autoclave, where the pressure applied by the vacuum bag is multiplied many times. Generally, no resin is bled off in curing, but it can be if you want. There is a risk of wrinkles forming if too much is removed, and the overall diameter of the outer plies is reduced by even a little. Wrinkles can result!
Mandrel Details
If you don’t get the mandrel right you won’t get your part off of it. The section has to be very consistent and there can’t be any major variability in diameter. Dents in a mandrel will cause the part to cure into the dent, requiring major deformation if the part is to slide off the mandrel. For thin-walled tubes this can happen – for thicker stuff it’s not going to work. I have a mandrel and carbon tube from one of my earliest attempts still forever attached because I didn’t do a good enough job preparing my mandrel surface.
From the right cross section shape, the surface must be prepared with careful sanding. A polished surface will work great, but 400 grit sandpaper works ok too. Deep sanding scratches or dents are the big problem. Sanding should always be done along the mandrel-axis so any scratches are at least pointing in the right direction.
You’ll want to consider a hole in one end of the mandrel on one end so that it can be held securely when the mandrel is extracted (part demolded) from the finished tube. This can take a bit of pulling! In the one-off world of boat stuff I have done this with chain-falls, forklifts and trucks. In a production situation, hydraulic rams and cable/winch systems are ideal. Also, if you are holding it with a lathe center on one end of your spinning machine, now is a good time to spot a hole for the lathe center to engage.
Laminate Details
Your laminate needs to be designed to provide the structural requirements you need and to meet the requirements of the process. While it is totally possible to use tapered laminates and additional patching, the base laminate of the tube will most often consist of fiber mainly in the 0-direction, with some +/-45 (or 30, or 60) plies and a small amount of “hoop” or 90-degree material. A common distribution is 60% of the fiber at 0-degrees, 15% at +45 and 15% at -45 degrees and the remaining 10% at 90 degrees. All-zeros works ok for small things like arrows or golf-club shafts, but doesn’t hold up well at larger diameters.
It is almost always best to avoid lapped plies in a tube layup. The lap isn’t necessary, and it creates an out-of-plane jog in subsequent layers. For this reason, it is almost universal to add any local reinforcements to the outside of the tube laminate. Symmetry in a tube is less important than with a flat part because the coupling effects are offset by the geometry of the tube (Note: I understand this to be true but do not have a reliable cite-able source). It is almost always best to have balanced laminate – with any +X oriented ply matched by a -X somewhere (preferably close by) in the stacking sequence. Because pull-tape debulking really only works well on 0-degree plies, it is common to separate +X and -X pairs by a single 0-ply that can be tape-wrapped without distortion.
Example: Tube made from 300gsm unidirectional with 200gsm twill surface ply. [90, 0, 0, +45, 0, -45, 0, 0, 200T:0/90] Underlined layers would be where I’d debulk.
Woven patches are also very common, both inside and outside. Placing woven material inside a tubular part will make it less likely to delaminate if holes are drilled or cuts made. It is all too easy to “unzip” a strip of unidirectional material! Ideally woven plies should be on both the inside and outside where cuts and holes will happen. For isolating carbon in the way of metallic fittings, plies of e-glass can be laminated right against the mandrel or as a final patch under where hardware will be located.
Because parallel-sided mandrels can be hard to extract from parts, it is helpful to use a 90 degree (or close to 90) initial ply over the mandrel. This is called a “hoop” ply because the fiber goes right around the circumference of the part. It can either be wound on – in which case maybe it’s an 80-85 degree ply – or applied as part of a woven ply. For thicker laminates, this is almost essential. It helps lock the cured part into the “large” size of the hot mandrel and prevents distortion in thinner-walled tubes during the demolding process.
Now, calculating the sizes of you plies for each layer can be done pretty easily. My advice is to visualize each ply as a rectangle of material unwrapped over the mandrel. Continuous strips run off the bottom of the rectangle and magically reappear at the top as they would when wrapped around a cylinder. For each ply angle and base cylinder (mandrel or previous layer) diameter, there is just one width and length of strip that will work – and it will be a parallelogram instead of a rectangle because it will taper out at each end.
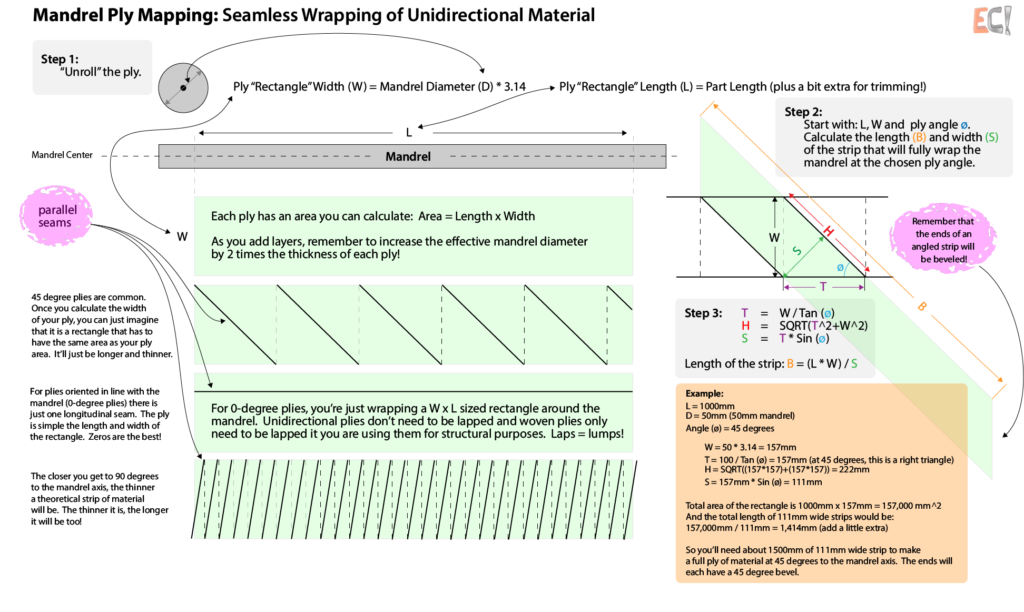
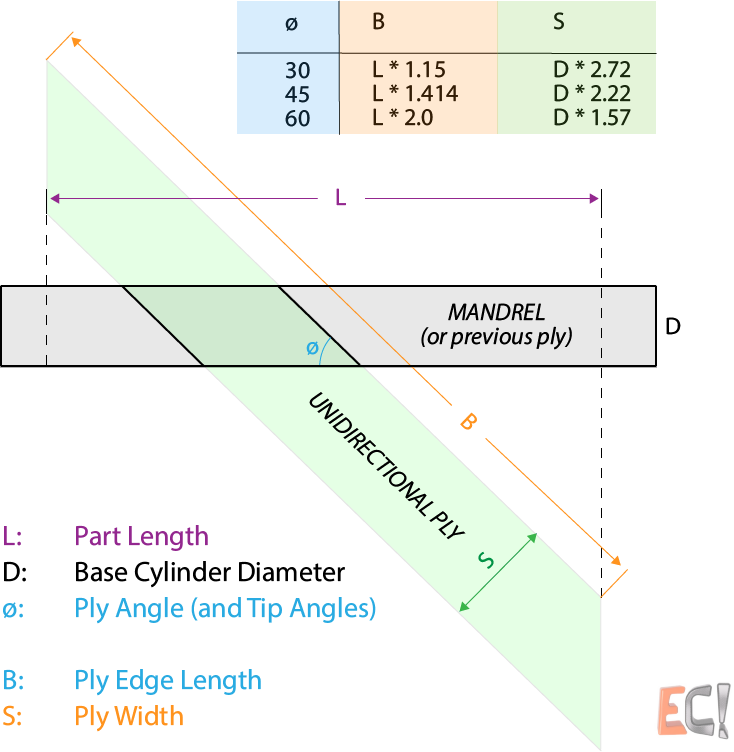
You will find that for each angle, the strip width is proportional to the mandrel diameter and the strip length will be a constant multiple of the mandrel length. The area of the strip with beveled ends is always the same as the surface area of the rectangle that would just wrap the outer surface of the mandrel or previous ply. It all scales linearly and is easily calculable – at least for un-tapered mandrels.
A 45 degree ply will always be a parallelogram about 1.42 (better to round up!) times the length of the base surface. The width will be 2.22 times the diameter of the mandrel – or the diameter of the prior ply on the mandrel. Once you know these multiples for a given angle, it is easy to map out your plies. The parallelogram’s ends are the angle at which you are wrapping – so 45 degrees in this example.
Zero degree plies are just large rectangles with square ends that have a width equal to the circumference of the base cylinder, and the same length. These are easy! Practically, it is best to cut these 1/4″ (6mm) wider than they need to be so there will be a small lap to trim off.
As you approach 90 degree plies, the strips become really skinny and really long. There is a practical limit to how close to 90 you can get and not have a mess that takes forever. Most of the time it is ok to select a practical width – like 1/2″ (12mm) or so (this will depend a lot on your mandrel diameter) and cut roughly the right number of strips at a practical length. These skinny strips can be wound and then either butted or lapped when one ends and the next needs to begin. Lapping actually easier because the ends stay put, but it will make a little bump. On a part of any thickness, this gets lost in the layup and won’t show up much on the surface.
Layup Details
The trick to laminating is to avoid laps along the edges. Small gaps are ok and will generally fill with fiber and resin during cure. For zeros, this is easy because the joint is very simple to trim. For spiral-wound off-axis plies like 45’s, it can be much harder. Getting the ply set at the right angle takes some practice, because it needs to be aligned right and also quite tight. There can be very little cheating sideways as you wrap – especially with wider strips on larger diameter parts. On more complicated larger parts, off-axis plies can be split into multiple widths and wound separately. This will often require a trim but can be a good way to make awkward shapes easier. See about 1 minute into this video for a look at how it is done.
Pull-tape debulking is done either after every layer or after every few layers. It is best to pull-tape debulk only after placing 0-degree plies – and worth planning your stacking order to make this possible. It will cause fewer wrinkles – wrinkles you can’t really fix once they happen. Tape debulking can be done by holding a roll of mylar pull tape with heavy gloves and after wrapping its end over itself on one end of the laminated mandrel. You’ll need a way to spin the wound mandrel – see the “spinner” shown above. This can be as simple as having somebody else turn the mandrel while you apply pressure with the tape. Advance each wrap only a fraction of the tape width to avoid ripples. This gets real old really quick if you don’t have a mandrel spinner with foot pedals or some other type of automated control.
You can also look into “roll wrapping” which is similar but uses a machine with two large platens that roll the fiber up on the mandrel by sliding the platens by each-other. This is a production process and only makes sense for high volumes of relatively small tubes.
Curing
Before curing, it can be helpful to wrap with tube with slit peel-ply to get a ready-to-bond surface. Get neatly slit peel-ply or it will be a huge mess because the edges will fray and become very hard to remove. Apply pull tape over the peel ply (or if you skip the peel ply for a shiny pull-tape surface) with a small (1/8″/3mm is good) advance per wrap. This uses lots of tape, but it eliminates ripples from uneven tape tension. You can pull the tape pretty tight – just avoid breaking it!
You can also use heat shrink tape for curing, but the risk of wrinkles and “waves” goes way up. It can work great though if you dial in a process. My advice is to avoid it unless you like adventure!
If you are curing in an oven, cover the pull tape with breather and a tube vacuum bag. Seal the bag at the ends to the mandrel if it is hollow, or enclose it fully if it is solid. In an autoclave, you can skip the breather or use much less of it – even some strips of peel ply outside the pull tape will allow air to flow out.
Be careful to support the part straight and without too much pressure on the part surface. A large part laying on a table can develop a flat spot from its own weight as it cures. Holding things up so there is no pressure is always a good move. For small light things, just laying the bagged mandrel on some breather cloth seems to work fine.
Demolding
After cooking, you’ll need to get that part off the mandrel. If all went well, it may even be a job you can do by hand. For larger things, secure one end of the mandrel to something very beefy. Using a rope and some straps, secure the tube to something movable and strong. Hitch the rope or straps around the part back from the end and stand off to the side keeping pressure on the tail end as you pull on the rope with the strong movable thing (forklifts are excellent). The mandrel should slide off. Be careful not to bend the mandrel or crush the tube once it comes clear of the mandrel end. This can all be done on the ground with a chain fall more safely, but it’s less exciting. Really though, be careful. This is a recipe for injury – especially if you are applying lots of load. For any kind of production environment, get a fixture and some hydraulic press parts and do it more safely!
And if you’re struggling to get your part off the mandrel, try putting it in the freezer (or a snow bank) for a few hours. CTE can keep working to loosen things up – even below room temperature.
Resources
Flexicon Pacific – Supplier of mylar “pull tape” for debulking.