This article is about how to make vacuum bags for use with composites. We’ll start with what vacuum is and then discuss how to harness the heavy ol’ atmosphere to clamp your stuff. Specific details about how to do it come next, followed by some common problems and how to avoid them.
You may also like these other articles:
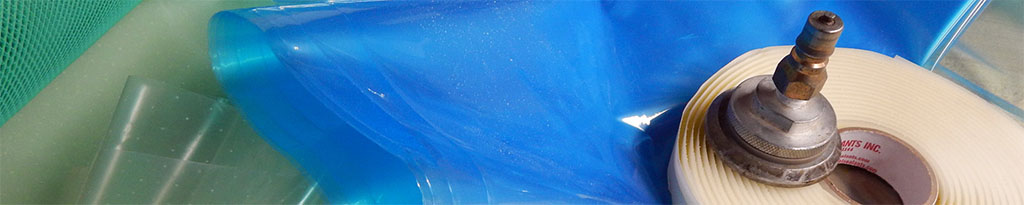
Table of Contents
- How Do Vacuum Bags Work?
- But First, Story Time
- Equipment
- Materials
- Vacuum Connection Options
- Making a Bag
- Three Potential Mistakes (that I have made a lot!)
- Pleats
- Tailoring
- Finding Leaks
- Bagging to the Part Itself
- Envelope Bags
- Common Problems
- Wet-Layup Concerns
- Infusion Concerns
- Pre-preg Concerns
- Debulking Bags
- Conclusions
How Do Vacuum Bags Work?
Vacuum bags are a common and effective way to put pressure on composite materials. The pressure is huge compared to clamps or weights – and uniform. It works because the earth’s atmosphere is actually kind of heavy – and pushes down on everything at around 14 pounds per square inch! We’re used to it (and built for it) of course so we don’t notice.
A vacuum pump and bag allow us to remove the air from an enclosed volume. Without the inside air pushing back we get the full weight of the atmosphere bearing down on whatever is in the bag – from all sides! You have to see it to get a feel for how much pressure you can bring down just with a sheet of plastic. For a 1 square foot area you have 12” x 12” = 144 in^2 and multiply that by 14 psi and you have 2016 lbs of atmosphere pushing down on that one square foot! Try doing that with lead weights or a bunch of clamps!
With the great power of vacuum bagging come plenty of challenges. The bag has to be relatively leak-free and the plastic can’t press unevenly on the work-piece or it can do serious damage. It’s pretty easy to use the bag to pop itself because plastic film isn’t that strong. Lots of other things can happen… Over decades of development, people have come up with lots of great products and techniques to make the process easy and effective. I’m going to share what I know here an hopefully spare you some of the mistakes I have made.
But First, Story Time
I’ll start with a story of my first vacuum bagging experience – probably in 2004 or so. Having done plenty of hand layup and “glassing” of wood with epoxy and fiberglass cloth, I was attempting my first part on a mold with foam core. It was a cylinder section about two feet long and the core wasn’t going to bend over it and stay without some pressure. This was before I knew about kerfed core or thermoforming. I read an article about vacuum bagging and had some materials I’d ordered. It was going to be awesome!
First off, I put “tacky tape” (aka “sealant tape”, “bag mastic” and “dum dum”) around the outside of my mold a few inches beyond the edge of the part – and then I laminated one skin of glass and placed the foam on the part – all gooped up with resin. Then I put some peel ply on top and some breather fabric. The foam wasn’t bending into place so I just laid them over the top and figured I’d work it all into place as the bag came down. I placed a big sheet of vacuum bag film over all of it and started to stick it down to the tacky tape around the mold. This is when I started having problems…
Some resin had run out and gotten on the tacky tape so the bag wouldn’t stick in a few places. The bag also got all bunchy and there seemed to be more bag edge than tape – except in one corner where there wasn’t enough! I finally got it all kind-of-stuck and put a piece of plastic tube that was connected to the vacuum pump inside the bag through a hole that I wadded up with more tacky tape. I turned on the pump and waited.
Slowly the bag shrunk down and crinkled into place and I worked the foam down over the surface of the cylindrical mold. I was only 1/8” core and it went pretty easily. The bag kept popping up off the tacky tape in the spots where resin got under and I held it down with Duct tape – and lots more tacky tape. One area there wasn’t enough bag to go into the corner and it stretched and pulled tight – and the tacky tape started coming undone. I couldn’t stretch the bag or pull more from somewhere else so I let it do its thing. I also had to keep pulling the bag out of the end of the vacuum tube where it wanted badly to get sucked in. By now the resin was starting to gel and I was not at all sure that things would be ok. I cleaned up, crossed my fingers and came back a few hours later.
Turns out I had made ALL the mistakes, and I the part I demolded was an expensive heap of trash. The core had popped up, and the bleeder fabric was hopelessly stuck to the peel ply which was bunched up with resin chunks and wanted very much to remain attached to the foam. My corner where the bag wouldn’t come down fully was all puddled with resin and the glass had pulled completely away from the mold. Everything was full of air and the hose to the vacuum pump had filled up with resin – fortunately it didn’t reach the pump!
It wouldn’t be for another year or so that I would get my first real schooling in vacuum bagging. I got a job working for Goetz Custom Boats building carbon fiber racing sailboats – and just about every piece of those boats was vacuum bagged! I was rapidly educated in vacuum bagging basics and I’m still building on that education to this day.
So if you’re anything like where I was with my first vacuum bag – I hope this article helps you do better than I did!
Equipment
First off – to vacuum bag you’re going to need vacuum. You could borrow one from somebody – but don’t suck resin into it!
Here’s my article on How to Choose a Vacuum Pump for Composites.
You’re also going to need a hose to connect the bag to the pump. For many things polyethylene hose is great. Its cheap and stiff and won’t collapse under vacuum. This is the standard for vacuum infusion and can be bough at hardware stores or composite material suppliers. If you’re going to connect it right to your pump, either be very careful or use a catch pot as described below.
Here’s my article on Vacuum Stuff: Hoses, Fittings and Accessories – it is like a more in-depth version of this section.
Generally you should use quick connect fittings only where they don’t run a huge risk of getting gooped up with resin. From the pump to a catch pot or a manifold is great. I use the ISO-B style fittings (see picture) for small stuff. Brass is the best mix of economy and not rusting – stainless is nice but expensive. For room temperature use, you have many options: heavy duty air hose, hydraulic hose, etc. but for cooking it is best to buy purpose-designed cook hoses – they aren’t crazy expensive and hose-failure is a silly way to lose an expensive part.
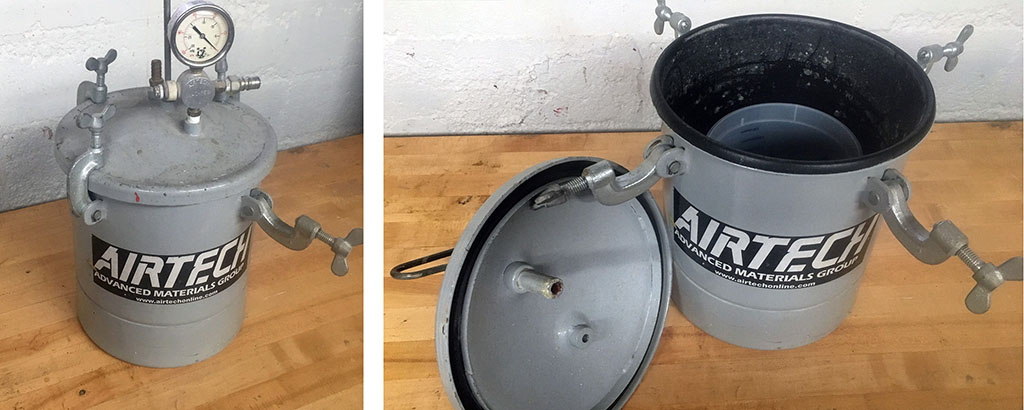
I strongly recommend that you use a catch pot, especially with infusion or big wet layups. This can be a pressure pot with the hose coming from the bag dumping into the pot and the hose to the pump sucking air from the pot – but not resin! If you put a bucket inside the catch-pot (and mold release in there too as backup) you can keep any resin from gooping up your nice pot.
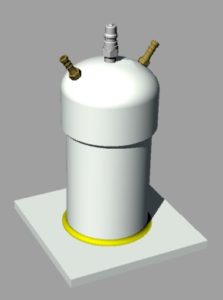
If you don’t want to spring for a fancy pot you can make catch pots from PVC pipe for about $20 US each. I made some of these for small infusions and wet-layup and they lasted for years. Brass barbed hose fittings will glue nicely into PVC pipe caps with pipe cement. When in doubt – add some bag sealant tape! Best to tap the holes, but if not – it’ll probably be ok if you drill holes slightly undersized and make the threads engage. Vacuum will tend to pull things tighter rather than blow it up – which is handy!
The sketch shows my basic design which is far from perfect – but worked for me. The pipe is 4″ PVC with a cap glued on and some barbed hose fittings of the right size for the polyethylene hose that works best for disposable infusion and wet-layup hose. No sense using expensive quick-connects on a catch pot inlet – though you can add multiple inlets and it does make sense to use whatever type of fitting you use for vacuum hoses to connect the pot to the pump. The base is a piece of PVC (or metal, or something vacuum-tight) that is held on with tacky tape (yellow). If you overflow your job and get resin in the pot, you can bust open the base and clean it out after the resin cures – or you can just leave it if it’s a small amount. Either way – mission accomplished – no resin in the pump.
If you have a better or cheaper design let me know – I’d love to add it here if you’re open to sharing.
Materials
The basic materials you will need are bag film and sealant tape (AKA “bag mastic”, “tacky tape”, etc.) Both of these come on a roll, and my advice is to be really fussy about keeping them on their rolls and well protected before use. A tiny hole in vacuum bagging film can totally ruin your day, and is extremely hard to find without the right approach and equipment.
See the Materials Library: Process Materials Reference for more on all these bagging consumables.

Bag Film
Bag film comes in a wide variety of materials, thicknesses, widths, and stretchynesses. If you are curing at high heat, you will have to make sure it is rated for the temperature. My advice is to start with a standard nylon/blend bagging film unless you have a very compelling reason to do otherwise. There are several types of very high elongation bag films (Stretchlon by Airtech is an example) that are described as making vacuum bagging easier. This material can be useful in certain situations, but it brings up a whole bunch of other potential problems, and forgives – or appears to forgive – several errors in technique that you are better off learning how to deal with the right way. The fact that it stretches makes it easy to conform to a complex part, but the very act of stretching can slide material around under the bag and will decrease the available pressure that the bag can exert on the part. Do not use the stretchy bag for infusion – all kinds of issues there! Go simple and get the pleating details square in your head and then try out the fancy stuff.
Bag films vary in their brittleness, but dry environments make most bag films more likely to crinkle and tear. Many suppliers offer blended films that have higher elongation and toughness but aren’t stretchy so you’d notice. If your bag is very crinkle-y and hard to manage, see if you can find a different version with better toughness at low humidity.
Breather / Bleeder
In order to distribute vacuum under your bag you will need some type of “breather” fabric. This is usually a soft non-woven sheet of fuzzy stuff. It comes in a variety of thicknesses. I’d suggest you stick to the thin stuff (4oz, 150g, or so) because it is easier to use and won’t suck up a ton of resin. You will need something to keep this breather (also called “bleeder” because it sucks up excess resin – really it has two jobs!) from sticking to your part. Generally this is either a coated peel ply (usually green or blue) that has a release agent on it and peels off your part easily – or a perforated release film.
Peel Ply
Peel ply is made of nylon, polyester and other coated fabrics – but mostly nylon. It goes right against the part to provide a clean surface to use for secondary bonding or finishing. Coated peel plies are great and release very easily. For infusion, a coated peel ply can be used to help remove resin coated surface-flow media. For wet-layup or pre-preg – if you are using an un-coated nylon peel ply it is best (ok, necessary!) to use release film. This will throttle the amount of resin that the breather/bleeder can suck up and will make it way to separate the breather cloth exposing your peel-ply covered part.
Release Film
Release film does two things – it controls the flow of resin into the bleeder while allowing air to escape. It also allows you to remove the resin-clogged breather easily after the part is cured. There are many different types of perforated (and un-perforated for you autoclave users) release films with different size perforations with different spacing. The most common is “P3” which is good for wet layup and infusion – if you’re infusion is one that benefits from release film.
One time when I was young(er) and foolish(er) I didn’t use release film on a large part and spent several days with pliers pulling peel ply and resin-soaked breather off my part. That sucked! Avoid that.
Sealant Tape
Sealant tape is what you’ll use to stick the bag down to the mold, or to the part on which you are adding vacuum bagged laminate. It is like Silly Putty in tape form – but stickier and comes on rolls with paper backing between the layers. If you buy a bunch of rolls or a case of sealant tape, be very careful to keep it cool and to keep the rolls stacked up neatly and aligned with the cardboard tubes. I once had some rolls of sealant tape in a box in my car during the summer on the way to a job. They shared a cardboard box with some other materials I planned on using. In a surprisingly short time several rolls became one gooey mass all over all the other things. It was a mess and a waste of expensive tape and I didn’t get my job done that day – a learning experience!
There are several different types of sealant tape with different heat ratings. For low temperature prepregs, infusion and all room temperature work, the basic kind will be fine. If you are doing high temperature things, spend the time to find a suitable sealant. The issue with high temperature will have to do with viscosity – too hot and the cheap stuff flows too much to keep doing its job.
This same basic material is often sold for sealing metal roofing and siding in building construction and may be available at building supply stores. You want it at least 1/2″ wide – don’t get the thin stuff even though its cheaper – you will become frustrated!
Vacuum Connection Options
You’ve got to have a way to connect your bag to your vacuum pump. Depending on what type of process you are using there are lots of good options. Your ideal bag-connections will look different for wet layup and pre-preg compared to the vacuum and resin feed connections you need for infusion.
For more information on this, see Vacuum Stuff: Hoses, Fittings and Accessories.
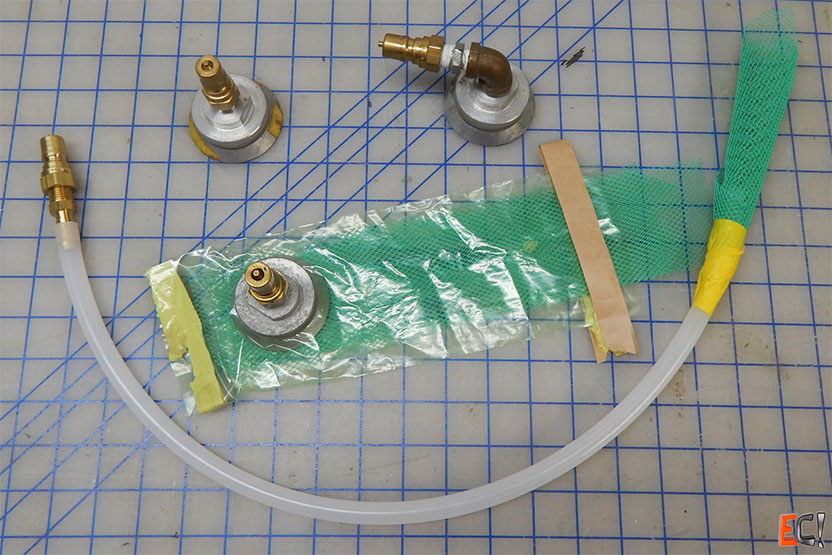
The simplest is just a hose wrapped in something and stuck through a pleat in your bag – see the image below. This is great for bagged wet-layup because if it gets resin on it it’s no big deal. For infusion, a variation of this using spiral wrap covered in peel ply or MTI hose (on the vacuum side) or similar. The key here is making sure the bag can’t get sucked into the end of the hose – so something like breather cloth or infusion mesh should be taped around the end of the hose. The other thing to aim for is keeping the hose and material off our actual part unless you have made provision for that. A hose and a big wad of stuff will print a dent into your part and probably cause a localized not-optimal resin bleed – best to place it off to the side on a tab of breather or mesh – just like you would a plate fitting.
When putting hoses through pleats it is really important to use the pleat as a “shock absorber” by making it several times the hose diameter high. Small pleats with hoses in them can too easily pop up from the mold flange and cause small (or large) leaks. Bad news! Putting hoses though pleats is less problematic than punching holes in the bag (for infusion, say) but it does require good technique.
Next up is the “plate” type vacuum connector – also called a “frog” or “puck” – that comes in two parts that clamp the bag around a hole. These are usually made of aluminum and have a gasket – see the image. They aren’t cheap and once you add a quick-connect to the threaded adapter for plugging in a hose you are talking $50(US) worth of stuff that you could destroy with resin. These are best for pre-preg or very controlled wet-layup. They’re very secure and vacuum tight and quick to attach – provided you remembered to put the bottom half under the bag!
Other methods include vacuum ports built into tools or re-usable bags. These are usually custom – designed to the situation and will have valves or quick connects or places to plug in and clamp a disposable hose. Large parts will often have a vacuum manifold to supply vacuum built into the tool – and also a second vacuum system to hold the part in the mold if multiple cures or cook cycles are needed. It can get complicated!
Making a Bag
I’m only going to discuss the actual vacuum bagging operation here. There is a video of me doing just the bag process on a simple mold. Here it is:
The written version is faster and you don’t have to wade (suffer?) through my highly dynamic presentation style. Go easy on me – it was my first video ever!
The lamination itself and the application of process materials – often called the “bagging stack” or “consumables stack” is a topic for another day. This stack usually consists of a peel ply, some release film and a flow or bleeder layer depending on what type of process you’re using. Assume that at this point we have all the process material placed and tailored over the laminate and the last thing to do is put on the bag and pull vacuum.
A note first on order of operations:
Unless you are working with prepreg or infusion, where no resin is actively starting to cure during the bagging step, it is best to get all the stack materials and the bagging gear set up before you start the actual lamination. Get your pump set up with a catchpot and hoses run to where you will need them. Measure and make your bag. Either apply sealant tape to the bag or the workpiece (mold, perimeter of the repair, etc.) and leave the paper backer on the sealant tape! Lay everything out and think through the process before you mix resin.
So, with that out of the way, let’s go through the bagging process:
The first problem is figuring out how big the bag needs to be. My advice after thousands of bags of my own, and seeing many other people battle this process is to make your bag bigger than you think it should be! Here’s an example of measuring a mold and coming up with the size of the bag:
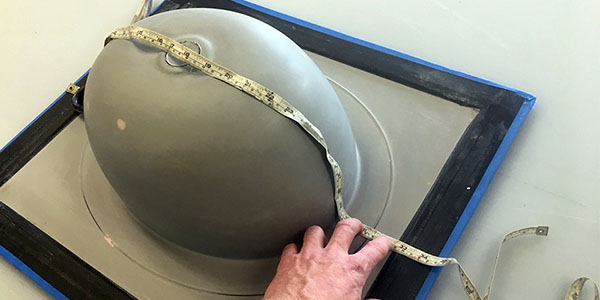
This part has a big lump in the middle of a rectangle – it’s a mold for a composite sink. If we made a bag the exact dimensions of the perimeter, there would be no room for the sink basin, and the bag would never reach the perimeter where we need to seal it. Here I am using a cloth tape to measure the distance from one edge, up and over the basin and back down to the other edge. In one direction this is about 36”, and its is about 32” in the other direction. Now think about the diagonal direction – if we made a bag exactly 36”x32” it would just work in each of the directions we measured, but on the diagonal, there wouldn’t be enough to get around the bowl.
The bag film I am using is on a 50” roll. So the long way, I would be adding 14” to the 36” to just use the roll width. I am inclined to use roll width bag film where-ever possible – why cut when you could not cut? Here I’m going to add 14” or so to the other direction and zip off about 4’ of bag from the roll. Looking at it now it looks way to big – but we’ll just go with it. Just keep thinking: “too big is just right.”
There are two ways to use sealant tape on a bag like this. One option would be to put it down on the mold, and then place pleats into the perimeter by adding extra sealant tape as you stick the bag down. The better option for something small is to put the sealant tape directly around the perimeter of the bag before even placing it over the mold. This is totally the best way to go with anything with lots of pleats – really anything that is not either flat or huge. For really big things, handling the bag is too risky and it is best to unroll it right out onto the part and do your pleating in place. But if you have a clean table that will reasonably accommodate most of the bag, go ahead and put the tacky tape on the bag first. Leave the paper backer on, and then go around the edge and trim off the excess bag on the outside of the sealant tape. This seems fussy – and it is – but it will save you the trouble of having a flap of bag stick to the wrong side of the sealant tape when you are placing the bag down. It is easier to un-stick sealant tape from the middle of a piece of bag than from the edge!
Three Potential Mistakes (that I have made a lot!)
Now that your bag is made, it is time to stick it down. But first – some important things:
First, place your vacuum fittings or hose! Now is the time! I have forgotten this more times than I care to admit and it’s no fun to pull up the tape and try to work your vacuum fittings into place. It makes you feel like a knucklehead.
Second, vacuum fittings need to go clear of wet resin, and clear of any resin that will squeeze out of the part when the bag compresses it. If you are using pre-preg or infusion, then you will probably have a specific set of vacuum-related plans. For vacuum bagging wet-laid laminate, you can use a plastic hose with bleeder, fiberglass, or (my favorite) infusion flow mesh wrapped around the end. This is cheap and low risk. Just run the hose to a barbed fitting on a catch pot. If you want to use a quick-connect mounted to a purpose-made vacuum through-bag connector you will need to be aware of the possibility of resin flowing into the $50 worth of hardware at the end of your hose. I have personally ruined dozens of these and while I’m sure your record will be better – be mindful of the risk!
Third, if you are putting a bag down over a part with wet resin, it is important to not get resin on the sealant tape or on the perimeter area where you plan to stick the sealant tape. Many experienced laminators stick masking/painters tape on the perimeter area where the bag sealant will go to protect it from resin. Wipe up any drips of resin outside your peel ply with a solvent BEFORE you pull up this masking tape. It takes a lot of wiping and you have to let the solvent evaporate before you stick the sealant tape down. Sealant tape will not stick if it has resin on it and you will waste much more time fixing this problem than you would have spent avoiding it in the first place!
So either tape off the sealant “landing zone” if you are putting sealant tape on the bag or leave the paper backer on the sealant if you are putting it on the mold.
Pleats
Pleats are the building blocks of vacuum bag tailoring. They are very simple, but the theory behind where – and how – to use them isn’t obvious.
Imagine an inch-worm working its way along. Stretched out it is like… an inch long. All scrunched up it is still an inch long but it only needs half an inch of ground from head to tail. A pleat in a vacuum bag uses the inch-worm trick to make a lot of inches of bag stick down to a smaller number of inches of mold perimeter. We’ll use inch-worm pleats of varying lengths to put more bag in the middle than we have room for on the edge.
Now imagine you are vacuum bagging a swimming pool with a deep end and a shallow end. You are using a huge rectangular bag. You will be putting the sealant tape around the edge and will need pleats to allow for enough bag to run down into the pool and fully cover the surface without stretching or pulling tight anywhere.
Looking at the pool from the end, where the cross-section is uniform, you would have two huge pleats right near each edge, like ears on a giant rabbit. The shallow end pleats would be the same height as the deep end ones, so there will be excess material at the shallow end. From the sides, you will need more bag to get down into the deep end, so you can make a huge pleat near the edge of the deep end, and a smaller one near the edge of the shallow end. You can then make a few smaller ones along the long sides of the pool where the bottom slopes up – just for some extra bag to play with. To have enough bag in the middle, you will have to have extra at the edges – pleats let us handle the extra gracefully.
Tailoring
I like to place the bag over the part and pull the perimeter clear of the edge – just drape it over and roughly align it. This is easy on a table but the same goes for working on a vertical or overhead surface – even if you need a few extra hands and some masking tape. I almost always stick the corners down first. Even if you have to walk around a mold a few times, make sure you have things in the right orientation and gently stick down the four corners.
Next, I look at where the bag will have to go up or down any features in the part. Think of the bag as having a grid on it like graph paper. For your first go at a new part it is totally reasonable to actually draw a grid on the bag with marker while you have it flat on a table – no really – try it! Your goal is to keep the lines of this grid running roughly at right angles to each-other. You will make inch-worm-like pleats in the bag’s edge to give the middle enough volume to completely cover all the area of the part. Unless you have a very good reason, try to make the pleats as symmetrical as possible from one side of the bag to the other.
For symmetrical things, my next move is to stick down the middle of each edge. You can pull the edge up away from the mold until it starts to get tight and then visually find the center and just remove the paper from the sealant tape in a little area and stick it down. I am careful to fold back the edges of the paper backing on the sealant tape so it will be easy to grab when the time comes to stick down more. Think about the pool example and see where you have any areas that will use up a lot of bag – like the wall of the pool. In theory, for a vertical surface, the pleat needs to be help as tall as the vertical part – the bag goes up and down the pleat – but best to give it a little more. Place these big pleats first. Gently tear the paper backer on the sealant tape, and fold the two sides together, gently pressing the sealant tapes together until you have a pleat that is the right height. Do the same on the opposite side of the bag. You can also just join the bottoms of the pleats leaving the paper on the tape inside the rabbit ear part. Now continue placing symmetrical pleats in all four edges of the bag. Take a moment to press the bag into all the features and make sure there are no tight spots. Because you have only gently stuck down the biggest pleats, you can pull them up and slide them along the edge to relieve any diagonal stretchy spots or areas where you don’t have enough slack. Your imaginary (or real!) graph-paper lines on the bag should not show any serious skews or systematic asymmetry.
Keep testing as you work your way around and finally have the bag gently stuck down all around the perimeter. With the bag sealed and all the slack placed roughly where it should be, it is time to connect the vacuum hose to the bag and turn on the pump.
“Pulling Down” the Bag
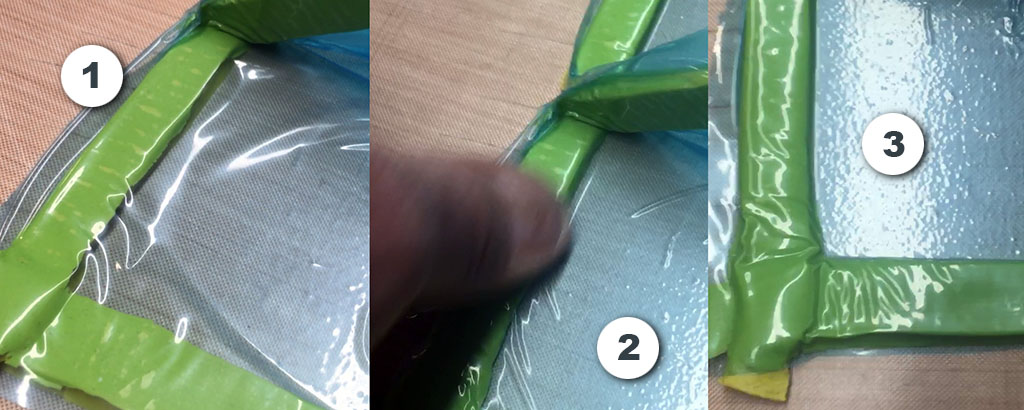
As the pump begins to pull the air out of the bag, work your way around the perimeter pressing down the sealant in the pleats and making sure there are no holes where air could get between the sealant and the mold. As the bag begins to tighten, work excess bag into inside corners and try to pull up small vertical folds that center on inside radii. This way, as the bag pulls down further, these vertical folds can slide open, leaving enough extra bag to follow the increasing radius of the inside corners. Feel free to stop or slow the vacuum to have enough time to get the bag just right. Try to avoid pulling a lot of vacuum and then releasing it entirely as this can introduce extra air to the laminate and mess things up. There should be no spots where the bag feels tight or like it is stretching!
You’ll hear small leaks now, and you can find them and squish them down. If you are bagging wet-laid laminate, it should start to bleed through the perforated film as your vacuum gets good. Keep working the edges until there are no leaks and the bag is squeezed tight to the sealant tape all around the edge. A small strip of air – visible as a radius in the bag just inside the sealant tape – is an indication of a nearby leak.
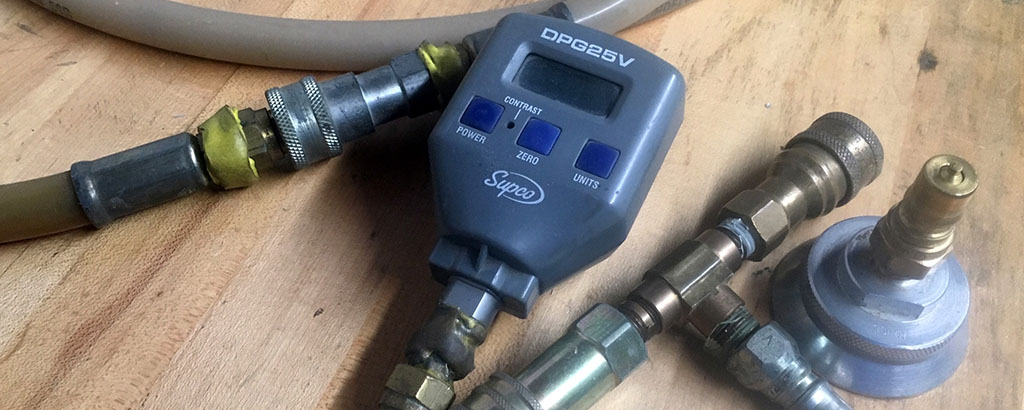
Once you’re all sucked down to the vacuum level you want, and you can’t hear any leaks, you are ready to go on to the next operation. If you are bagging wet laminate, this may be enough – just leave it and come back when the resin is cured. For prepreg or infusion, the bag is going to have to be really good. You may want to do what’s called a “drop test.” In a drop test, you disconnect the vacuum pump (with a valve so the vacuum stays under the bag) and let the bag sit for a given duration – 10 minutes maybe – with a vacuum gauge on one of the through-bag fittings. By measuring how much the vacuum level drops in a given time, you are able to quantify the air-tight-ness of your bag. Often in a production environment, a process will require a vacuum standard for a given job. For example, a bag can’t drop more than 2in/Hg in 10 minutes. If it drops more, you have got to find the leak(s) and try again.
Finding Leaks
Finding leaks is hard. Unless you have a mold with a history of holding good vacuum, you can’t always be sure that the leak is coming through the bag itself. The most common source of vacuum leaks is the tacky tape seal. Kinks in the tacky tape leave thin spots and it is hard on a large bag to make sure everything has been chased down. The next most common place for leaks is in the vacuum plumbing. Hose fittings leak, vacuum through-bag fittings leak, and infusion feed and vacuum lines leak. Look closely at these if you are having problems.
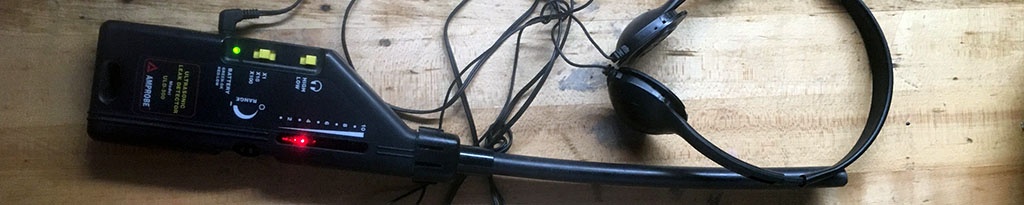
Sometimes there’s just a hole somewhere in the bag. You can try putting your ear close to the bag and moving back and forth but this has its limits! There is a tool called and ultrasonic leak detector, which is used for finding small leaks in all kinds of situations. The most common ones look like a box with a little tube connected to earphones. The detector picks up high frequency noise made by the air rushing into the leak and makes it audible. You’ve got to be patient, and these are a last pass when you can’t find a leak in the usual spots. Good ones are not cheap, but in a commercial composites processing environment, they are very useful on occasion. If you’re making really fancy (expensive!) stuff or autoclaving, it is probably worth going around your sealant tape with an ultrasonic leak detector just to be sure.
If you are really fancy you can use a thermal camera to find leaks. I’ve never done this but it is done in industrial situations for finding leaks in pipes. The leak shows up as a colder spot. I’m going to try to find out how this works and get some pictures because it is promising for factory situations where silence is impossible and finding leaks quickly is valuable. Let me know if you have information on this!
Bagging to the Part Itself
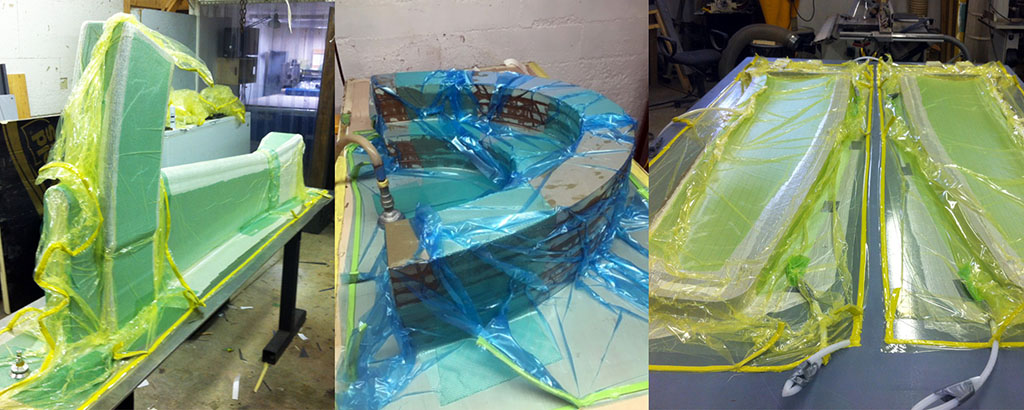
You can bag to a mold, but sometimes you have to bag secondary operations onto a semi-finished part. This might be tapes to tie to separate pieces together or additional reinforcements to a specific location. As long as your part is vacuum tight (or close) you can bag right to it! Here are two examples:
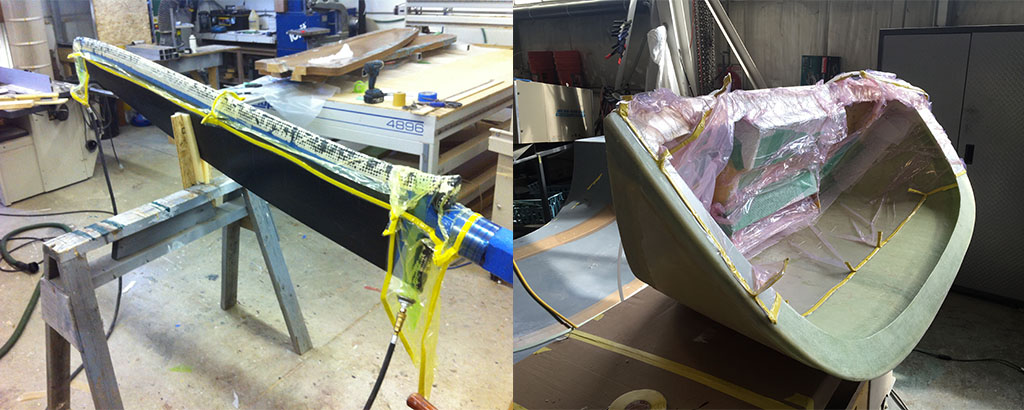
In the first, a few layers of biaxial carbon are laminated to tie the halves of a yacht rudder together around the leading edge. In the second, the bag is compacting several layers of secondary bonding/tapes/tabbing to join the insides of a few pieces that have been molded separately. For both situations the parts are able to hold vacuum well enough, even though the bag mastic goes over flash tape and even masking tape in a few places. You may find that sticking high quality masking tape down and then putting your bag mastic to the masking tape will keep mastic from sticking to not-so-shiny or peel ply surfaces. Of course its is always a good idea to leave peel ply on as long as possible – but here we haven’t done that!
Envelope Bags
An envelope bag is a bag that fully contains the part (and tooling) that is being vacuum bagged. Imagine putting your job in a huge Zip-loc bag and pulling all the air out! This can be very useful for small parts, or for jobs where the tooling is not air-tight.
Envelope bagging requires padding the back of your mold or the non-laminated areas of a secondary bonding operation so they don’t tear the bag. Breather fabric or masking tape (or a mix) can cover up any nasty things that might become a problem. It is often easier to slide a small molded part into an envelope bag rather than to try to seal a bag on a perimeter flange that is too small. This works great with small molds that have no backing structure. It is also necessary for parts where the tooling is made from MDF for plywood which cannot be reliably sealed.
I will include as “envelope bagging” the bagging of things down to a vacuum tight table. This a really common and useful way to deal with lots of problems. If you have a one-off MDF or tooling board mold (like the rudder molds above on the right) that doesn’t have enough flange for a bag – and wouldn’t hold vacuum if it did – go ahead and bag it right down to a flat table. You get a good vacuum and the table will hold the mold perfectly flat. You’ll have to be careful to release coat the table or put plastic sheet under the mold (do both!) so things don’t get stuck permanently. A thin sheet of painter’s plastic under a mold will save a lot of trouble in this situation. Just remember to place the bag sealant perimeter outside the edge of the sheet plastic! It’s just like envelope bagging the part, except one of the pieces of “bag” is really stiff and flat!
And how do you get a big flat table that holds perfect vacuum… well there are a bunch of ways! One of the best is a metal plate – ideally thick enough to be stiff and ground flat. MIC-6 aluminum is the best but it’s expensive. You can also make a table by hand out of plywood and then fiberglass and fair it. Make sure to seal the back or it will want to warp. The best one I’ve ever had was 2mm aluminum sheet bonded on 50mm aluminum honeycomb. It was vacuum bagged up on a giant granite surface plate and was almost perfectly flat – and easy to handle. I had it made by a business called Atlantic Industrial Models which happened to be close to where I was working. It was cheaper than an equivalent piece of MIC-6 and way stiffer. If you’re doing lots of cooking and carbon work, it may be good to make high temperature carbon tables with or without core to have a matched CTE. Aluminum honeycomb is probably the best core for this, but at lower temperatures, balsa works well too.
Tube Bag
I can’t not mention tube bag because it is just that good. It is just what it sounds like – vacuum bag in the form of a lay-flat tube. It comes in diameter from 100mm / 4″ to 1.2m/4′ and in a variety of bag materials. It is perfect for sliding items into for envelope bagging. You can also use it to bag tubes by sealing it around the tube. For mandrel molding it is perfect!
The great thing about tube-bag is that you can bag long things without long seams. Seams are always a weak-point in a bag and tube bag is just more likely to remain sealed than something with lots of seam. You only need to apply sealant tape to the insides of the ends of the tube and attach it over or around the long skinny thing you’re bagging.
For things with internal bags, tube it perfect because it avoids sealant tape inside often-confined areas. There are also high-elongation tube bags that are much more forgiving for internal-bagged parts – especially in an autoclave where any bridging will pop and ruin the fun.
Common Problems
Some of the common vacuum bagging problems have already come up. We have leaks in all their variety, and more specific problems like resin on the mastic.
The most common problem in vacuum bagging is making the bag too small.
The second most common problem is getting it skewed or bunched up so that as the vacuum pulls the bag down it stretches and pulls up the sealant tape or bridges an area and threatens to pop. This is where systematic alignment of pleats and careful arrangement of the bag before the vacuum is fully on are really helpful.
From here, holes are probably the next biggest problem, and they come in a wide and frustrating variety. It’ll happen. If you are careful with your bag film and fit it carefully, you will probably not have a ton of trouble with holes in the bag – but you’ll have them from time to time.
Be careful cutting bag off a big roll! Many times I have seen a slip with scissors leave a hole in the roll of bag that keeps on “giving” many layers deep. If you do it, at least mark the spot and leave a note to warn the next user of the roll of film!
Vacuum plumbing can also be a source of frustration. Gauges that don’t work or complicated valve manifolds that are prone to mis-use are worth attention. Avoid having too many jobs on the same pump, especially if those jobs have different requirements.
There are some process specific problem to look out for and I’ll address these next.
Wet-Layup Concerns
The big one here is resin on the tacky tape. We have discussed this and you will no-doubt be very careful. I still get resin on my tacky tape sometimes – but I’m sloppy.
The worst defect I see in wet laid parts is air or voids in outside radii of parts. It easy to have this happen if you do not follow up slip joints in the laminate and bag stack with enough extra bag to allow for full vacuum pressure on what will be inside corners for the back (bag side) of the part. Make sure your really push the bag into these corners and allow for small pleats in the corners to release extra bag if needed. If you are careful, a rounded stick with some peel ply or breather over the end can be used to really hammer in these radii – I have actually seen people hammer the push stick gently – and it works. Gotta be gentle though.
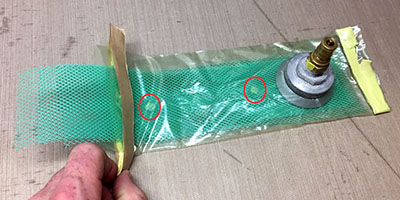
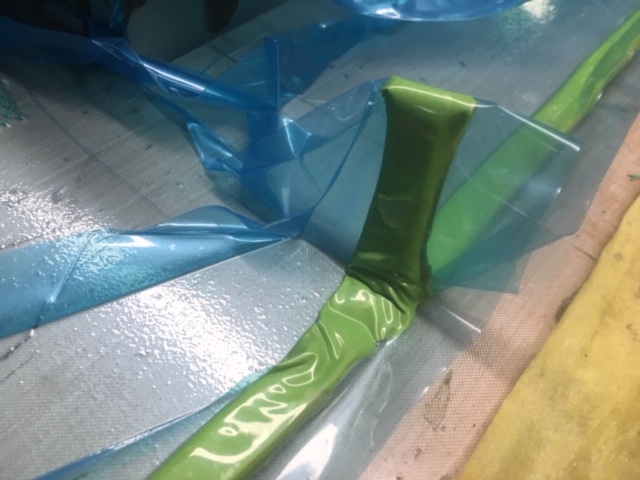
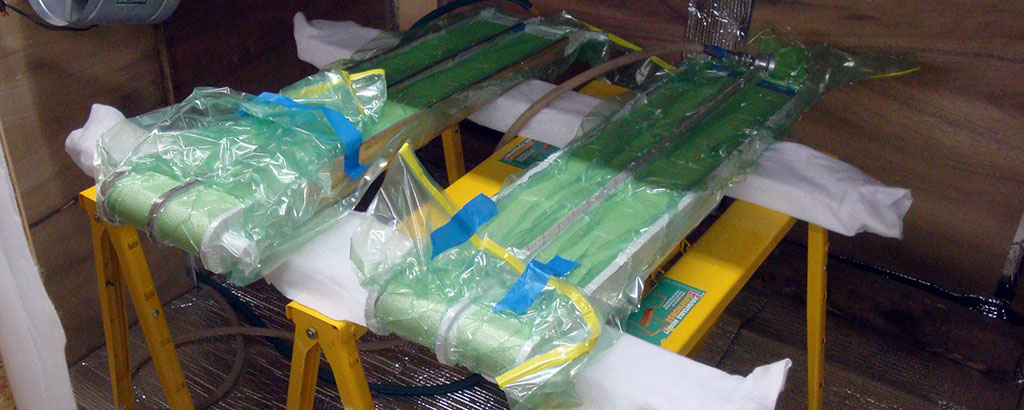
Also, sucking resin into the vacuum fittings. There is a trick for protecting fittings and also making the bag attachments more flexible that I learned while working in an excellent but quite fussy shop building a boat. See picture to the right. It involves placing your vacuum fitting inside a secondary piece of 4” tube bag that has strips of infusion flow media inside. It’s kind of like a remote vacuum port. The infusion mesh is held together with a few dots of bag sealant tape (circled in red) which keep it from sliding out. The vacuum port is on one end and the other end sits under the perimeter bag seal with its own extra tacky-tape seal.
You probably won’t do this much, but if you don’t have room for a vacuum fitting and you’re worried about a hose printing into the part, this is a great solution. Also excellent for pre-preg cooking or debulking where you want to keep the fitting with the bag but don’t have room to place it on a un-laminated part of the mold.
Infusion Concerns
With infusion, you don’t just have features to pull air out of the bag, you have to get the resin in too. For small infusions it is a good idea to place both your vacuum plumbing and your resin feed tubes in perimeter pleats in the bag. For larger parts, you have to make holes in the bag to fit resin inlet tubes. There are lots of specific products that help make this work, but the most common are spiral wrap, resin channels (EnkaFusion, etc.) and plastic tube fittings. This all makes the bagging operation more complicated and leaks are more catastrophic than with bagged wet layup.
I’m not going to get into it too much here – more on infusion here: Troubleshooting Vacuum Infusion. And here: Introduction to Vacuum Infusion.
Also, if you are using a surface flow mesh, the cut edges of this can be sharp. Be careful pushing your bag over these and if you have leaks, this is a good place to check once your sure the perimeter is good.
Prepreg Concerns
With prepreg, you are dealing with heat, which makes things more interesting. First of all, make sure your bag and sealant tape are rated to take the heat!
The environment inside an oven is often windy with all the fans moving air around. You’ll have thermocouples to deal with and vacuum hoses running all over. It is a good idea to tape down flaps of bag so the wind doesn’t get ‘em and flop them around. It’s also good to make sure hoses and thermocouple wires are not sitting directly on the bag – put a little breather under them to be safe.
One thing to keep in mind is that tacky tape gets much softer when it heats up. This is no problem, unless your bag has bridging or some feature that puts pressure on the tape. As the tacky tape heats up and softens, the bag will be able to slide. Too much of this and the tape will get thinned out and pulled apart and you won’t have vacuum anymore more!
Debulking Bags
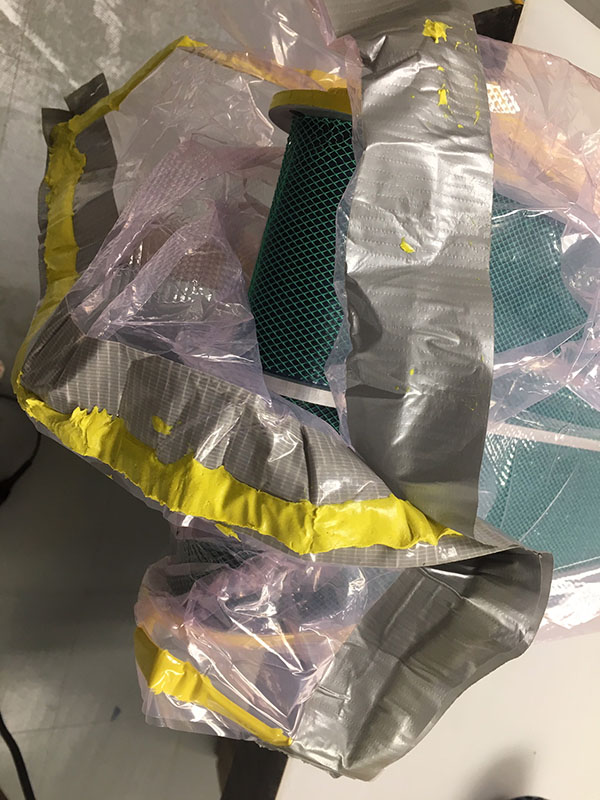
For reasons I won’t go into here, prepreg often needs to be “debulked” during layup. Every few layers (or every single layer you fussy guy!) you will want to vacuum bag the whole thing to compress the prepreg plies together and pull air out. Debulk bags don’t need to be perfect but they should be good and should have some type of flow media covering the laminate. I am a big fan of infusion mesh for a flow media and will choose to leave the thin backer on the prepreg and perforate it with a spiky wheel – but enough on that here! Check out Laminating with Pre-pregs.
One feature (probably not aerospace approved!) that is awesome is the duct tape “zipper” on an envelope bag – or from a bag to a table. If you take an edge of a bag that you want to be able to open and close several times (for quick and easy debulking) and put a line of duct tape on each face of the bag, you can then grab it and the duct tape keeps the bag from stretching! You just stick the tacky tape to the duct tape, and give it a tug and the tacky tape comes off the duct tape. It requires a little more pushing to stick it down, but it saves a ton of time. The zipper works great for envelope-type debulk bags. Just “zipper” one side and you’ll be in and out of those bags in seconds instead of minutes!
Conclusions:
So there you have it – everything I know about vacuum bags!
Resources
Edit Log:
Updated 5.31.20 – added edits and vacuum pot design