Prepregs are very tidy to use, but they are easy to mess up. There is little that you can do once the parts go into an oven or (especially) autoclave so preparation is key to success. This article is about some of the more common ways to mess it up. I only know this because I have spent lots of time messing it up!
For a start-from-scratch “how-to” article, see: Laminating with Pre-pregs
The focus here is low to medium temperature epoxy prepregs cured in ovens or autoclaves in standard tooling/molds using vacuum bags. This is the most common processing method and is most likely to be used by people getting into prepregs for the first time. Here are a few categories of issues people have getting prepregs to work right:
- Tooling: tool stability, materials, surface finish
- Release Systems: contamination, slip, using wax…
- Laminating Process: debulking, slip joints, more debulking!
- Core: moisture, thickness, film adhesive, venting…
- Bagging Details and Process Materials: bleed, vapor control, core issues, more slip joints
- Cooking: cure cycles, dwells, resin viscosity control
But first, a few things about prepreg storage and how it goes bad…
Freezers, Thawing and Moisture Drama
- Frozen storage is necessary – make sure your freezer is cold enough and that it is working right.
- Prepregs have a limited “out-time” at room temperature before they become unusable.
- Moisture condensing on prepregs that are still cold from the freezer can be a big problem.
Prepreg needs to be stored in a frozen state or it will begin to cure prematurely. Your manufacturer will tell you in the data sheet for your material how cold it should be and how long it will last out of the freezer. Material also comes with an expiration date – which is no fun – but is important to pay attention to!
First, make sure your freezer is cold. Keep a log book of when material comes out and for how long. Time out of the freezer is called “out” time. Some resins have an out-time of only a few weeks at room temperature, so don’t waste it.
Material that has been out too long will start to get “crispy.” It will have a slight crunch when you bend it. This is because the resin has started to cure in an awkward half-hearted kind of way and it won’t have enough cross-linking potential or reduced viscosity to work right. It may get sticky when you hit it with a heat gun – this is a good test – and still not reach the ideal laminate performance once cured. So you can make parts but they won’t be that great mechanically – but maybe good enough that you don’t realize. This can be bad.
Make sure your material is wrapped in a relatively air-tight bag when it goes into the freezer. When you take it out to use, you’ll have to let it come to room temperature before removing the bag. Water from the air will condense on the cold bag and you need to be sure the moisture stays off the prepreg. Make sure the prepreg has warmed up above the dew point before exposing the material to the air. The dew point depends on room temperature and relative humidity (dew point is about 9C for 20C air at 50% relative humidity for example) so the higher the temperature or the relative humidity, the higher the dew point.
Moisture in your laminate (even a little) is bad. It can cause voids and make big vapor pockets between skins and core – especially honeycombs. This can be a very real problem and is a good reason to air-condition your layup room and store core in a low-humidity space.
Tooling
Tooling for prepreg has to behave well across a wider temperature range than room-temperature tooling. Resin heat distortion temperature (Tg) has to be above the peak cure temperature of the cook by a good bit. Composite tools will need to be post-cured, and made with a resin that has an ultimate Tg that is high enough. The coefficient of thermal expansion (CTE) of the tool laminate is important too. It is good to match the CTE of the tool to that of the part material – which is why people build carbon parts in carbon molds. For small things this is less of an issue, but for long things it can make a big difference!
Common Problems
- Tooling distorts during cook due to inadequate tool postcure or wrong tooling resin choice.
- CTE mismatch causes tool to shrink on cool-down trapping or breaking part – or mold
- Rough tool surface causes vapor or air to stick to mold surface during cure leaving pinholes
- Tooling with too much thermal mass warms too slowly or unevenly to allow part to cure consistently
- Tooling or core insulates areas of laminate from oven air keeping them from fully curing or curing evenly.
- Thermal cycling results in micro cracking in tooling – causing vacuum leaks and voids in laminate.
Mold thermal mass and conductivity are important too. If a tool is heavy or well insulated (cored) it will take lots of energy to heat it up and the part will face uneven temperature during the cure. Sometimes backing structure can block heat reaching parts of the back of a composite tool and cause cold spots. Metal molds are heavy and can take a long time to heat up. Parts can have hot air on the bag-side and a cool mold on the mold-side and can cure unevenly – which can be a problem.
Surface finish is also a variable when it comes to the quality of a part surface that comes out of the mold. Almost always, shiny is better. A rough (even 320 grit sandpaper or Scotchbrite) can cause issues with surface tension and bubble formation on the part surface. Material matters too – an aluminum mold finished to 320 or 400 grit may make nice parts but a composite mold with the same finish will have issues. Of course, the release system plays a big part too. Generally, though if you’re debulking and curing with a suitable cure cycle with a dwell and you’re still getting surface porosity – check roughness – and release system. So many variables!
Release Systems
Rule #1: don’t use wax! Prepreg cure temperatures make wax behave badly. Also, avoid PVA. While it might work, there are better options and it’s not worth the risk. Spend a little money on a semi-permanent release system with both a sealer and a release coat.
Common Problems
- Wax release causes poor release or messy surface
- Release system is too slippery and debulked material won’t stick – or will pop off after debulk.
- Release system makes high surface energy so the resin resists flowing cleanly onto the surface. Surface tension (I think?) causes pinholes.
- Old or out-of-date chemical release systems don’t work right – parts stick.
Sealers and primers are an important part of a release system. They are like a very thin paint almost that fills in small holes and scratches and prevent mechanical keying situations that could hold-up part release. They also keep the release coat itself from being absorbed by any semi-porous parts of the surface. Sometimes sealer is just a “thicker” version of the release only used for initial mold preparation – so the low-buildup release can be used between part molding and avoid excess buildup.
Semi-permanent chemical release systems come in a wide variety of types. Most have a solvent and a bunch of chemicals that actually cause the not-sticking. You spray or wipe them on over the sealer coats and let dry for an interval. Manufacturers will tell you the number and timing of coats. They will have a specified maximum use temperature, so stay well below this with your cooking.
“Slip” is exactly what it sounds like – how slippery a release coat is. Very slippery release coats can cause issues with debulking initial plies. The idea is that debulked plied will stay stuck to the mold – if the mold is way not sticky, they will pop up and cause wrinkles or trapped air. Band news. Temperature matters too with this, so you may be ok at 18C but struggle at 28C because the resin tack varies with temperature. Another plug for the air-conditioned layup room!
In some situations, a surface can be too slippery, and it will resist having the resin flow out evenly. By using a less slippery (higher surface energy) release, you can keep this from happening. Most standard release systems will not cause this even if you have a very shiny tool surface – and also use mold sealer! Manufacturers can help you select the right product if you think this could be an issue.
Be really careful of old release materials – they go bad. Many types of chemical release coating are degraded or damaged by exposure to air. Put the caps back on tight and consider decanting from the big expensive jug to smaller sealed container for day-to-day use. Pay attention to expiration dates and consult with manufacturers about storage. This can be a huge issue – I’ve had parts (and mold surfaces) ruined because I used and old can of release-coat and it didn’t work anymore. It’s a lesson you only have to learn once!
More about release systems here: Guide to Mold Release Systems
And because we’re in the release systems section, I’m going to make a pitch for adhesive-film release coatings. Usually fluoropolymer or PTFE (Teflon) with a sticky backer, these are an ideal mold release option for one-off or small volume prepreg parts. No chemicals, no transfer risk and only a big headache on compound curved parts. More information here: Adhesive Teflon – It’s Awesome.
Lamination Process
If you’re laminating with prepregs, you have to do it carefully. The keys to the process are careful control of ply orientation, slip-joints and laps – and a good debulking system. If you’re saying “debu… what?” then this may be the issue! Debulking is the process of using a vacuum bag (usually) to intermittently squish down your laminate as you add plies. It is key to laminating with prepregs on parts that are more than a layer or two thick, or have core, or need to look nice.
Common Problems
- Lack of proper debulking early and often in the layup
- Slip joints not used in outside radii (which are inside in the tool)
- Woven fabrics can have a loose weave and can result in voids where fiber bundles cross.
- Initial debulk on mold surface pops off because of high-slip mold finish.
- Warm work area makes prepreg too sticky, mess happens.
- Wrinkles in layup on outside corners from loose initial placement of laminate
Debulking
If your parts are coming out with porosity on the surface or outside radii (on the part) that look bridged and full of air or bubbly resin, this may help. To debulk, you need a vacuum bag and a breather layer. My preference is to use infusion flow mesh directly on the prepreg or over perforated backer that is left on the prepreg for the duration of the debulk. You have to tailor it nicely so there aren’t big wrinkles. Another good option is to use a perforated release film over the prepreg with a breather cloth/fabric over. Again, this should fit the part surface completely without any bridging. It is good to use a stretchy flow media or perforated film so it will conform under the bag.
You pull down a vacuum on the partially laid up part and allow it to sit under full vacuum for 10 minutes or so. This presses the plies down so there aren’t any air bubbles trapped between them. It also fully pushes material into inside (of the mold) corners and radii, while compacting outside corners and preventing extra material that could form wrinkles. It is not a terrible idea to use a roller or push stick to go over very tight inside corners to make sure that slip-joints have fully settled while the part is under debulk. Also, a gentle heat-gunning (I use a hair dryer) can help lock layers of material together – like a mini localized hot debulk (see below).
There are rules of thumb for debulking. Some people say that you have to debulk on the first ply and then every 1000g of material. Generally, it depends on the part and the geometry and if it will be cured in an oven (vacuum pressure) or in an autoclave – with much more pressure!
See this video for example of debulking – or any of the other prepreg samples: Laminate Sample #38: Prepreg Carbon with Reinforcing Structure
Hot Debulking
Hot debulking is when you debulk the plies normally and then while the bag is on, you heat things up so the resin viscosity drops. You only need to heat it to 40-60C for low-temperature resin systems – and you want to keep it low enough to avoid any cure onset! This can help remove air in thin plies of material, especially against the mold surface. If you’re having pin-hole issues, this may be a good choice. While the resin is hot, things slide around, and air is able to escape.
The down-side is that if you hot-debulk, the laminate will not be as ready to debulk when it is ramping up before the final cure. The well-consolidated plies will choke off any volatile materials in the prepreg resin and keep it from escaping. This is usually only an issue for thick stacks of unidirectional material. Another downside is that the resin will make a huge mess of your debulking flow media or breather and release film. You really have to let it cool sufficiently to remove them or you’ll be asking for trouble.
If you’re curing in an autoclave, hot debulking is probably unnecessary. The additional pressure should manage to remove trapped air or volatile components of resin – or squish them down so small that they aren’t a big deal. You still need to debulk with an autoclave cure – but you may not need to debulk as much as with out-of-autoclave (OOA) cures.
Slip Joints
Now for a bit about slip-joints and how they are practically necessary on outside corners. Carbon doesn’t stretch. If you run a reinforcement through and outside (to the part) corner of the mold (and inside corner to the laminator) it may not make full contact with the mold surface. This is especially true with unidirectional plies that don’t have “crimp” to make up some slack like with a woven material. You need to make a lap joint in these corners to get perfect parts. Maybe you feel that you can finesse it – but it’s better to just slice and lap! More on slip-joints here: Slip Joints and Why You Need Them!
Wrinkles
And the opposite of slip-joints are outside corners where excess laminate gets debulked down and instead of bridging, it has excess fiber to conform perfectly to the radius of a feature. The fiber has only two options – wrinkle sideways or up and down! Sideways wrinkles lay flat on the surface but have a structurally-sub-optimal impact on the part. Worse are up and down wrinkles that you can actually feel on the part surface. They may appear to go away when you cook, but most times they result in a serious weak spot. Straight fibers are strong fibers!
It helps to have the right level of “tack” to the prepreg when laminating. Tack is the stickiness level of the resin in the reinforcement. In a cool room, some prepregs will barely stick. On a warm summer day some become so sticky as to be unusable! This is why temperature control in your work area is important. The tack of the prepreg should be sticky enough to stay put when applied to the part, but no so sticky that it can’t be pulled off and re-placed before debulking. Once its rolled, rub-sticked or vacuum debulked then forget it – you’re not getting it back apart!
Tack is especially challenging with adhesive films for bonding cores – which are pretty much sheets of resin. Making sure you don’t have a sticky mess can be hard. In many cases it is a best practice to purchase material with a resin film already applied for plies that will face a core. You can also pre-debulk the resin film to the core-facing sides of reinforcements before they are applied. Using a flat table (ideally warm) for this is great! See this video for an example: Laminate Sample #2: Pre-preg Carbon on 15mm Nomex Core
Also be mindful of weave type. This is usually not a problem, but sometimes very thin plain weave laminates – especially as skins on honeycomb cores – can result in pinholes in the little open areas between the weave. Twill is usually flatter and has less crimp – so it’ll work better.
Core
Cores can present problems, mainly with heat-related changes during cooking. Moisture and trapped gasses in core are a big deal – and are present with balsa cores, some foams as well as with aramid and Nomex honeycombs. Aluminum honeycomb and high-performance foams like Rohacell are the least drama-prone because they don’t trap moisture and are stable across a wide temperature range – but they’re expensive.
Common Problems
- Core off-gassing
- Moisture or volatiles expanding and causing no-contact bubbles in the skins.
- Core crushing – especially honeycomb!
- Voids in outside corners in way of poor core fits.
- Super light skins can lose tool much resin to core bonding with honeycombs – yielding pinholes!
Foam Core
Many foam cores behave badly when subjected to higher temperatures. PVC and SAN foams soften, but many can be processed at low temperatures (below 95C or so) – Divinycell HP, Airex C70 and Gurit Corecell are examples. The softening can be managed and because this also means that these foams can be thermoformed, they make a compelling choice for curved surfaces where toughness and impact resistance are desirable.
Core should always have small (.5mm) holes punched through on even spacing (50mm squares for example) to let trapped air and excess resin escape. It is typical to use adhesive film from about 100g – 400g per square meter to bond foam core. Using the resin in the prepreg skin laminates to bond the core is risky and will starve the skin of resin or fail to bond the core adequately. It can be an option – especially for very light things – but be sure to test to your satisfaction before building something useful.
You have the option of curing off each skin separately (more work) or trying to do some combination of skin and core, or all three at once (fastest). If you are co-curing the mold-side skin and the core, corners can be problematic. The uncured skin will have to get all its compression via the core indirectly, so if the core doesn’t fit the skin perfectly you will end up with voids or trapped air. Areas where laps or slip joints add extra skin thickness should be rebated (or thermoformed) out. Some cook-time thermoforming is possible but there are limits! Outside corners need to fit very well or the skin won’t be compacted. It is often possible to “pot” core edges in ambient-cure adhesive to get a perfect fit to the debulked but not cured skin. Many prepreg manufacturers supply “mono-component” adhesives for filling core joints and edges. These are just prepreg resin with some kind of expanding (thermoplastic microspheres?) additive that helps them fill gaps.
If you have issues with bubbles in the top skin from trapped air or gas between the skin and the core, it is a good practice to vent the core with holes poked fully though the top skin. This is more of a thing with honeycomb but can be helpful with foam too. See the honeycomb section below for details.
Honeycomb
Honeycomb core is generally less fuss than foam. There are still plenty of potential problems though – and handling and precisely trimming and machining honeycomb is more of a headache.
Aluminum core can be prepared for bonding in a variety of ways and your core supplier should be able to give you guidance. Often it is possible to get aluminum honeycomb that has cell-to-cell holes for venting the core and will not require perforating the top skin (or perforating it as much).
There is some debate about preparation of aramid or Nomex honeycombs for bonding, but my understanding is that they should have sharp cell edges and be free of any dust or hanging chunks of paper. To get a clean edge, sanding core ramps and faces with a fine sandpaper (400-600g) can really help. This is basically Kevlar mixed with resin, so it wants to be fuzzy and difficult! A source of clean, dry (like, add a special extra filter to the air line) air is good for blowing out the dust from cutting, sanding or machining. Any fuzz will suck up resin but not contribute to the forming of those important little glue fillets that make honeycomb work.
Nomex or aramid honeycomb needs to be stored dry so it doesn’t being moisture into the composite panel. If there is even a small amount of moisture in the core, it will turn into water vapor with the combination of high temperature and vacuum. Water vapor is more than 1000 times larger than the liquid equivalent, so tiny amounts of liquid water turn into huge volumes of gas – and huge volumes of gas are bad! Excess water vapor can form big bubbles between the skin and core and potentially over-power even a vacuum bag. You need to have some way to vent this off. This is where perforating the top skin comes in!
To do this, you need to poke holes through the top skin in an even pattern (50mm square pattern maybe) and allow the air in the core cells to escape as the cook ramps up and liquid water turns to vapor. For very thin-skinned laminates this is less of a big deal, but over two plies or 600g of skin and you should look into it. Ideally each cell would be vented (this is an option on heavier thicker aluminum cores) but here we just want to blow off any big bubbles that form. The holes can be drilled with a 1mm (or so) metal punch sharpened like point. The back of a drill bit sharpened to a 3:1 taper works pretty well. Your goal is to make a hole by spreading fibers not by tearing up a bunch. Just punching through by hand is ok but using a drill to spin the little spike seems to work better. This is often done through the peel ply after it is applied to the part – and printed patterns or a grid drawn on the peel ply helps.
Some people score the tops of honeycomb cells to allow air to travel from cell to cell – the resin fills and glues these shallow slices as it becomes liquid, and they get glued back together. You can make a tool with a set of parallel spaced razor blades sticking out only 1-2mm like the paw of a robot tiger. This gets swept across the top of the honeycomb in parallel strokes to make tiny slices in the tops of the cells. I’m not sure it’s necessary but it’s a thing.
Honeycomb can also get crushed by the vacuum bag if it is not supported around the edges. Metal, foam or (in a pinch) wood frames can help prevent this. You put them outside the edge of the part where it will be trimmed so the edgings get discarded when the part is trimmed. Core ramps should be at least 2:1 to avoid the risk of crushing – especially where they run parallel to the ribbon (L) direction of the core and there is no cell edge to resist folding sideways up the ramp. Many people replace honeycomb ramps with foam ones. This can be a good idea! You can also fill the core ramps with light filled epoxy putty. In some cases, even cutting the core ramps can be an issue because light-weight honeycomb is very floppy and hard to fixture.
Example of basic honeycomb processing here: Laminate Sample #2: Prepreg Carbon / Epoxy on 15mm Nomex Honeycomb Core
Bagging Details
Bagging and process material details can be key to success with prepreg parts. It’s like you are “pre-programming” your whole part for what will happen when the cook is underway, and the resin viscosity drops, and everything flows and starts to cure. Besides leaks, the biggest issue is to make sure the bag doesn’t bridge any inside corners. Slip-joints in all of the process materials (“the stack”) are necessary everywhere you place them in the laminate. Voids and bridged outside corners are no fun!
Common Problems
- Bridging the bag in corners results in resin pooling and potential voids.
- If you don’t slip-joint the process materials too, they can prevent bag pressure on inside corners.
- Tension in the bag causes sealant tape to slide at cook temperature making a catastrophic leak!
- Incomplete coverage of release film (perforated or not) allows resin to over-bleed in some spots.
- Leaks in bag – always a challenge.
- Bridging in bag with autoclave pressure makes bag pop – and the party is over.
Most of these problems are about bagging hygiene and careful assembly of the bag and process materials will keep you in good shape. It is always a good idea to do a drop test on your parts after they have been fully bagged and pulled to a suitable (good) vacuum. If you loose vacuum quickly, check fittings and make sure there are no obvious leaks. With cored parts it may take a while to get all the air out, so give parts an hour (or more ideally) before you start your cook.
Bagging leaks can be detected with a drop test (aka: draw-down test) and then found with manual chasing or a leak detector. You really do need a pretty good bag to get the best results. There should be plenty of slack bag inside each corner and you should pull wrinkles away from outside corners, as bag wrinkles can lead to wrinkles forming in the part itself if there is a bit of excess material.
You also want to make sure that your process materials are covering everything they need to cover. Having a gap between some release film can expose your part to excess resin bleed – and you need that resin to stay in the part! This is especially problematic with autoclave curing, where the additional pressure can drive resin out of the part and into bleed stack or any low pressure void formed by bridging the bag. The autoclave will also pop that bag in any unsupported area.
And finally, you gotta use slip-joints in the bagging process materials just like you would in the laminate. Don’t run peel ply, release film or (maybe) breather through inside corners without a lap that can give a little. You’ll end up with voids, resin-rich corners and other baddies that are easy to prevent with good process details.
Cooking
The cook is where this all comes together. Controlling the part temperature and ramp rate are important. It is also good to keep the temperature as consistent as possible across the whole part and tool. A good well-circulated oven with enough power and a ramp-and-soak controller will make this a lot easier.
More on ovens here: Oven Options for Pre-preg Curing
Common Problems
- Ramp rate too low and resin bleeds excessively before
- Ramp rate too high and resin starts to gel before the viscosity gets low enough to release trapped air.
- Incomplete cure due to too-short cook or uneven temperature across part.
- Runaway oven temperature from mis-placed oven control thermocouple
- Over-bleed from un-restricted resin path and high pressure in autoclave
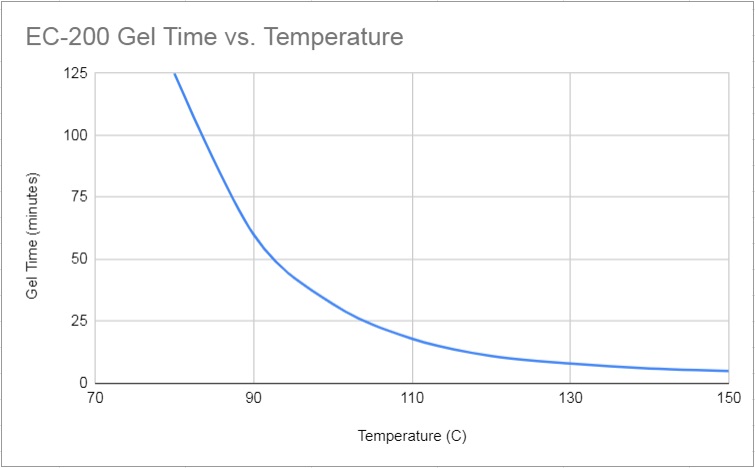
If you look at the data sheet that came from your prepreg manufacturer, you should see some information about viscosity vs. temperature and perhaps curves showing gel time, minimum viscosity compared to ramp rate. This will give you can idea how the resin will behave when you start to cook.
Prepreg cure cycles (“cooks”) should be designed to match the resin system, while taking part size, tool thermal mass and oven operation into consideration. A single-skin part 3mm thick in a heated aluminum mold can be cured much faster than a large cored part in a wood or composite tool that is heated by circulated air in an oven. The goal is a balance that doesn’t cause any problems to get out of hand, while making the overall outcome as ideal as possible.
So you’ve got to keep the constraints in mind. Ideally you will have chosen a prepreg resin system that will cure well in the situation you have. Low temperature is always easier and should be a first choice in general use. Heat always makes thing more challenging, but it can get you fast cycle times or higher part service temperatures and mechanical performance too.
Ramp and Soak
The ideal cure profile will allow the resin to heat up uniformly to a very low viscosity state – so it can bleed off any trapped volatiles or air and consolidate stacks of fiber. Once the wet resin has settled into a stable situation and isn’t flowing or doing anything important, you can let the temperature increase (“ramp”) to a point where resin starts to gel. Generally, for larger parts it is best to do this at a modest pace – or “ramp rate”. Your part may heat unevenly, and you are usually better off letting it sit in a liquid but uncured state for a little longer, rather than rushing to cure it as fast as possible.
In many cases inserting a “dwell” or a “soak” at a certain temperature that is just below what would start the curing reaction is a good idea. For large, cored parts, an hour or two is not uncommon. Of course, this dwell is a time when liquid resin could bleed off and out of the part very easily. If you don’t have adequate release film (perforated or not) and minimal paths for resin to leave the part, you may have issues with over-bleeding.
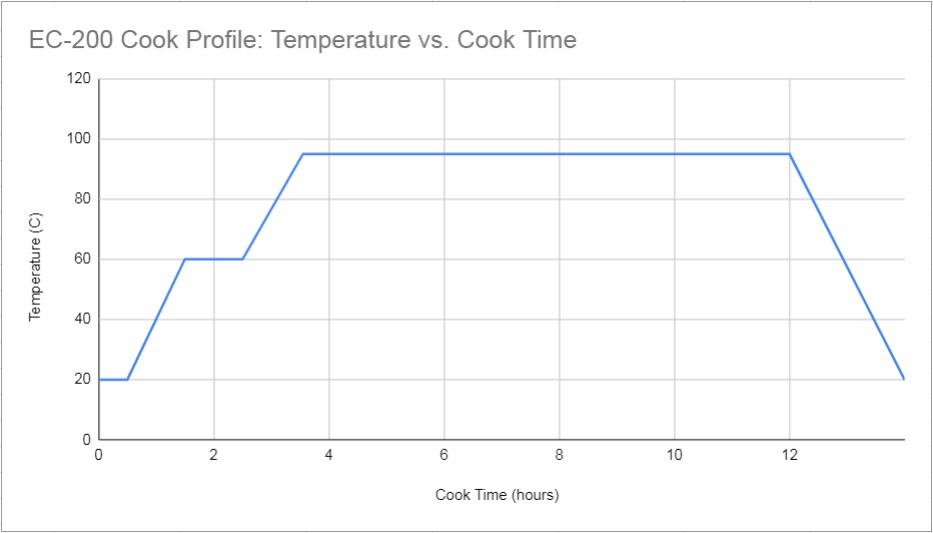
Here’s a look at a ramp and soak profile for a hypothetical cure cycle. This has two ramps (at about 40C per hour) and a 1-hour dwell at 60 degrees. The cure is done at 95C. The complete cure cycle is done after 12 hours, and the part is allowed to cool at a modest rate back to room temperature.
In reality, the actual part temperature will closely follow this pattern but will lag behind as this represents the air temperature in the oven. It is a good idea to monitor the part temperature in several places to be sure it is not deviating from the cure cycle you have planned. Avoid using part temperature to control the oven though!
Make sure you control your oven off the air temperature if it is of the circulating-air type. Your oven controller will have a control thermocouple, and this should be in as open an area as possible. For directly heated molds, use the mold itself to control the temperature with an inserted thermocouple – the part will take care of itself. It is all too easy to way-over heat your parts if you mistakenly connect a control thermoucple to a slow-heating part with lots of thermal mass. Good way to start a fire too. So, control the thing closest to the heat source but monitor the things you care about!
So in terms of problems, if you ramp too fast to cure, the resin will not have enough time in the liquid phase to let air and volatiles escape. Surface pinholes and ugly outside corners can be a result. It can also drive the resin to cure too fast, resulting in warped parts if some areas cure before others. Heavily reinforced areas can have spikes in temperature as the resin cure creating even more (exothermic) heat. Too hot and you risk damaging the resin (and part) itself or potentially overshooting the stable temperature range of the mold, core or vacuum bag. Because of the thermal mass, metal tooling can help absorb the excess heat created by “exotherm.”
Ramping too slow is risky in that you can have resin flow excessively, leaving too little in some areas. Here test panels are a great idea and will let you see if void content is impacted by cure rate. Core-bonding can be tested too to make sure there is enough resin at the bond-line. Generally, you will have fewer problems ramping too slow than too fast – especially for larger things with core!
Conclusions
So, there are plenty more ways to mess up your prepreg parts, but this covers some of the common ones and how to fix them. I can’t emphasize the value of testing enough especially if you are using new materials or building large complex parts. The chemistry is very repeatable, and it takes a lot of work to make the laminating and curing process repeatable too.
Lean on your suppliers – they have technical resources and a huge range of experience with their materials – and they want you to make good parts so you’ll buy more stuff!
Good luck and happy cooking!