Introduction
This is how I’d do it. And more importantly this is how some people who are way more experienced than I am suggest it should be done. None of this is all that difficult, but there are numerous details that can cause grief and extra work if you get on the wrong side of them.
The most important lesson I have learned about building tooling is that you can’t cut corners. I’m inclined to push the limits – especially when a job is boring and time-consuming – and I’ve made many mistakes! There are plenty of ways to do this job right, but each will require being fussier than you feel is necessary and being aware that each day you have a chance to mess up everything you have done so-far. But you can’t build nice parts without nice tooling so this is the place to sweat those details – because it will pay off.
Table of Contents
- Plug Construction
- Fairness
- Smoothness
- Plug Preparation and Release Agent
- Scheduling
- Gelcoat
- Skincoat
- Resin Choices
- Laminating
- Support Structure
- Demolding
- Polishing
- Conclusions
Plug Construction
The process we’re discussing here involves building tooling without the aid of vacuum – using manual consolidation – “hand layup” or “open molding”. We’ll start with a bit about building plugs for open molded tooling for production parts. Your plugs aren’t going to need to be vacuum tight so you can build them out of whatever works. They will need to hold up to the exothermic heat generated by the curing resin as the tool gets laminated on the plug surface. This can be up around 150F / 65C or more depending on the weather and the resin system and catalyst ratio used – or sometimes much higher if you’re not careful. So when you’re building the plugs, make sure that there aren’t materials that will warp at those temperatures.
EPS or other light foams can cause a lot of trouble if not heavily laminated-over. Urethane foam is better. Wood can also be problematic if seams aren’t glued together. It is easy to just screw together wood and then apply fillets of Bondo and then primer over. This can cause problems because the un-bonded edges of the wood will move with heat and cause print-through into the finished mold. They’ll also fight you as the weather changes and moisture content fluctuates – seams will keep popping up after you fixed them yesterday. Strip planking also should be glued well with epoxy or a gap filling glue like Gorilla (urethane) so the strips are less likely to print.
Laying a ply of glass over everything before fairing and priming can really help. This should ideally be done with epoxy because it is a much better adhesive when it comes to gluing to the wood or foam substrate – and it doesn’t shrink. If you plan to use a polyester primer like Duratec over epoxy, you will need to be sure the epoxy is really well cured so it won’t interfere with the primer’s curing process. A modest post-cure or a few days sitting (out in the sun?) will really help. Peel ply on the glass will help too because it removes any amine blush from the surface of the cured epoxy.
You may also want to “back coat” your plug materials with resin to minimize the effects of moisture on the stability of the surface. This really helps with strip planked or veneer-laminated surfaces.
When it comes to fairing the plugs, I suggest getting all the filling and heavy sanding done as soon as possible – even if it means lots of applications of putty and coarse grit paper. Better to do the shaping completely first and then move on to making the right shape shiny. A good heavy shot of primer will cover 80-grit scratches no problem. Most primer manufacturers make a high-build primer and this can be a big time-saver. You’ll probably be looking at three rounds of primer to get a hand-built surface to the point where it can be worked up from 320 grit after the last primer to 1200 or more and then compounding and polishing. It’s a ton of work and it totally pays to be as systematic as possible.
If you are CNC machining your plugs then it’s a different story. You’ll get the shape off the machine but then you’ll have to fight to keep it!
Have a look at the article: HOW TO USE MDF FOR COMPOSITES TOOLING.
Fairness
Finally, a little about the finished surface and what it should be like. You want a surface that is both fair (or flat – if you’re after flat) and also smooth. Fairness is what you have with a surface that has a continuous rate of curvature change. So there aren’t any changes in curvature that are abrupt. Think of a circle – the rate of curvature is always the same. Now think of a spline-like curve – the rate of curvature changes but that change is smooth – or continuous.
Fairness is the reason that hard sanding blocks exist. Fairing theory in one sentence: “You fair a surface with a block or board that takes the shape of the surface you want – not the surface as it is.” A very soft block will flex and sand the low spots the same as the high spots. A too-hard block will not bend to conform to the desired fair finished surface. You’ll want a whole range of blocks for fairing: blocks of G10 or aluminum for flat areas, bendy boards with hard surfaces and flexible acrylic glued to the face of soft sanding blocks. For coarse fairing, Velcro-backed paper is great. When you get to finer fairing, I strongly recommend you use adhesive paper that comes on rolls about 2″/50mm wide. The adhesive has less “give” than the Velcro – so it better conforms to the block surface and makes fairing and smoothing easier.
It’s important to consider the difference between “bendy-stick” fair and “computer” fair. Computer programs use a mathematical version of “fair” that involves continuous derivatives of the curves involved and interpolating weighted control points. These closely approximate the smooth curves you’d get by bending a thin batten around some nails – but they aren’t the same. When you are sanding (fairing) with a long-board or hard sanding block, you are using “bendy-stick” fairing techniques. If you’re doing this on a CNC-machined plug surface then you have to be careful not to fight the potentially (slightly) different versions of fair that happen – especially at joints or the edges of surfaces. Usually it is best to blend in any “curvature continuity issues” by hand just so the parts will look good – at least with loose-tolerance pretty things.
Smoothness
Smoothness is a more local phenomenon that is separate from the global curvature of your surfaces. It is a measure of surface roughness – or lack of roughness. First, what sanding actually does: As you fair with sandpaper on a block, you are creating scratches that dig deeper into the high parts of the surface and shallower into the low areas. Because it is a subtractive process (unless you skim with filler or spray more primer) you will have to reduce the height of surface features until they are uniform. At a certain point this “fairing” level work will become more and more complete and your job will shift from correcting surface shape to removing the scratches from the sanding you have already done. This is hard – because sanding scratches can be deep. You’ll also have to be sure to preserve the fairness as you bring the smoothness up to perfection.
The depth of sanding scratches gets shallower very quickly as you move up in grits. 80 grit paper will leave scratches up to 0.02” (.5mm) deep, but 220 will leave scratches only 0.002”(.05mm) deep – so 10 times shallower. It would take lots of rubbing to remove 80 grit scratches with 220 paper – so you “work through the grits” from coarse to fine. In theory you will remove only a little more than half of the scratches from the previous operation – realistically you’ll want to go a little harder. So a good strategy is to do most of your fairing and sanding up to say 180 grit and then spray your last primer. This will fill the 180 grit scratches and any remaining coarser scratches.

When you start to sand the last (you hope!) shot of primer, start as fine as you can – like 320 or 400 grit. Any scratches you make now will have to be sanded out as you work to finer grits – so be really fussy. Use a guide coat between grits! If you have to deal with drips or sags in your primer, this can be a lot of work with 320 grit – you can go back to 220 or further – just be very careful! A sharp scraper can be an effective way to remove drips or sags without over-sanding the surrounding area.
A bit about machine sanding – because sometimes a dual-action (DA) or random-orbital sander can be a huge help. Machine sanding is good for flat or gently curved areas, but it can cause real set-backs if you aren’t careful. Bumping the edge of a pad into a corner or not keeping the pad perfectly flat on the surface is asking for trouble! Sanders should be started and stopped on the work-surface to minimize the risk of digging a corner and leaving little moon-shaped gouges.
Shininess!
I’d suggest doing almost all your sanding and compounding and buffing on your plug, and save only a light compounding for the finished mold. Primer is almost always easier to sand than tooling gelcoat! So taking the surface up from 320 or 400 grit and all the way up to 1200 or so before switching to compound… is a lot of work! Using a spray/wipe of Dykem (blue dye in alcohol) or a sanding guide coat before each new (finer) grit will make things go much faster, better – and make the process more satisfying! Guide-coat will show any scratches better too. Make sure you clean off the surface carefully after vacuuming between grits to keep heavier grits from previous sanding from riding along and scratching deep grooves in your surface. Not all the sand stays glued to the paper and it doesn’t take much of the wrong grit getting rubbed around to really mess things up!
Compounding can be done by hand on small parts, but a power polisher with a foam or wool pad (aka “bonnet”) will work much better. Be sure you keep the RPMs low and don’t generate too much heat or you can bring out distortions from filler and seams in the underlying plug. Work in manageable sections as you compound the plug and try not to let the compound dry in place. In complex areas really fine sandpaper – like 3000 grit – can work in place of similar grit compound. Give the surface a good cleaning and inspection before getting into release coatings!
Plug Preparation and Release Agent
Assuming that you have a fair surface AND a smooth shiny surface, it is time to apply a release coat so the mold comes off the plug. There are lots of choices but wax is probably the most common and will give excellent results if you are careful. Most mold-release waxes will specify the number of coats needed and the time between coats. This is important to actually follow even though rubbing wax and then polishing it off is a difficult and dull job. You’ve spent all this time fairing and polishing that surface – don’t mess it up by cutting corners now!
You could use a semi-permanent chemical release system if you’d like. There are some great primer/sealer/release systems that are really reliable and leave very nice surfaces. The only downside to this is that it brings in another variable. It’s also slightly more likely to pre-release than wax because some products are so not-sticky! If you choose a semipermanent release, get one that has moderate to low slip to help avoid pre-release of gelcoat and skin coat. A technical sales representative from your release-system vendor can get you sorted – just be careful and do some tests before you commit to anything big. For simplicity’s-sake this article is going to stick with wax – real mold release wax actually for mold release. Avoid generic car waxes – or test them thoroughly.
Before you release-coat, it is important to thoroughly clean your polished mold surface. This will give you a chance to remove any remaining polishing compound and also to look closely at the whole surface to make sure it is as good as you want the future parts to be.
Wax should be applied to relatively small areas at a time – maybe 2’x2’ / 600mm x 600mm – and rubbed in with a clean cloth rag. After a minute or two the wax will start to haze and you come back with another rag and polish away the remaining wax. There should be no smears or smudges of built-up wax when you are done polishing and ready to move to the next 2’x2’ zone. Wax hardens if you don’t polish it out quickly, so you need to work areas small enough to get through the whole area in a few minutes total. It takes a surprisingly large amount of rubbing effort. If you’re having trouble getting through the polishing step before the wax starts to harden, reduce the size of each zone you work. For best results don’t always work in the same pattern over a mold surface – it can be too easy to miss spots.
After you systematically cover the whole plug and flange surface, give the wax a half-hour or so to harden up. Avoid making dust during this process it will get stuck in the wax and make your surface less-nice. Go back and repeat the wax spreading and the followup polishing at least three times – follow the directions your wax brand recommends. It is common to do more than three coats, but consider 3 an absolute minimum! For large surfaces, a power-polisher can work for the “wax off” step – but it requires care. Too much pressure can generate heat which will un-do your waxing efforts in not-super-predictable ways.
You should give your wax at least half an hour after the final polish before you apply your gelcoat – more is ok but try not to leave more than a day. If in doubt, come back an hour or two before gel spray time and do one last coat of wax and a good polish. Always cover prepped surfaces if you’re going to leave them for more than a few hours – all kinds of gross stuff settles on them. It’s not unreasonable to be fussy about this!
People have suggested to me that it is good to run a bit of masking tape around the outside of the mold flange. This is supposed to help keep the gelcoat from going around the corner and then chipping when demolded. Either way, make sure your flanges on the plug are a little bigger than the ones you need on the molds – some trimming may be necessary. Or plan to lay up all the way to the edge of the plug and grind flush before demolding.
If you are concerned about release, some people like to spray several light coats of PVA (poly-vinyl alcohol) over the finished waxed surface to ensure that things don’t stick. I know that PVA can make the surface ugly if you don’t apply it in thin sprayed coats, and that for areas you don’t care about it is a good reliable (and removable) release coat. It won’t play nice with wax that has silicone additives – you’ll get fisheyes and pools in the PVA. Beyond that I have no clue about PVA! If you have good PVA-related advice, please let me know.
Scheduling
Because these polyester/vinyl-ester type resins are temperamental and demanding (says the epoxy guy) you should try to plan your schedule to compliment the cure times and the requirements of the resins. Until you get to the final ply of the mold, you’ll be counting on the resin to remain “open” to chemical curing with subsequent layers. This is a very cool feature of polyester and vinyl-ester resin systems: they cure – but not on the surface. (Just don’t use waxed “finishing resin” or wax additive!) For a few days you’ll be able to come and lay down more laminate (or skin on gelcoat, or laminate on skincoat) and the resin will chemically bond to the resin in the previous layer.
My suggestion is to try to do the gelcoat and the skin coat in one day. You want to get something on the gelcoat to protect it and because it will bond best to the laminate when it is fresh. If your work-space has temperature fluctuations, it will be good to get some laminate on that skincoat as soon as possible. Avoid doing gelcoat and skincoat on Friday afternoon and letting it sit all weekend. It’ll probably work but it also might be a problem. If you do, check carefully for pre-release by looking and by tapping (very) gently with your finger. Unless areas of concern are major you may be best-off repairing the surface after you demold. This is a call that only experience can make – and I don’t have it!
Once you start to get some laminate on the mold, it’ll depend a lot on your choice of resin systems as to how you break up the sequence. You should avoid just dropping half an inch (12mm) of laminate right on there because it will make lots of heat and shrink and mess up your mold. A good rule of thumb is 1/8” of laminate per application for an iso-polyester tooling resin. For some low/zero (aka “shrink controlled”) resin systems, you may be able to do up to ¼” per application. You should be able to do several applications of mold laminate per day depending on mold size and work-space temperature.
Sometimes molds are built with core in them. This isn’t ideal because it is a lot of work and introduces another material with insulating properties to the process. If you have large flat areas and you can’t get away with just increasing the mold laminate thickness, balsa core is a good option. Make sure it is isolated from the mold surface by at least ¼” (6mm) of chopped strand mat laminate. The skin covering the core on the outside of the mold can be much thinner and can have some non-mat materials.
It is a good idea avoid woven roving in molds because the huge fiber bundles can print through. Better to just make things thicker and/or allow the backing structure to support the shell rather than try to make the shell super strong. All chopped-mat laminates are very common and work fine with adequate thickness. Some light non-crimp mat-backed fabrics where you need extra strength are fine, but it is better the make sure there’s plenty of mat between those plies and the gelcoat.
You’ll have to have a plan for backing structure to support the mold. This will depend totally on your budget and plan for the mold in production. For small or short-run molds, plywood is fine. You can tab it together and coat it and it will be stiff and work just fine. For larger more complex molds or ones that you expect to use a lot, metal backing structure is great. It requires welding and degreasing and another set of work processes but it’s stiff and strong and once you’re set up for it things go fast. Wood and metal together work well too – it all depends on the situation, budget and handling requirements.
I understand that the climate has a lot to do with the choice of backing structure. People in uniformly warm areas tend to use steel more and people in colder climates (or where molds get stored outside in winter) often opt for wood. It’s a matter of the coefficient of thermal expansion – steel moves more across temperature variations and can break stuff… and wood rots if the covering laminate starts to crack.
Gelcoat
Now I am no expert on spraying gelcoat – but I have done it and I have talked to plenty of people who are pretty skilled. So – this is my distillation of best practices and should not be taken as totally guaranteed best method. Like most things related to composites manufacturing – there are lots of variables (aka: ways to screw it up) and lots of ways to get good results. Best advice: do tests!
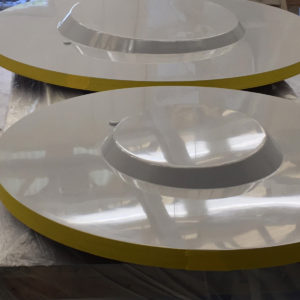
Gelcoat is a key feature of production tooling because it provides the shiny hard surface that will give the parts their surface finish and play nice with release systems. There are special types of gelcoat just for tooling that are tougher and harder and better suited to long-term abuse in a production environment. Tooling gelcoats are typically tuned chemically to cure into a harder more abrasion resistant surface. They often have fillers added and are almost always of isophthalic polyester or vinyl-ester chemistry for toughness. Usually they are available in black or orange – or green sometimes. Orange is a color that is very different from the gelcoat used on most common parts – so it offers a good visual spraying guide. If you’re building an orange part – choose black or green tooling gel!
My advice would be to use the best tooling gelcoat you can get – and by “best” I mean vinyl-ester. There’s really no reason to cut any corners here. The properties are better and the people I have talked to all pretty much agree that unless you need to save money, use VE gelcoat and skincoat. If you’re going to paint the parts or are only doing a quick and dirty mold for ten parts – then use whatever you want. For tooling that will be in service for hundreds of parts, invest a little in using the best materials – the consensus is that it will pay off!
Spraying gelcoat is best done with an industrial spray unit that moves a lot of material and sprays at relatively low pressure. MVP, Graco, GS Manufacturing and others sell these and they are great for industrial-scale situations where you’re spraying many gallons of gelcoat at a time. The machines have a gelcoat pump and a metered catalyst pump and these two are mixed and squirted from a gun with pressurized air to control the spray properties. There is no need to thin or mix individual batches and the guns can be adjusted to apply “droplets” instead of a fine mist – or a fire hose.
For smaller parts, gelcoat can be sprayed from a HVLP gun with a large nozzle (2.5mm+) or a “dump gun”- which is a simple sprayer that dispenses right from a bucket of material. The 3M Accuspray guns with the disposable parts are good too if you get the bigger (2-2.5mm) nozzles.
The problem with HVLP guns especially is that the gelcoat is often too thick to spray well. You’ll get splattering or big “chunks” instead of smaller droplets and the gelcoat won’t flow into an even thickness. Thinning can be done to a certain extent with styrene monomer – but you’ll have to be careful not to thin too much. Extra styrene will modify the curing properties and will require time to evaporate which can cause pinholes or “alligatoring” (more later on these) if you don’t let it fully evaporate before applying the next layer of resin.
Now I’m not going to say you can’t brush the tooling gelcoat – but for big things you expect to be nice I would avoid it. The thickness will be uneven and there will be the risk of brush marks in the mold surface – and bristles if you use a crappy chip brush! It will work ok and sometimes it’s not worth the trouble of spraying. But since you’ve gone to the trouble of making a shiny surface and are going to be making many parts off this mold then I’d suggest avoiding the brush method. If you do brush, better to do two thinner coats – tipping in different directions each time.
For any gelcoat spraying, the goal is to apply material in an even thickness without too many sags or drips. Thickness is important. Too thin a coat and the gelcoat will not have the mass to cure properly – too thick and it will shrink and cause cracking or pre-release. And the point of gelcoat is to make a nice surface – so any defects or repairs will be no fun at all – and lots of work. Your overall goal is to apply a “wet film thickness” of a little more than 20mils (thousandths of an inch – which is about 0.5mm). This can be measured (ideally off your part – but the gauged spot will fill up on the next pass) with a “mil gauge” which is a little stepped block of metal that you set on your wet surface and that picks up color along small steps up to the thickness of the wet film.
Three things will determine how your gelcoat cures: temperature of the mold, catalyst ratio and the thickness of the coating. You should really do this above 70F. Below 60F and you’re asking for trouble. Above 85F and it could be more challenging too – but you can deal with this by reducing your catalyst ratio – but not below 1%. The temperature of the material only really matters when it is in the gun – once it hits the mold surface, the mold will dictate the temperature – so check your mold temperature for uniformity and make sure it’s warm enough. Also, don’t do this in direct sunlight unless you have a really good idea what you’re doing. Curing too fast can cause cracking and shrinkage and you don’t need that. Also – styrene is heavier than air and it will get stuck like a stinky cloud in deep parts of your mold. This will keep the styrene evaporating off the part as it cures from actually leaving – causing problems. It is good practice to get a fan and gently blow air into your deep molds – or rotate them so the styrene vapor falls out!
Usually you’ll be ok applying your gelcoat in one shot. It should be done quickly so that it doesn’t start to cure on the surface before you’re done spraying the full thickness. Use a systematic pattern of spraying and go back over areas three (or more) times applying a 5-8mil thickness in each pass. Mostly, just don’t hose it down so much that it runs and sags!
In some cases it is best to apply gelcoat in two applications – especially when using an HVLP cup gun to spray and have to thin the gelcoat. The first coat should be allowed to cure until it is a little sticky but no color comes off when you touch it with a gloved finger. If you spray a second coat too soon you can get alligatoring where the styrene can’t escape the now-covered material as it continues to cure. If the first coat is too thin, it may not be able to cure itself – very thin films can’t sustain the chemical reaction and only cure when subsequent material is applied. This also causes the “alligator” effect.
So what you should have when you’re done is a wet surface that a mil gauge says is 25mils or so thick and has an even “orange peel” like texture. There should be no major drips runs or “curtains” with thick spots. If you are brave and lucky these can sometimes be brushed out – but be careful. If you are concerned about the surface or have any cracks or pre-released areas (tap gently with your finger – does it feel like a bubble?) it may be best to let the gelcoat cure and then remove it all and re-do. It’s better to have a small heartbreak and do some re-waxing than to have a big one when you pull the mold off the plug.
Let this gelcoat cure until you don’t get any transfer when you touch it with a clean glove. It could take anywhere from under an hour to a couple of hours depending on temperature and catalyst ratio. Get ready to laminate your skincoat!
Skincoat
The purpose of the skincoat is to provide a resin-rich backup for the gelcoat surface. In a mold this provides extra toughness and allows you to lay up the main bulk of the laminate with less fuss. The skincoat shouldn’t create much heat or cause loads on the gelcoat when you apply it – it’s only going to be 3/4oz (250g) – 1.5oz (500g) chopped strand mat after-all. You can use more, but for an all-chopped mat laminate this should be plenty. For parts, a 3oz skin coat is pretty standard – but here you are backing it up with structural laminate that has large fiber bundles. With an all-mat mold laminate, the next application of fiber and resin will have small fibers too. Especially with bindered mat off a roll, it can be hard to get trapped air out of thicker skincoats. If you are spraying (chopper gun) the skin coat, you can vary the thickness – which is a nice feature but not necessary. My suggestion is that you use vinyl-ester resin for this – just like the gelcoat. It’s the top-drawer option and costs more but it will give you a tougher mold surface that will resist damage better. If you want to use the same resin that you’ll be laminating the rest of the mold with, that is fine – just be sure to keep it catalyzed moderately for the working temperature to avoid hotness.
It is important to make the skincoat really nice. Any bubbles here will be right up behind the gelcoat and will leave areas of the tool surface unsupported by anything – and those gelcoat “bridges” over voids won’t hold up well. So when you start laying up the skincoat, use a brush to thoroughly wet out the surface of the gelcoat and then the thin chopped strand mat. In tight corners it can be helpful to mix up a thin putty of short chopped fibers or silica to brush in. This will help you avoid bridging the skincoat – and will help everything stick in there. Keep the putty thin though so it doesn’t shrink or create too much heat when it cures. Go over the laminated fiberglass layer very carefully with a right-sized wetout roller and make sure it is perfect. Try to avoid large overlaps because they will create heat (and distortion) when they cure because of the doubled-up thick section.
If you have lots of very fine features, it can help to use lighter veil material right up against the gelcoat. Veil is really fine random-fiber mat, but the fibers are continuous usually. Cutting it in strips can really help with getting fiber up against the gelcoat surface in tight detailed areas.
Note: some people (and tooling material manufacturers) recommend a barrier coat of vinyl-ester resin be applied to the back of the gelcoat before the skincoat is applied. This seems like a good idea as long as you let it cure before applying the skincoat. The logic is that it provides additional isolation of the surface from fibers – which can tend to print through. You can use the resin you’ll use for your skincoat for this – or some product specifically intended for this purpose.
So the big take-away about skin coat application: you should be really fussy here – like wearing a headlamp fussy – and do it super nice. You’ll be happier in the long run! Let your skincoat cure – probably overnight – and then you’ll be ready to apply the bulk of the mold laminate.
Once it cures up, you can take that same headlamp and a marker and go over the whole surface looking for voids. Often they will be in laps or inside corners. Mark any ones that are bigger than 1/16” (2mm) so you can find them. Now for the sucky part – come back with a pointy little burr on a die-grinder. Dremel tools work well – or one of those air-powered pencil grinders. Zing open each small void so you can fill it with resin – but don’t zing the gelcoat! Once they are all opened up, come back with a small mix of resin with some silica filler in it and brush/squeegee it in to fill the voids. A syringe works too. Smooth out all the wet resin and let it cure.
Hopefully that was not a big deal. Maybe you did such a nice job on the layup that you didn’t have to do any repairs – which is incredible!
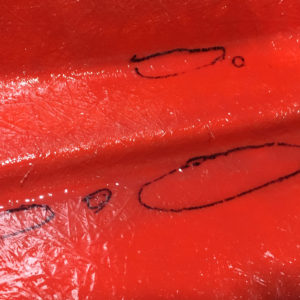
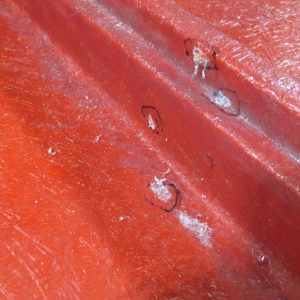
Voids ground out.
Laminating
Resin Choices
First a bit about resin choices. There are some good options for mold laminates that can make this much easier. Traditionally polyester molds are laminated with an isophthalic polyester resin for increased toughness and reduced shrinkage. Often resin is filled with alumina trihydrate filler (also used as a fire-retardant additive) to increase thermal conductivity/stability and to extend the resin. MEKP catalyst is most common but blends (MEKP/CHP) can be used in specific situations and resin systems to reduce the exotherm and shrinkage.
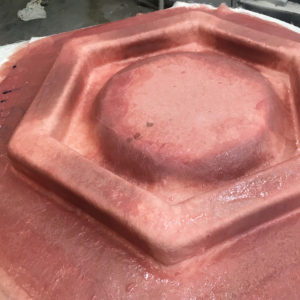
There is a newish (last decade or two) category of tooling resin that manufacturers call “shrink controlled” or “low-shrink” or even “zero shrink”- and it has some real benefits. There are a bunch of these systems that use either polyester or vinyl-ester resins. Most of these systems make use of fillers to adjust the thermal properties of the resin – and none are clear about how exactly they work! Some are highly filled DHCP/polyester blends. Some use additives that expand with heat to take up the slack of the shrinking resin as it cures. Some take advantage of controlled micro-cracking as the resin cures at high temperature – fueled by its own exothermic heat. The upshot is that you get better surface finish on your molds and you can lay up the mold in thicker layers – reducing application time. They are also tuned to produce a high hardness quickly and to create enough heat to completely cure themselves, so you don’t have to wait days for the resin to fully cure before demolding.
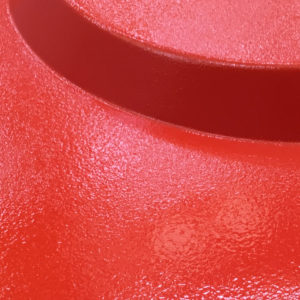
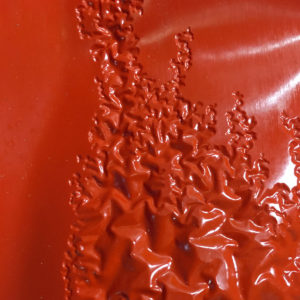
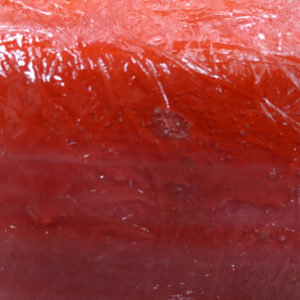
This AOC Moldtru resin turns white as it cures.
The pictures here show molds made with the AOC Moldtru vinyl-ester tooling system. You can see the color change from clear to white as it cures. As it starts to gel you can see the white form in thicker areas where there are laps – and it spreads across the part as the resin gels. The heat generated is concerning and some of the surfaces get too hot to touch, but it seems to work really well – plenty of hardness fast! It is worth discussing your tooling resin options with your technical sales representatives and learn as much as possible about the options.
If you are able to infuse your molds that is an option. It is more work and easier to mess up, but several manufacturers make polyester and vinyl-ester tooling resins designed for infusion. You’ll avoid nasty open layups, but your plugs have to be nicer (vacuum tight) and you will have to research the best types of reinforcements. Mat is an option but you might be able to use more structural reinforcements once you have enough mat against the gelcoat side of the mold to block print. I don’t have any experience with making these types of molds with infusion on anything larger than I can carry. To me it seems like a better choice for epoxy molds for higher temperature work where doing the laminating by hand would be challenging and yield a much lower quality tool.
Laminating Process
Your skincoat should be hard but a little tacky from the unreacted surface of the resin – this is good! It’ll be ready to stick to the laminate you’re about to apply. It is probably a good idea to go over the whole thing with some 60-80 grit sandpaper and very gently remove any sharp strands of fiberglass sticking up. Wear some thick gloves to do this because those little glass strands soaked in resin are super sharp and will stab your fingers. It won’t sand nicely because of the sticky resin but your goal is only to flatten out any jagged bits sticking up. Give it a vacuum but avoid any solvent wipe.
For molds with lots of shape or features, it is probably easiest to pattern and pre-cut the glass. Really, I’d suggest it for any mold! You may have done this for the skincoat and that can be used to test out how well your patterns fit. Laying 6-10 plies total of 1.5oz chopped strand mat will take some time – and cutting or tearing each layer to fit the mold will add more time. You’ll want to be sure the seams are staggered a bit but the edges of the mat will spread a little as you laminate so you really only need a few inches of staggered edge – and it doesn’t have to be super neat. Avoid huge piles of overlaps because they will create lots of heat.
If you have access to a chopper system for dispensing glass and resin, it can be a fast way to build material thickness. You need to be skilled at operating it or things can get messy and you can have too much resin for the amount of glass fiber. The lack of binder makes rolling out the laminate much easier though. It can be a good way to build molds fast and cheap – but it is very skilled work when used for mold making because thickness control is so important.
Laminating the molds is pretty much like laminating anything else. You do want plenty of resin, and should do plenty of rolling. The binder on the mat breaks down readily and then it’s super easy to get things wet-out. The rolling/bubble popping should happen on every layer of material applied to the mold. Try to tune your catalyst ratio to give plenty of time to get all the material down for a given application of material before it starts to gel. You may have to work larger molds in sections – just stagger back the plies at the edge so you have something for the next zone to lap onto. Make sure to wait enough time between applications to allow the surface temperature to get back down to room-temperature. If you are so inclined, you can test the hardness of each layer to make sure things are working right.
Your overall mold thickness will depend on how stiff it has to be. For little molds that have lots of shape to create stiffness, .25”/6mm is a minimum reasonable thickness. For larger molds, ½”/12mm or more is reasonable. It’s a trade-off with your mold support structure.
If you are building multiple-piece molds, there will be this same set of laminating steps done over again after demolding any fence or split-line molding features. The next part of the tool set will be prepped and laminated against the release coated flanges you made on the first stage mold unit. As long as you don’t pre-release the already-complete parts, you don’t need to have the backing structure in place to start on the adjoining second-stage mold units – but it’s not a bad idea to start in just in case.
If you have concerns about cure, you can check the hardness development with a Shore D tester during initial gel and then switch to a Barcol 934 tester to evaluate cure completeness. Resin data sheets will have information on hardness progression and what your targets should be. This is less of an issue with shrink-controlled resin systems, but with traditional tooling resin it is good to monitor for a day or two after layup to make sure things are curing completely. Having the luxury of leaving a recently laminated mold on the plug for a week or so can really help ensure that it doesn’t have free styrene to cause problems with sticking the first few parts.
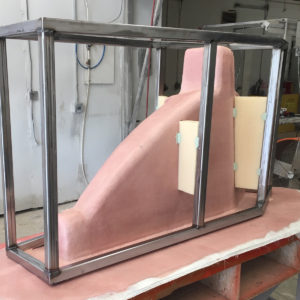
Support Structure
When your mold shell (gelcoat, skincoat and structural laminate) is complete it is time to attach your support structure. Unless your mold is very small, you will want something to support it and allow it to sit flat on the floor. Support structure should aim to support the mold shell but not constrain it or apply pressure to it. Don’t use the mold shell as part of it’s own support structure – its job should be molding parts, not supporting itself too.
And don’t demold or move your plug until the support structure is fully tabbed in place and fully cured!
The most common materials for mold support structure are steel and wood. Sometimes composite panels or pultruded fiberglass can be a good option but it is more expensive. For large parts, the coefficients of thermal expansion for the mold and the support need to be considered – especially if there will be a big thermal range in use – like a postcure or lots of exotherm heat. For large molds, steel framing will probably be the most functional, durable and economical option. Wood needs to be coated and sealed to last and can interfere with air circulation and mold heating if that needs to be part of your production plan.
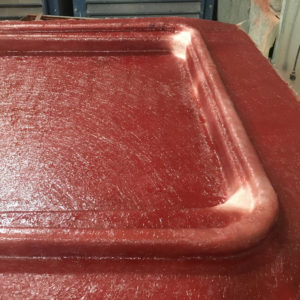
The little mold to the left has a large flange for a re-usable bag. The mold structure here is made of Strongwell fiberglass pultrusion fully laminated over. The CTE matches very well and any print-through of the structure is off the part itself. It made for a very light, stiff and quick structure so the tool would sit flat on a table.
The biggest problem with attaching mold shells to support structure is the risk of the support printing or telegraphing it’s location onto the mold surface. This is usually the result of too much contact and unnecessarily heavy or continuous tabbing from the support to the mold shell. The shell should be held off the support structure by at least an inch or two – and contact should be by tabbing only. You don’t want to bed your support structure to the tool with big globs of thickened resin! If you glue plywood right to the tool and then tab it in place, there is the risk of the shrinking of the tabbing or movement of the plywood causing a distortion in the mold surface. If it is only held with the tabbing, there is kind of a “shock-absorber” in there to keep stress off the mold shell. This is less of an issue if you have a thicker tool shell laminate and if you have used a shrink-controlled resin system.
Many builders build very nice production tooling with full contact support structure, but usually only with well sealed wood or cored composite panels for the support structure framing. They use continuous tabbing but it is usually relatively light – maybe only a single 1.5oz mat with a 1708 biaxial – or something like that. And most of the time this will actually bridge a small gap between the mold shell and the structure. This can be a cleaner looking method and will be fine as long as the mold shell is relatively thick and well built. Best for curved surfaces where the structure doesn’t run along the middle of a flat panel – because flat panels are easy to distort!
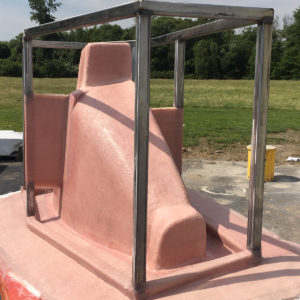
For steel support structure, it is nice to leave a few inches between the steel frames and the mold shell. Usually this steel can be pre-built from a computer model if the plugs were CNC machined and will fit nicely. You can also build the frames in place on top of the mold shell while it is still on the plug. Welding on top of a fiberglass structure is concerning so sometimes people use protection mats or tack the structure and do the full weld-up of the support structure after removing it from on top of the mold. It can be lifted back up once fully welded and supported and tabbed in place.
Round steel pipe/tube is nice because it is easy to handle and fit and the fiberglass tabbing can be wrapped smoothly up and over the pipe and back down to the mold shell surface. Square tube can be easier to deal with for square things – and tabbing will have to just deal with the corners!
Before you tab the support structure in place, it is good to make sure it isn’t twisted or under any load from being supported unevenly – even it’s own weight can cause flexing or twisting. The last thing you want is for the mold shell and the support structure to spend the rest of their days battling each other!
Demolding
Once your support structure has been fully tabbed and detailed and maybe even coated with air-cure gelcoat (the kind with wax) to make it pretty – it is time to demold. This is a really easy time to mess up that surface you put all that work into! I suggest starting by grinding up and tidying the edges of the mold. If you laminate all the way to the edge of the plug flange, you can just zip around and make it so that the two are not glued together in any way. Your gelcoat can be easily chipped, so it is important to use demolding tools that are softer than the gelcoat surface – so no chisels or screwdrivers!
This is also a good time to hook up some lifting on the support structure. You don’t want too much, but enough to reduce the weight or support the mold shell itself. If you really jerk on it with a forklift or something it is easy to damage your mold and put unnecessary strain on the support structure to mold tabbing.
Work your way around the perimeter seam with a bunch of shallow plastic or wood wedges and try to open up the perimeter a tiny bit. Long shallow wedges are your friend because they do more lifting and less bending of your flange. The very thin plastic wedges used for shimming doors and windows are good! It is fair game to use a rubber hammer to wack the back of the mold as you gently tap in your wedges. Be careful wacking too much or too hard!
In my experience the most valuable thing when demolding parts is patience. It’s not something I come to naturally and I have broken lots of stuff to win this perspective! You can do lots of damage fast if you’re in too much of a hurry. Sometimes just taking a 20 minute break while there is some load on wedges and maybe from overhead will do wonders. If you really get in a jam and it isn’t coming off you may be in for a bit of a battle. But many many people have been where you are and have lived to tell the tale – often very helpfully and in detail on the internet! If you’re stuck – take 5 and do some thinking and research before getting a bigger hammer.
Polishing
So once your mold has parted company from the plug and you have it flipped over and you’re walking around it all hawk-eyed looking for problems… you’re almost there! First it is good to do like you’re already doing and carefully inspect the whole surface. The good news is that molds can be fixed and that gelcoat repair is a pretty well-developed science. Lots of re-gelcoating, wet-sanding and polishing can bring pretty much anything back to a perfect surface after repairs have been made.
So that brings up polishing – the last step. This is usually necessary (or desirable at least) to get rid of wax smears and bring out the very best in your mold. You shouldn’t necessarily need to use an abrasive buffing compound unless there are dull spots. A good going over with a clean rag for small molds or a wool pad on a buffer will get any wax off and get you ready for whatever release system you plan to use.
Mold preparation before building parts is important. Sometimes the gelcoat in the new mold is not chemically inert and can react with the new part you are making – causing the part to want to stay in the mold forever – or be “stuck.” Nothing suck like a part that’s stuck! Check out this article from Rexco: WHY MOLDS STICK: The Phenomenon Explained
It is a good idea to to a “blow coat” or “peel coat” on new molds just as a precaution. This involves spraying gelcoat on the release-coated tooling just as if you were building your first part. Maybe you back it up with a very light chopped strand mat if the geometry is complex. Then when it cures enough, you peel it out of the mold – or blow it out with compressed air, which limits the risk of scratching the new surface. This “experience” allows unreacted gelcoat on the mold surface to work its issues out – and if there is a problem it is way easier to remove a ply of peel-coat than a stuck part.
Most production composite parts will be built with a semi-permanent mold release system. These usually work together with mold cleaners and a sealer that are applied to first clean and then seal a mold before release-coating. They work very well but the cleaning step is important and it is probably worth buying into a system and using matching products from one manufacturer. They’ll provide you with all the instructions for how to use the products and will be there to (hopefully) answer your calls if things start getting wierd.
More about release here: Guide to Mold Release Systems
Conclusions
I hope this was helpful. There are lots of ways to do this and many people who are more qualified than me to give advice. I am trying to synthesize the best of the information I have from people who have lots of experience with this. Keep in mind that there is always more than one way, but for any way there are a near-infinite number of ways to mess it up. Good luck!
Appendix A: Shrink Controlled Resins
- AOC Moldtru LPT-68000 (VE)
- CCP/ Polynt OptiPLUS 040-8077 (polyester)
- Polynt Optiplus 040-8089
- Nord Composites NORESTER 3000 (VE) and NORESTER 2000 (polyester)
- Polipol 321-ZERO (polyester)
Additional Resources
- AOC Resins: Tooling Resins (Applications Guide)
- WHY MOLDS STICK: The Phenomenon Explained (mold preparation for part layup)
- Polynt “Cook Book” (Legendary resource – see p.188 for tooling.)
Please Note
This article is for educational purposes. It is meant to explain one approach to this process – not to provide a set of step-by-step instructions guaranteeing success! This is hard – and you will definitely have mistakes as you learn – and even after you’re very experienced. Please talk to as many people as possible about your plans and enlist help if your project is high-stakes enough that you would be really upset to have to do it over. I wish you luck. Please be safe!
Image Credit
Images from work done by North Shore Composites between 2015 and 2018.