I always wanted to log vacuum levels to a computer during pre-preg cooks and for general quality control. A gauge reading is great – and manual logging works fine as long as people remember to do it – but its distracting. You can have a look at the gauge every now and then and have a feeling about how things are going – but it’s so much nicer to have data points instead of feelings!
It is totally possible to spend a couple of grand and buy a ready-to-go setup for logging vacuum. If you have a nice autoclave or oven it may even have come with this built in. My goal with this article is to give two examples of how a most basic vacuum logger works and to show how simple and inexpensive it can be.

The Logger
The first thing I needed was an analog to digital converter/logger and some software to display the logged data. There are many products that would work, but I knew I wanted to log voltage – from 0v to 10v – because it is simple and flexible. I bought a “Data Acquisition Starter Kit” – the Model DI-1100 from DATAQ – because it was the cheapest one I could find that looked easy to set up. They even sold the 250 ohm shunt resistor I would need to convert 4-20mA (current) input to the right voltage range and had a nice video on how to use it. Price: $75 delivered – with two resistors.
If you do Arduino stuff, the analog inputs can handle up to 5v and with 10 bit analog-digital converters you can get pretty good resolution. I haven’t done this but it should be easy enough and then you could do whatever you want with your data!
The Sensors
Next I needed some transmitters/transducers to turn pressure (vacuum) into electrical signals that could be read by the logger. I had a bunch of SunX DP2-40E pressure sensors (now a discontinued model) that once served as gauges on an oven – they display LED vacuum levels and can trigger an output (alarm, pump starter, etc.) if vacuum levels go above or below a threshold. They also have an analog output! This delivers a 1-5v signal over the pressure range – in this case full vacuum (29.9inHg) to no vacuum (0 inHg). This should be a direct plug-in to the data logger.
Panasonic seems to have bought SunX and the current version of this product is the Panasonic DP-101-A or 102-A – just make sure it has the A for analog output. The analog output for the current models can be either current (4-20mA) or voltage (1-5vdc) – so they can be configured in either of the two ways I will demonstrate!
Looking on Ebay, these can be had for between $30 and $150. New ones are about $100.
My second transmitter is a NOSHOK 100-30vac-1-1-2-6 – which I bought surplus many years ago to log vacuum – but I never got it set up. This one is pretty nice and costs around $600 new. The rated accuracy is .5% which is very good. It is designed to be plugged into things in an industrial environment and wired to a remote logger or PLC. No screen, no buttons – just two wires and a ground. These can be found on Ebay for significantly less than their retail price – I think I paid about $150 for mine.
Setting up the Logger
DATAQ includes a basic viewing and logging software called WinDaq with the logger hardware. I downloaded and installed it. Then I plugged in the USB cable and the power light came on. Ready to go!
Setup for 1-5VDC signal with the SunX sensor.
This is a straight up plug and calibrate situation because the output from the SunX sensor is 1-5v and the logger input is 0-10v. The inputs on the DATAQ logger are positive and negative. The SunX sensor requires 12-24 volts so I grabbed a small plug-in-the-wall charger from an old WiFi router and stripped off the leads. I’d recommend using a real power supply but was being lazy for testing. I found the positive (trial and error – got it wrong the first try but nothing bad happened) and 0v leads and wired them up. The negative (0v) goes in (-) on the logger (using channel 1 here) along with the 0v(blue) lead to the sensor. The positive power lead goes only to the sensor +12/24v(brown) input wire. The analog output wire from the sensor goes into the (+) input of the same channel on the logger.

When you power up the logger and load the software you will need to calibrate the voltage to match your vacuum range. In the WinDaq software this is under an option called “Engineering Unit Settings.” If you have a reliable digital gauge, you can hook it up to the same vacuum source and use the calibration (dropper button) and enter the vacuum level at the no-vacuum voltage – and same for the full vacuum range. For starters you can just enter 1 volt in the “Lower Level” field and 5 volts in the “Upper Level” field and corresponding vacuum units on the right – like this:

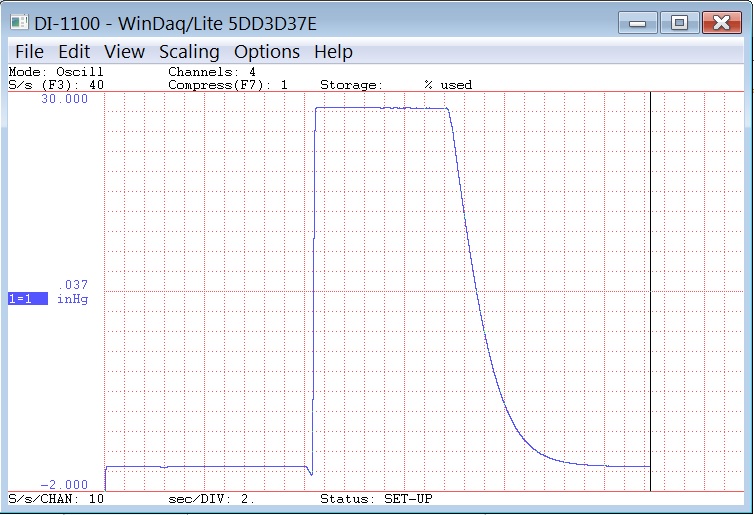
Now you should be able to plug some vacuum into the transmitter and see both the digital display show the vacuum level and the logger register the vacuum on the screen. You can adjust the sampling rate and tweak the ranges of the display and what reads as positive vs. negative. Here’s a log of me plugging in and then unplugging the sensor – in this case vacuum is positive:
Setup for logging 4-20mA current signal from the Noshok 100-30vac sensor.
To convert a standard 4 to 20 milli-amp (4-20mA) current signal to 1-5 volt signal, we can use a 250 ohm shunt resistor. This resistor is placed across the channel inputs at the same time as the current input. Ohm’s law (V = I *R) is used to calculate the resistor needed – see this quick video from DATAQ for an explanation of this exact setup. The NoShok sensor takes positive voltage and returns a current signal with the vacuum level. Here’s the PDF of the wiring diagram – see the first entry – the 100 series.
So we give the red wire (+Supply) the 12v input and hook up the black wire (+Output) to the positive input on the logger. The 0v / negative wire from the power supply goes to the (-) input on the logger. From here we are in the same place as with the SunX sensor – just have to calibrate the inputs and we’re good to go. Here’s what it looks like:

I hooked up a vacuum quick-connect and gave it a try. These fittings were just put on without thread sealant but for real you’d want it!

And logged the plug and unplug with this sensor and vacuum set to negative this time:

Conclusions
So there you have it! That is my quick introduction to logging vacuum from one’s kitchen table. If you have an oven or autoclave you may want to set up some kind of automatic vacuum logging to document your process. It is nice to be able to see vacuum go up and down with cook progress and make sure things are where you want them. You could also use a PLC or a setup like the SunX controller and an actuated valve to isolate a damaged part or popped bag automatically or to turn on a backup pump if vacuum level drops below what you want. If you find any good products for this please let me know and I’ll add them to the resource list. If you find I have made a mistake please tell me what it is so I can fix it. Happy vacuuming!
Resources:
- Omega Vacuum Transmitter
- Vaccon Vacuum Switch
- SensorsONE Vacuum Transducers
- Omega: Digital Pressure Gauges with Alarms and Analog Output Functions
Revisions:
Published 12/2/19