Here’s an article about how to get started building composite parts with pre-pregs. It covers buying, storing, laminating and cooking – and lots of the details that can trip you up along the way. This is the pre-preg laminating process that I have learned/used over the last 15 years building racing boats, boat parts, and all kinds of non-boat stuff. It has been an evolution as I went from job to job and learned new techniques and tried experiments with different methods.
Pre-pregs are the pointy end of advanced composites – for when you need structural awesomeness and near-perfect control of fiber orientation and weight. It’s not hard but there are lots of things that you wouldn’t necessarily figure out on the first try that make it work better. My goal here is to present the basics and give enough information to get you to success on your first few parts. Appendix A at the end has a list of useful resources to learn more.
I’m decently experienced in my own lane, but there are tons of things I haven’t done or don’t understand about pre-preg handling and curing. If things aren’t clear or you think stuff is wrong or missing, shoot me an email – I’d really value your opinion. This is a work in progress and I want to make it better and better over time.
In this article we’re going to deal only with epoxy resin, which is the most common type of high-performance resin system. If you are starting out with pre-pregs, it will almost certainly be with low temperature epoxy systems – and if it isn’t – why not?
Videos
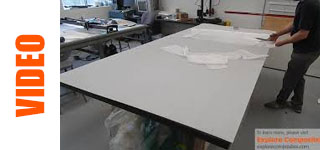
Here are a few videos of Laminate Samples from the EC! Library that show the process of working with pre-pregs and may be a good thing to look at if you are just starting out. They aren’t instructions, but they show the process clearly with a very simple type of part:
- Laminate Sample#4: Pre-preg Carbon Plate with Quasi-Isotropic Balanced Laminate
- Laminate Sample #14: Prepreg Carbon on Aluminum Honeycomb Core
- Laminate Sample #2: Prepreg Carbon on 15mm Nomex Core
Table of Contents
Introduction
Handling Pre-pregs
Tooling
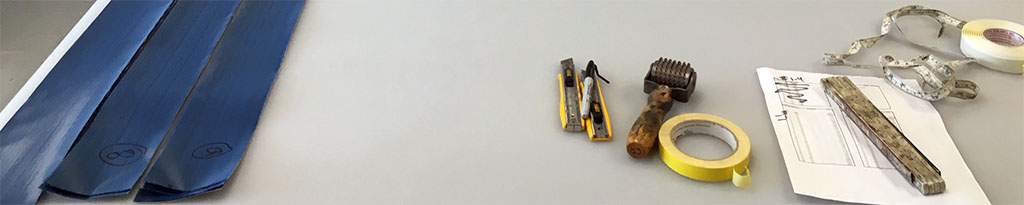
Things You’ll Need
Lamination
Cooking
Introduction
So what are pre-pregs?
For your first ever composite part, you probably got some fiberglass (or carbon if you’re fancy) from one vendor and probably some resin from another. One came on a roll, the other came in a bucket. You could choose any combination you want. So you mixed parts A and B (epoxy) or added some catalyst (polyester or vinyl-ester) and mixed it up. Then you did the laminating – mixing the resin with the fiber and squishing it together. Finally you pulled off those gloves and let the resin cure – and in a few hours you had a part! What you used is called a “room temperature cure” or “ambient cure” resin system. So now you want to take it to the next level. Now you’re gonna try pre-pregs!
“Pre-preg” is just shorthand for “pre-impregnated.” With pre-pregs, you are outsourcing the job of mixing the resin and then applying it to the fiber. The rolls of dry material are “wet out” by a manufacturer with a resin that only cures at high temperature. There is a big machine that rolls the sheets of fiber through a bath of mixed resin (“A-stage” cure) and then through big rollers that precisely control the resin content of the pre-preg. The the material is heated and the curing reaction starts – but then it gets cooled off fast leaving the resin in what is called “B-stage.” It is chilled until the resin is not tacky anymore and plastic or paper sheet is applied to protect the material and keep it from sticking to itself. Then it gets rolled up nicely and put it in a freezer. Freezing stops the curing process and the pre-preg stays “B-staged” until you take it out of the freezer and cook it. Because the resin chemistry is tuned to require heat to cure – it can hang out at room temperature for a few weeks while you use it without picking up the cure reaction and hardening. When you’re done laminating, you have to cook the pre-pregs in an oven at elevated temperature. This kicks the resin system into the final stage of it’s chemical reaction – “C-stage” – and you get a completely cured part.
Some pre-pregs are not B-staged, they are just made with a resin that requires a high cure temperature. These are more like wet-preg that you’d make with a fabric impregnator or by hand between sheet plastic. In many situations this is fine, but the handling characteristics can be different.
Temperature control allows you to effectively break down the curing process into discrete steps. This gives you more control and time to laminate very complicated things that you couldn’t get done in the limited window that room-temperature-cure resin systems give you. Combining this leisurely laminating schedule with the perfectly tuned fiber to resin ratio and a just-right level of stickyness (“tack”) for laminating makes pre-preg the ideal way to build complex and structurally demanding parts.
When should you use pre-preg materials?
First, there are a bunch of real down-sides to building with pre-pregs:
- Pre-pregs are expensive!
- Pre-pregs require frozen storage and have a limited shelf life.
- Laminating is slow and laborious. Debulking, careful tailoring, removing backer… don’t forget the backer!
- Tooling has to be able to take high temperature curing cycles – so it’s more expensive.
- You have to have an oven or autoclave.
But for some types of work it is worth overcoming those challenges because the benefits can be huge:
- Maximum strength to weight ratio for composite processes. Optimal (low) resin content.
- High resolution laminating – exactly the right fiber in exactly the right spot!
- Honeycomb cores: Nomex, aramid and aluminum cores are the lightest for their stiffness and are best used with pre-pregs.
- Process control can be excellent because of the time available for lamination. Layup is not a fire-drill.
- Potential for high service temperatures.
It is important to make sure your project can’t be done with a less expensive processing method – like bagged wet layup or vacuum infusion.
Who uses pre-pregs?
Prep-preg lamination is the go-to method for many industries:
- Aircraft: Boeing, Airbus, etc. all use pre-pregs in both manual and automated layup.
- Space Stuff: Rocket fairings, tanks, spacecraft and satellite parts – almost all “space composites” are pre-preg.
- Racecars: Formula 1 and other racing classes, also: Ferrari, Lamborghini, Koenigsegg, etc.
- Racing Bicycles: frames, wheels , etc.
- Racing Boats: Wooohooo! Hooray for boats!
Handling Pre-pregs
Buying
Compared to buying dry fiber and resin, purchasing pre-pregs is a hassle. There are far fewer suppliers. Things are much more expensive. Shipping is expensive. Often the minimum order quantity is a roll – which can cost thousands of dollars – or worse: a pallet or truckload. Also, there are lots of choices!
The first thing you will have to do it find out what you can actually get. Fortunately there are many retail composites material sellers who are starting to supply pre-pregs in by-the-yard / meter quantities. See Appendix A at the end of this article for links to some. If you operate at a commercial scale, there are no shortage of suppliers who will sell you material, but you may have to wait a long time or buy it by the truckload. Talk to your sales representative and see what the real deal is – ideally there is a frozen storage warehouse somewhere with just what you need.
Once you know whats available, you need to choose a resin system. My advice is to choose something common. Just the fact that it is common means that other people who know more than you choose to use it a lot – so it must be ok. See if you can find a few people who use the same material and verify that it will be a good choice in your application. If you are looking at a whole catalog of resin system options you’ll see a wide variety: high temperature, low temperature, fire resistant, toughened… it’s a lot to handle if you’re a first time buyer. Generally, I’d advise choosing the lowest cure temperature that will be both common and get you the mechanical properties you need.
For epoxy resin systems, you’ll find standard cure temperatures of between 250F / 120C and 400F / 200C will be quite common. The lower end of this range is reasonable to process with composite tooling that isn’t crazy expensive. Even better, there are “low temperature” pre-preg systems that can be cured at 170F / 70C to 220F / 105C . These open up the option of using wood (MDF) and epoxy or urethane tooling board products for direct molds. Low temperature pre-pregs can be processed in easy-to-make composite tooling too for production lamination. More on tooling later. If you can go low-temp, you should – and unless you have a very specialized application or high service temperature requirement there are few good reasons not to!
Last you have to choose your fiber weights and types. The material supplier will probably stock standard stuff: unidirectional, woven, glue film. It is best to try to stick to standard material types for your work and add weird stuff as needed. You’ll also want to make sure all the components in your pre-preg system are compatible and from the same manufacturer. This is a big one – resin chemistry may not always be compatible in ways the user will understand or be able to measure. Just because it sticks together and gets hard – that doesn’t mean it’s doing what it should structurally! Most manufacturers will be able to supply a set of materials with compatible resin systems. If you need glue film, core splice or some unusual fiber, make sure to confirm that the resins are all compatible and will co-cure nicely.
If you are just starting out, you will be able to cover most of the bases with a light woven (200g or so) and a medium-weight unidirectional (also 200-300g). One thing you’ll notice about pre-preg is that unidirectional material is much more commonly used than with infusion or wet layup. You can get pre-preg stitched (non-crimp) biaxial, triaxial or quad material but it is less universal.
For practice or low-stakes work, you may be able to buy (or be given) out-of-date material. Ask your supplier or get in touch with local larger composites factories. Once material has passed it’s expiration date it cannot be used for many critical applications. Often it gets cooked off and thrown in the dumpster. This is a huge waste and as long as it has been kept frozen, it should work ok. You can test it by grabbing some with a (gloved) hand and letting the heat from you warm the material. If it gets gooey or soft and slightly sticky then it should be fine for practice or playing. Be sure you don’t get some crazy industrial high temperature resin system though – you still need to be able to cook it. And be careful accepting too much – you become responsible for cooking off the stuff you don’t use so the resin becomes chemically inert before you dispose of it.
Thawing
To keep the resin system from slowly curing, pre-preg materials have to be stored frozen. They can be thawed and re-frozen, say for shipping, or so you can cut some material off a roll and then put it back in the freezer. The problem is that when pre-pregs are at room temperature, they are slowly starting to cure. After a certain amount of time out of the freezer (the “out time”) the resin has started to cross-link and becomes too chemically “used up.” It won’t flow well when heated or have enough “tack” at room temperature. And it won’t have the right mechanical properties when cooked. If you have old pre-preg and it starts to feel dry or “boardy” – don’t use it anymore for anything you care about!
Depending on how much you bought (and the time of year) your pre-pregs may arrive frozen in a freezer truck or thawed in a cardboard box. Or maybe you picked them up at a supplier’s warehouse.
If you are going to use them right away, leave the material. Support large heavy rolls by the tube instead of laying the roll down. As the material comes to room temperature it will get soft and you can make crinkles or flat spots in the roll by leaving it on it’s side. If you leave it on end, the material can slide down and the edged will get all messed up. Best is to put some wood blocks under the ends of the cardboard roll and support it that way.
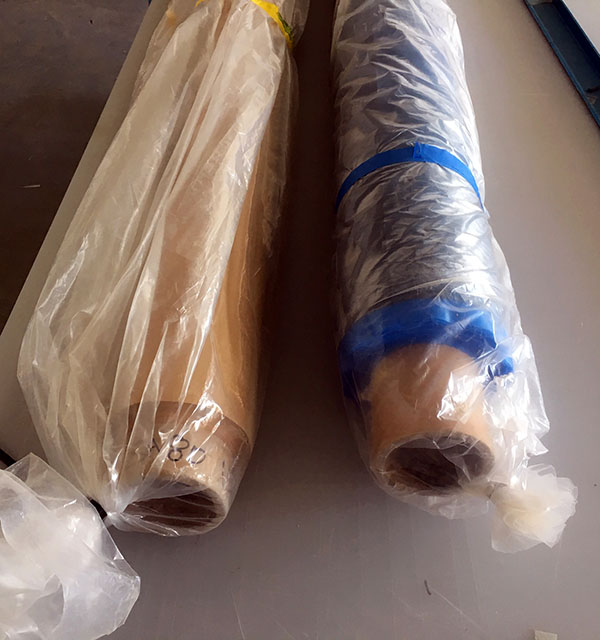
Leave the bag on and sealed as long as the material is colder than the room temperature. If you expose cold pre-preg to the air, moisture will condense on the material and you will have water on/in your pre-preg. This is bad news! Always store pre-preg in a sealed bag when in the freezer and always leave it to come to room temperature still sealed in the bag! This means that you need to plan ahead and remove tomorrow’s material today. If your material gets wet, it will stay wet until it is in your part and in the oven – then the combination of vacuum and heat will make the water boil. Best case you get steam in your vacuum pump – worst case you have bubbles of trapped vapor in your part. Bubbles in your parts are super bad. Some people (engineers mostly) even call them voids!
Pre-preg manufacturers specify both storage and “out-time” limits for their material. Typically you have a year or two to use the material before it goes out of date and is no longer recommended for use. It’ll still work and you can make stuff with it, but you’re on your own. If something bad happens you will have done a negligent thing and used “faulty” materials. You also have to keep track of the “out-time” of your materials. This is just how many days a certain roll of material has been out of the freezer. Some materials have a short out-time of just a few weeks. Others can go months. The out-time will be specified for a certain room temperature. If you’re room is colder, you have more time – hotter, less.
Material Management
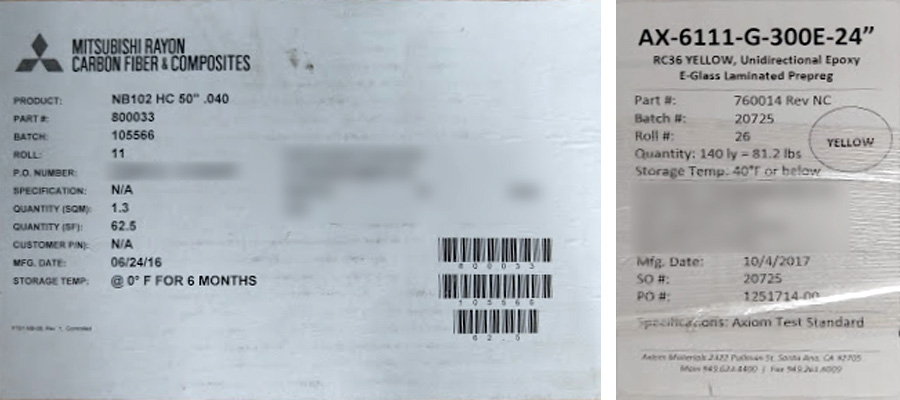
For each roll of material you should keep a record of when you bought it, the manufacturers batch number and then log each time you remove it from the freezer, and how much time it spends unfrozen. If you are doing this commercially you should also log what jobs you use a specific roll of material for – and where in that job it was used. If there are problems down the road, or if the manufacturer finds out that a certain batch had a problem, you will be very glad to know what exactly is compromised! Here’s an example of a tag from a roll of Gurit pre-preg:

The tag has some basic information about the type of material:(SE84LV resin, “HEC” standard modulus 300g carbon, 35% (+/-3%) resin content. And the date of manufacture, and expiration date. The “Gurit Code” is their internal designation for this 300g uni carbon with SE84LV resin. Batch and roll numbers will allow you to keep track of exactly when this material was made – you should keep a record of this stuff in-case there are problems down the road.
Logging can be as simple as a sheet of paper with some blanks and boxes to fill in. Each roll you purchase should get a unique identifier – a number or code or something. Write the roll number and the batch number on the paper and add lines for the dates when the roll is removed and replaced in the freezer. Standardize this form and make a binder or some other well organized system for keeping track of the information. Hopefully you won’t need it – but you’ll be glad it’s there. It also reinforces the need to be thorough and careful if you have to log an action in a book!
Most manufacturers will have similar kinds of information. Here are some more examples of Mitsubishi film adhesive (a short sample roll) and some Axiom e-glass unidirectional material:
Freezing
Your manufacturer’s data sheet will tell you the ideal temperature for storing your material. The Gurit SE84LV resin system I use a lot recommends long term storage at -18C (0F). This is really cold, and if you have the option it will mean your material lasts as long as possible. They also say that -5C (23F) for general storage is ok. If you go through material quickly, that will be fine.
So you need a freezer – or should have one already by the time the material arrives! There are lots of options. The cheapest and easiest is to buy a chest freezer normally used for home or commercial use. You should buy one capable of holding the rolls of material you need plus the extra cardboard tube that sticks out the ends! Usually this means only the largest chest freezers will do for 50″ material. Chest freezers usually have a dial where you can adjust the temperature. If you store only small amounts of material, a vertically oriented freezer will work too.
Moving up, you can buy a modular-style walk-in freezer unit and have it installed. These typically consist of metal-faced foam panels which make up the walls and floor. The refrigeration unit can be mounted on the roof of the walk-in for small freezers but you may want (or need) to put it outdoors. A walk-in freezer is a serious commitment to floor space and is not easily moved. If you handle many rolls of material each week, it is probably the best option.
Another storage method that is good for deep storage or short term storage is the frozen storage shipping container. These can be trucked in and moved easily with a large forklift or crane. Typically the refrigeration unit is attached and can be plugged in to power or run off a generator. Again, they’re not cheap – but if you do a large volume of pre-preg processing it can be a flexible alternative to the built-in-place walk-in freezer.
If you are doing this commercially, you should periodically check the temperature of your freezer and log it somewhere to make sure that it is stable and that your freezer is working. It is not unreasonable to make up a “freezer is too warm” alarm with a small temperature controller and a buzzer. You’ll also want to make sure that the freezer closes completely and that it stays closed unless you are actively removing or replacing material.
Planning Your Process
There are some choices to make regarding how and when you cook your laminated parts. Depending on cores, thickness, molding method and many more parameters, you can cure parts in one cook or many. Very thick parts that generate a lot of exothermic heat may benefit from multiple cooks. Parts that can be cured in one cook with autoclave pressure may be better done in several cooks at vacuum pressure. You’ll have to weigh secondary bonds vs. curing all at once – and the risks inherent in both.
Some pre-preg resin systems will work with partial cooking, which allows resin to harden but not cure completely. It is a cook cycle with enough time and heat to gel and cure most of the resin, but not all – there’s no long soak at temperature to really ram home the cross-linking density. This is ideal for curing skins laid into a mold in an initial step before applying and bonding core. Core can (will) insulate skins against a tool and can make curing uneven or even incomplete. By partially curing a skin, you get the benefit of good compaction and cure, while leaving some primary bonding opportunity for the core adhesive. It also means a shorter initial cook! Check with your material manufacturer to see if this is a good idea.
If your part has core, you will have to decide how many cooks you’ll use to balance speed, cost and desired part quality. Solid parts are ideally cured in one cook so that the whole thing is “primary bonded” – the resin cures all in one shot. Secondary bonds (where uncured resin is asked to bond to already-cured resin) may not have the reliability or mechanical properties that primary bonds do – ask your engineer!
Cored pre-preg laminations can be done in one cook in many cases, but there will be downsides when it comes to quality, fitting detail and weight. If you have a very complex part with lots of radii that are cored, you will be better off cooking off the outer skin and then proceeding to fit and cook in the core. Once the core is bonded in place, you can detail core joints and ramps and carefully fir the outer skin. Really high-end cored stuff is usually built this way. You probably won’t see a Formula 1 team making their monocoque structure in one cook… or do you? For more information on one-cook coring, see my post Cored Pre-preg Parts in One Cook.
Tooling for Pre-pregs
Tooling Considerations
Tooling is half the battle when it comes to composites. With pre-pregs it’s critical to have molds that can take the heat required to cure the resin systems without behaving badly. I would consider the following bad behavior:
- Warping, sagging, twisting, bending… not staying the desired shape.
- Developing vacuum leaks
- Printing surface features or defects into the part
- Releasing lots of moisture
- Expanding too much at elevated temperature (CTE mismatch)
- Off-gassing anything super gross
- Insulating the part so that it takes forever (ok, a long time) to get to the oven temperature
- Cracking – cracking sucks
Most off-the-shelf non-tooling-specific (little hyphen party there!) resins have relatively low thermal performance. It is important to consider your pre-preg system’s curing temperature and to compare that to the thermal performance of your tooling resin system. Thermoset resins have two really important thermal metrics usually supplied by the manufacturer – the Tg (“Tee sub gee” – the Glass Transition Temperature) and the HDT (Heat Distortion Temperature). They both provide a measure of the temperature at which a resin system starts to soften (Tg) and as the temperature goes up even more, starts to lose it’s mechanical properties in a serious way. As you can imagine, if you build a mold out of something that softens and gets all floppy at 200F and then you cook pre-preg in it at 220F – all will not come out well. If you are building composite tooling for pre-pregs, keep the Tg of your tooling resin very much in mind!
You’ll also have to think about the coefficient of thermal expansion of your tooling. As most things are heated, they get bigger. The coefficient of thermal expansion (CTE) is a measure of just how much bigger they get. Carbon fiber has a very low CTE. When you heat it up it stays pretty much the same size. Now, if you have a material like aluminum (or Urethane foam, or MDF) for your mold, the mold will get bigger at the cook temperature and the part will cure at that size. As the mold and part cool, the mold will get smaller but the part will stay the same. This is very powerful and will break the part, prematurely demold the part (pre-release) or break the mold. None of these are good. To keep this from happening, it is important to match the CTE of the mold to that of the material you are laminating. So carbon mold for carbon parts, fiberglass mold for fiberglass parts. Either that or design the tooling so that the CTE mismatch isn’t a problem.
Composite Tooling
Composite tooling is great because it is light, heats up fast for cooking, and has a matched CTE – especially important for building with carbon fiber. You have to be careful when designing a process for building your tooling because there’s plenty that can go wrong. It is really just a game of trying to get as much geometric stability as possible to survive increased temperature ranges as you go from step to step. There are a wide variety of resin systems for building composite tooling, and your choice will depend on the cure temperature of your pre-pregs and on finding a system that is easy to use and gives repeatable results.
Because you’re building a plug (copy of the part you’ll be manufacturing) and then using the plug to laminate molds, there are two different sets of thermal requirements. The plug has to be stable to a temperature that lets you post-cure high-temperature tooling resin but the molds themselves will have to be further cured to give them the thermal stability to handle pre-preg cure temperatures. Many tooling resin systems can be laminated (infused, hand laid, etc) at room temperature but will not achieve complete cure until they are post-cured around 140F (60C) for many hours. At this point they are strong enough to be demolded from the plug, but will still require a high temperature post cure cycle to bring the Tg of the resin up to it’s ultimate level which should be well north of the maximum cook temperature. This two stage post cure process allows you to use low temperature tooling processes for your plug with a low temperature (“supported post-cure”) and to then get high temperature performance from further post curing (“unsupported post-cure”) your mold after it has been removed from the plug.
First about plugs. These can be made of just about any material you want as long as it can handle an elevated temperature post-cure of around 140F (60C). The options for wood and tooling board shape making are described below. Many machinable tooling paste systems are suitable for this and there are plug manufacturers who can deliver a complete plug – faired and ready to release-coat. Learn more in my article: Building Big Patterns with Tooling Paste. If you plan on vacuum bagging your tooling laminate (and you should!) you will need to be sure that your plug is vacuum-tight or that you can envelope bag it to a table or some other vacuum-tight surface. If you do this, the plug can’t be hollow or crush-able – remember how much pressure vacuum bags put on stuff!
It is my opinion that vacuum infusion is the best option for building tooling for low-to-mid temperature pre-pregs. The benefits include low void content, fast lamination of thick materials, and overall control of the process. Infusion is it’s own can of worms, but here are some rules of thumb that I use:
- Drop test (vacuum test) your plugs before you release coat them or start laminating. If you have leaks, find them now when it’s easy to fix.
- Design a balanced and symmetrical (about the neutral axis) laminate to limit warping.
- Limit fiber orientations to two (0/90) – three or four if you have a truly compelling reason.
- Use lots of slip joints in your layup – at every inside corner!
- Let your dry stack “soak” under full vacuum for at least 12 hours. This helps remove moisture and volatiles from the material stack.
- For high viscosity resin systems, consider infusing in a very warm (100F+) room. Let the mold and unmixed resin heat up too. Viscosity decreases as temperature increases – it’s uncomfortable though!
- Only core large flat areas. Balsa is a good-ish choice.
- Use a print-blocker or surface layer of light fabric (200g or less) to prevent heavier material from printing into the surface.
More on infusion here: Introduction to Vacuum Infusion
There are also several really good tooling pre-preg systems that cure at around 65C / 150F. These will work the same way as your infused tool – with a partial cure on the plug and then a free-standing post-cure off the tool to let the tooling resin reach a high Tg. Layup is standard pre-preg with debulks but the open time is often quite short – just a few days at room temperature. This is the price you pay for a very low sure temperature. Solvay CYFORM, Toray Ambertool, Airtech LTC3 and Composites Evolution Evopreg are examples of this type of tooling pre-preg. The final service Tg of these is often above 200C once they have had a full cure cycle – so these are overkill for low temperature pre-preg use in the 80C-120C range – but they’ll be great to use. The main reason I’d suggest infusion is that it’s significantly cheaper!
For carbon molds, I would recommend a minimum single skin thickness of 5-6mm on curvy areas and small molds. For larger stuff, 6-9mm is probably better. Large open flat areas can have core added, but be aware that it will reduce the thermal conductivity of the mold and insulate the future parts – this could be a problem. Standard foam cores may not be a great choice because they tend to soften, move and “thermoform” at high temperatures. Balsa is good and cheap but it can make infusion more complicated if there is moisture.
Fiberglass molds (for fiberglass pre-preg parts) should be made thicker – maybe 25% more than carbon. This is generally ok because fiberglass is cheap. They will be less stiff than carbon and may require more finely space backing structure.
I have heard rumors about people having success with carbon “skins” cored with solid fiberglass for making cheaper tooling for carbon pre-pregs. I love the idea of saving money and I think there might be something to it, but I am concerned about CTE issues and internal stresses. Perhaps if the fiberglass “core” were made of short shopped strand mat (most mat comes with a binder that will not play nice with epoxy – be careful!) then it would not “fight” the carbon. It is an area worth exploring and sharing because lots of carbon goes into molds and if that quantity could be reduced that would be awesome! There are also several companies recycling industrial carbon scraps and selling either chopped or long-fiber random orientation carbon mat materials. These hold lots of promise for tooling and I would love to learn more about the options and how it works.
And one more thing about backing structure. You’re going to need something to support that pretty mold shell and that structure shouldn’t constrain or fight the low-CTE carbon mold. If you use steel or aluminum (aluminum is probably poor choice) please consider the differential expansion rates and allow the ends of any long mold to “float” on the steel frame. Some people use silicone adhesive so there is support but that support is somewhat flexible. My preference is to isolate the mold surface from a steel frame so the steel is no closer than a few inches from the back of the tool. The connection should be minimally thermally conductive – ideally the same material as the mold shell. You don’t want it to make “hard spots” in the tool surface.
And another “one more thing” about mold coatings. Many manufacturers of tooling systems make surfacing coats that act like a gelcoat for the inside of high temperature tooling. You apply them directly to the release-coated plug and then laminate a skin-coat or lay up your infusion stack right over the surfacing layer. The idea is that they give a hard stable surface for the inside of the new mold. This is great when it works. If you are going this route, please get as much information from the manufacturer as you can get and do some testing with the actual plug surface material, release system and infused mold laminate. When in doubt, skip it and go for a print blocker or light fabric layer on your mold surface – the first ply of the tool laminate laid up on the plug.
And while I’m at it – one more plug for adhesive PTFE/Teflon surfacing film… works great on composite tools and saves worry over surface coats and release systems.
Metal Tooling
Metal tooling is really nice for high production volumes or for situations where there is a lot of load on the tooling, like compression molding or autoclave curing. The problems are that it is super expensive, heavy, and surfaces can be hard to fix if scratched. But it’s soooo nice to work with. When I say metal, I am mostly talking about aluminum. I haven’t ever had an Invar budget! Aluminum conducts heat beautifully and it can be directly machined to a very high degree of accuracy. It is possible with metal molds to make split lines that have the tiniest bit of flash and alignment features that index perfectly. You can also use insert heaters to heat the mold directly instead of placing it in an air-heated oven or autoclave.
Unless your part is small, long and skinny or you have a very complicated multi-part tool for some seriously detailed component, aluminum molds may be too pricey for anything but large volume manufacturing. For many things, tooling board will be much cheaper to machine and just about as thermally stable. One thing about aluminum – if you hurry you can go from a block to a cooked part in one day – which is hard to say for any of the other tooling options. It’ll probably be along day, but curing and drying time won’t hold you back. And high performance release systems work beautifully with metal molds!
This article isn’t going to get into compression molding or tubular molding with bladders, but for this kind of thing metal molds are ideal. Check out some high-end bicycle builders and the tooling they use to mold complicated frame geometry – it’s beautiful! Mandrel molding – also a case where aluminum is perfect – and also a subject for another day.
Tooling Board
There are many nice tooling board products that can handle low-temperature pre-preg temperatures. Usually epoxy based products will have the best thermal performance, but they’re expensive. These machine beautifully and are dense enough that they transmit heat relatively well. Be careful about CTE matching. Be careful with epoxy + heat + urethane boards – there is some evidence that chemical issues can cause release systems to work less well, especially the primer/sealer/release kind. Check out this article on Machinable Tooling Boards for more.
When it comes to vacuum bagging parts onto tooling board, you have two options – the first is to bag the whole mold down to a vacuum-tight table and not rely on the closed-cell properties of the tooling board to remain air tight. The second is to bag right to the tool surface. This may work, especially if you have primed the surface. I would advise you not to do it though because it is more risky. My main concern is that the board will crack or become “porous” along a glue line during the cook – especially if it is a cavity-type mold where your part is inside. You may think I’m being overly concerned about the improbable – but if it’s just as easy to bag the whole thing down – why not. And you have something to hold onto when handling the mold. And you have something to keep it flat. And you have a nice place to put your vacuum fittings. And… And…
There is one product called Compotool, which is made of some type of ceramic material that is worth considering for pre-preg tooling. It is cheaper than aluminum and much more stable. It can be machined and sealed and has an incredible service temperature. Check it out – might be a good match for your project if making composite tools is too much of a job.
Wood-based Tooling
For low-volume small parts or one-off large parts, you can have good results using wood-based tooling for low temperature pre-pregs. I have made probably hundreds of pre-preg parts using MDF molds or molds made of plywood or strip planking over molds. Boatbuilders tend to have to make do with cheap tooling materials because everything is always a one-off. Wood-based molds are cheap and quick to build compared to other options but there are plenty of things to consider if you want successful parts. First off, if you’re using wood and you have any detailed areas – or if you just need a small mold to make a one off part – MDF is going to be your friend – I mean “frenemy.” And I have written an article on Using MDF for Composites Tooling! Hooray!
So now that you know all I know about MDF – what about bigger things? Say… a boat? Well, I’m glad you asked… A long time ago I worked in a shop that built racing sailboats. They were really nice and practically everything was carbon pre-preg with honeycomb cores. And all the tooling? It was wood. It usually had a layer of fiberglass over it and some primer – but it was wood. This was the only economical(ish) option because each boat was different – the same way that each Formula 1 team has a slightly different car – even though they are governed by the same racing rule.
The great thing about these boats was that they needed to be build fast. Usually the designers needed as much time as possible to finish the shape and structure and so the builder would get crunched and have to do a 10 month job in 6 or 7 months. As a youth, I thoroughly enjoyed the process – and the overtime! The great thing about wood tooling is that is goes together fast and is relatively economical. Compared to jobbing out a large CNC-shaped plug and then infusing and post-curing a composite tool – wood can have you laying up the parts in just a few weeks – for something 50 or 60 feet (15-18m) long. The trade-off here is that there is a lot of skilled (expensive) handwork and craftsmanship required and a good bit of large-scale fairing work. But you don’t have to rent/own a multi-million dollar CNC machine – just a little one.
There are a few key things you need to do to have good success with wood-based tooling:
- Cook at low temperature. Ideally less than 200F(93C) or so. The moisture in the wood behaves better if it doesn’t boil!
- Use fiberglass skins to provide vacuum integrity. The fiberglass provides a structure to support resin and primer which actually seal the mold.
- Design your mold structure to allow air to circulate on the back of the tool so things heat evenly.
- Remember CTE – you may need to let the ends of a long tool “float” a little if placed on a metal strongback.
- Consider gluing the perimeter of your part to the mold or use a peripheral vacuum manifold to prevent pre-release.
- Thoroughly resin-coat any MDF plants that will be inside the vacuum envelope of your mold. If one were fussy, one could pre-cook them a bit too.
- Expect some imperfections. Remember – this is the cheap option so there will be some stability and surface finish compromises.
- Consider male-molding and manually fairing convex one-off parts – mold construction, layup and fairing will be easier and cheaper!
Tooling design is critical here because everything depends on being able to keep as much accuracy as possible while building as quickly as possible. This becomes especially important with male molds where core thickness, ramps and skin deductions have to be considered and built into the mold. If the inside isn’t spot on then you lose control of the outside geometry and/or it will require lots of manual fairing. As the designer of the tooling it is your job to “mistake-proof” the process as much as possible by designing the parts to fit together intuitively and without lots of guess work.
My favorite method for this is the “egg-crate” – which is a 3D plywood structure that locks together – like those wood dinosaur models. The sheets are designed to lock together and form a 3D grid that intersects at 90 degree angles and provides a controlled surface for applying strip planking, plywood, or stringers and “cold molding” style skins. The thickness of the skin is known (including the fiberglass that will get laminated over) and is deducted from (or added to) the surface in CAD so the egg-crate is cut to support the final desired shape.
I’m going to try to write a whole article on this at some point. For now this overview will have to do. Send me an email if you’re stuck on something and I’ll try to help.
Things You’ll Need
Ovens and Temperature Stuff
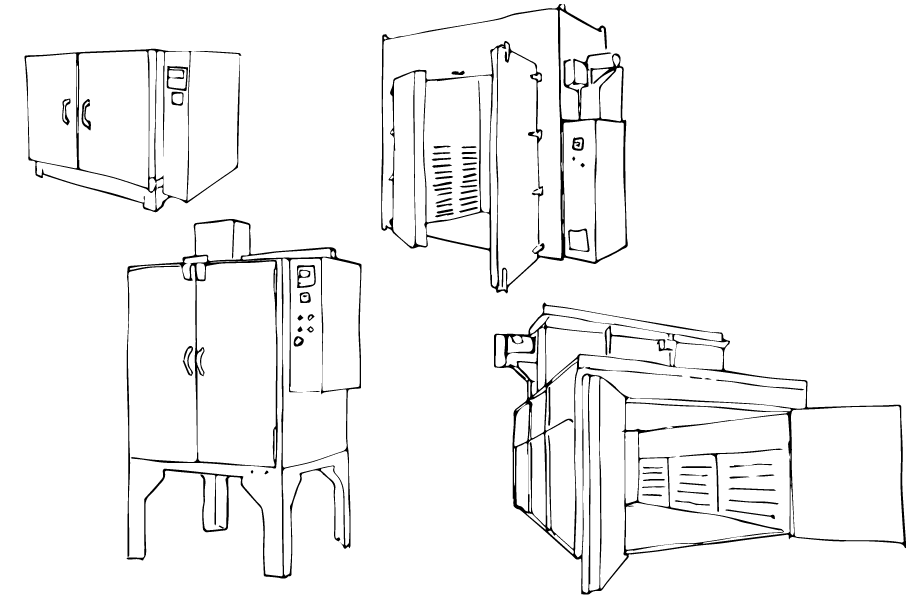
If you’re gonna play in pre-preg land you gotta have… an oven! …that you can use… that gets hot enough and doesn’t catch fire. Read all about it in my article on Oven Options for Pre-preg Curing.
Once you have the oven thing down, you’ll need some way to monitor the temperature of the parts you’re cooking. I recommend a thermocouple data-logger. You’ll need some thermocouples (a couple!) and a laptop or something to show the temperature graph as you cook. I have a product called a Pico TC-08. It has been awesome for almost a decade. More on thermocouples below in the “Data Collection” section!
For experimentation and hobby-level pre-preg work, you can get away with a single thermocouple in the oven air or even a thermometer stuck though the side of your oven. You’ll just have to overcook because you’re flying blind when it comes to actual part temperature. Even if this is you, try to find a single thermocouple digital reader that you can use to monitor the temperature on your part – they are under $50.
Vacuum System
Vacuum pumps make all this possible. You’ll need a decent one for pre-preg work, but not necessarily a big one. This is a situation where the only really good option is an oil-lubricated rotary vane pump.
A what? Huh? Fortunately this guy I know wrote an article on Buying a Vacuum Pump!
So now that you have a pump that pulls good vacuum and is ready to suck – you need to connect it to you vacuum bags. If you’re going to be doing this for work, or even a lot for a side job or hobby, it is worth getting some basic hoses, gauges and connectors.
Look! Another article with more details: Vacuum Stuff: Hoses, Fittings and Accessories.
For vacuum hoses, the main obstacle will be temperature. For room temperature work, you can get very good results using standard thick walled air-hose or vacuum-rated hose – which is pretty much the same thing. The problem with these is that they soften at high temperatures and the vacuum makes them squish themselves flat – and air stops flowing through! You need a wire-reinforced hose for oven work. I have high temperature hoses from Airtech and Torr Technologies and they have been great. You may also be able to use hydraulic hose – but check the specs for the heat tolerance of the rubber.
For fittings, I use Parker (style) ISO-B quick-connects. These seem to be a common choice in shops I have spent time in. Try to get the brass ones – they’re cheaper than stainless and don’t corrode and stick like the steel ones. There are plenty of other options so ask around and see what people use. Camlock fittings are good for larger hoses feeding manifolds and for large parts.
You’ll probably also want to get some locking bag connectors (also called vac-valves, pucks, probes…) and to plumb your vacuum into the bag. These are nice because its easy to connect and disconnect vacuum hoses and they don’t put stress on the bag. They are available from many places including Airtech, Torr Technologies, Composite Envisions, Easy Composites – and most places that sell vacuum bagging stuff.
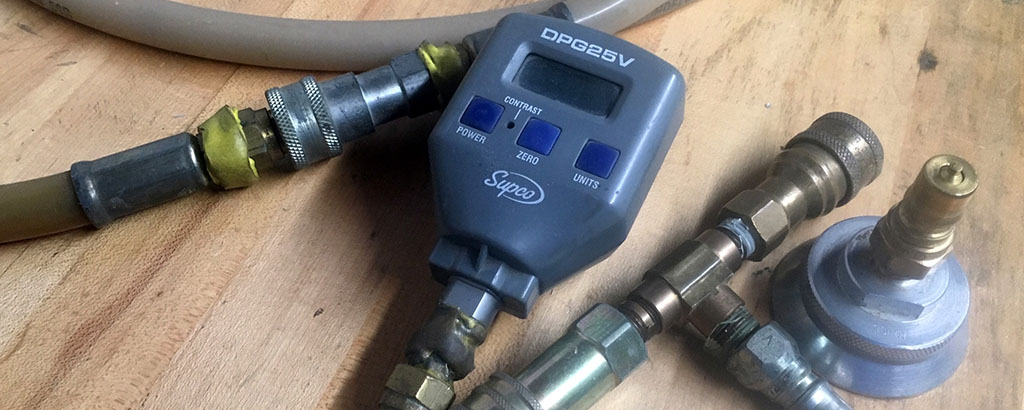
And finally, if you want to know how much vacuum you are pulling – you’ll want a gauge. For hobby-scale work a liquid filled gauge should be fine. Your main goal is to make sure that you have vacuum at the part, so ideally your gauge is plumbed to a second (or another if you have many vacuum inlets) port in the bag so you are reading bag vacuum rather than the vacuum level right in front of the pump. For professional use, a digital absolute gauge is ideal – and they only cost a few hundred dollars so if you are routinely cooking thousands of dollars worth of material it would be good to have a close handle on your vacuum level.
If you’re really fancy you can log your vacuum levels while cooking – as described in this short article about How to Log Vacuum.
Process Materials
The “bag stack” you’ll need for curing low temperature pre-pregs is very similar to what you’d use for bagged wet layup. In most cases you’ll use a peel ply followed by a release film and then a layer of breather material. This will get some vacuum fittings places strategically and then a nylon bagging film attached with a sealant tape – both rated for the cure temperature – will seal the operation. Because of the elevated processing temperature, you’ll want to be sure everything you use can handle it – but 180-250F (80-120C) is not super hot as these things go, so materials are easy to get.
Here’s an article with more details: Process Material Reference
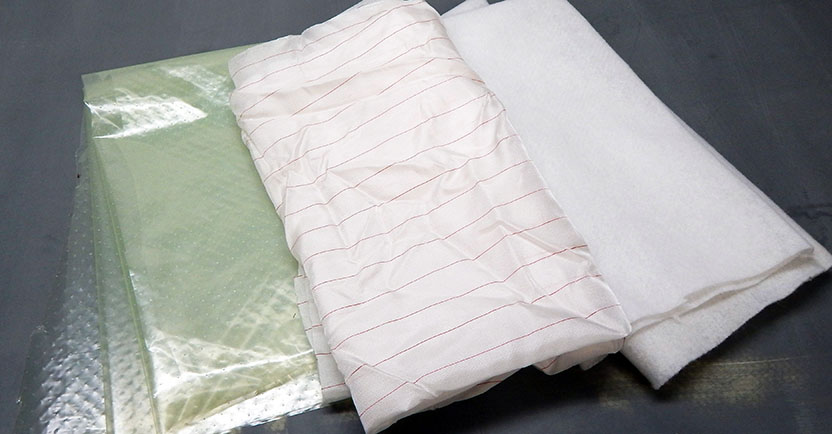
First – peel ply. This goes right against the last layer of pre-preg and should be carefully tailored and slip-jointed just like the composite materials. A basic nylon peel-ply will leave a textured surface when removed that is ideal for secondary bonding. If you have an application that makes this useful, coated peel plies are available that come off more easily and leave a finer texture. Expect peel ply to soak up some resin from your laminate, around 50-100g/square meter or so. If you are using very light skins on core, this may be a concern. You can skip peel ply and go straight to the release film – only leaving peel ply in sport where secondary bonding will be done.
Second – release film. Release film controls resin bleed and is available in a variety of perforation levels – and also without perforations. It also keeps the bleeder fabric from sticking like crazy to the peel ply and making it a very unpleasant job to remove! For vacuum-only oven curing, use perforated release film. You bleed off a little resin but also get a chance to remove trapped air. For thin parts with no extra resin, you can use non-perforated release film over well debulked laminate. Try some fiberglass tows running from the edge of the part past the edge of the release film just to help trapped air escape before things get hot and sticky in your cook.
For autoclave curing, use non-perforated film. The autoclave does magical things to air and forces it out even with a solid barrier of plastic – not really sure where the air goes. The autoclave also goes nuts sometimes pressing resin out of the laminate and can easily over-bleed resin and not leave enough in the part. If you have any information about this please let me know – I’d love to add more explanation here.
For vacuum-only curing, there needs to be a way to bleed out air, water vapor and a limited quantity of excess resin. The standard release film I use (Airtech Dahlar® Release Bag 125) can be bought with a “P3″ perforation pattern which has .015″ needle-punched holes on 1/4” centers. This is a little too bleedy for thin laminates and there are other options. I have some “P6″ too which has the same .015″ holes on 2” centers – so way less bleed and less room for air to escape! “P31″ is a middle ground with .015″ holes on 1” centers. More from Airtech, and Hawkeye on perforations.
Third – and last before the bag – you need some kind of bleeder fabric. This is mostly to allow air to be removed from under the bag but it also absorbs any resin that is bled off through the perforated release film. You want to use the thinnest kind you can get that will absorb the resin without becoming full. Standard thicknesses are 4oz and 10oz. I almost always use 4oz. If you are using non-perforated release film then you can use whatever breather you want – there is nothing doing the “bleeder” job anyway. The thick stuff is like a carpet and is really only good for wet-layup of thick resin-rich parts and to pad stuff in an autoclave.
You can also use plain old e-glass cloth for your bleeder. This can even be isolated from a thicker layer of breather by a solid release film – so you are separating the bleeding and breathing functions. Sometimes in areas where there is a risk of serious resin bleed (like a single skin recess in a cored panel) I like to use some infusion mesh to let air out once (if) the resin saturates the breather.
This is a super boring video – but it shows how I prep bagging materials.
Video: Preparing Peel-ply, Release Film and Breather for Vacuum Bagging
One nice trick (basically the only reason for the video) is to spray-glue the release film and the breather together on a table. Roll out the breather and place the roll of release film on top. Spray the spray glue (contact adhesive, Super 77, Airtac, etc) on the breather ahead of the roll of release film and then roll over the glued area sticking the two layer together. Now you can tailor them as one! Make sure you slip joint well. I don’t recommend adding the peel ply to this to make a 3-layer stack because the edges will leave exposed breather and it will leave little fuzzy lines all over your parts. You do want to overlap your process stack materials maybe 1/2″ to 1″ – but not too much.
Now for the bag. You want to be sure that whatever you choose is rated for the temperature. Most standard nylon bagging films will work up to 150C – but check to be sure. And same goes for the sealant tape. I am going to put in a vote for avoiding stretchy-bag (like Airtech Stretchlon) for pre-preg use. Some types will take the heat, but either way it is better to do a good job with tailoring a non-stretchy bag than to cut corners with a stretchy one. And stretchy bag just begs you to cut corners! If you’re new to vacuum bagging, check out my article Introduction to Vacuum Bagging.
Lamination
Release Systems
So you’ve got that nice stable, high temperature mold and you’re ready to make some parts. Excellent. But what kind of release system will work best for pre-pregs? First, there are a few things you should do before you apply whatever release coating you’ll use to the tool:
- Drop test: make sure your mold is vacuum tight and get yourself a base-line drop test reading. Ideally run the tool through a full cook cycle under vacuum.
- Make any templates for fabric or core.
- Scribe the tool surface for any details that need to transfer to the part.
- For one-offs, it is a great time to thermoform core or fit areas that will be difficult.
Ok, so now that that’s over – what release system should you use? I recommend that you avoid wax and PVA. Wax gets melty when things heat up and it is not reliable, especially through multiple cooks. It will probably work but you may get nasty surface porosity or parts stuck to your tooling. There are many better choices! PVA may work but I’ve never tried it – heard of examples of it working fine at low temperatures. Let me know!
I’m going to take a minute to make a pitch for adhesive PTFE film. For short run parts and one-offs this stuff is awesome! The surface quality is great if you’re going to paint your parts and it leaves a very nice surface, except where there are compound curves and there are little lines at each wall-paper cut. The great thing is that it goes over fair but not polished surfaces – say 180-220 grit – so you save a ton of labor shining things to the point where chemical release gives a easy releasing and pinhole free surface. I’m such a fan that I even wrote an article about it called Adhesive Teflon – Its Awesome!
But if you’re going to use a chemical release – and on composite and metal tools this is a great choice – you’ll want something semi-permanent with little transfer to the parts. I have used Frekote release systems (FMS-100 and 770 or 700NC) on composite and aluminum molds and have always been happy with it. It smells very bad and you must wear a respirator when applying it. Chem-trend’s Chemlease and Zyvax brands have similar pre-preg suitable semi-permanent systems. Airtech used to sell a water based PTFE emulsion release called Safelease that I really liked. I heard about some problems with it not working and it may no longer be available. It was good for composite and metal molds and didn’t smell bad – it was super slippery though if you spilled it on the floor!
If a system comes with a sealer – use it! Don’t cheap out and skip the sealer and go right to the release agent. The sealer is important – especially on sanded primer surfaces. It fills in the little holes, grooves and other stuff that can make your part want to take up permanent residence in your mold.
One note on release systems and vacuum bags: make sure you don’t put release coating where you will put your sealant tape. It is worth taping off the perimeter of a mold and avoiding this area when applying several coats of mold sealer and release coat on a new mold. Sealant tape can sometimes slide off a released surface when it gets warm and gooey – not that I’ve ever had this happen or anything…
With all chemical release systems, be careful about contamination and shelf life. Release coats can evaporate or take up moisture and then they don’t work as well. Problems depend on the specific chemistry of the systems, but leave the caps on and keep an eye on the expiration dates.
It is a good idea to test new release systems on small sample panels or parts before using them on things you really care about. Make sure your samples have the same substrate and finish level as the tooling you will use at a larger scale. The problem with composites is that you can change one little thing and the mix of chemistry, craft and chaos will make it hard to figure out what went wrong. Try to limit the number of variables you change at any one time. That’s rich coming from a guy who likes to change all the variables all the time!
Environment and Cleanliness
Pre-preg is kind of fussy – it’s not really but you should imagine that it is! You’re going to be working to a higher standard of material tailoring and fitting than possible with wet layup or infusion. Your tools should be sharp and your work area should be clean. Wipe down any cutting tables with clean rags and solvent to get nasty stuff off – and make sure your rulers and cutting tools are oil free. You should wipe the oil off your razor-knife blades too.
Because temperature effects the stickyness (“tack”) of pre-preg resin, you need to find a working temperature that allows for the right level of stickyness. This should be around 65-72F / 18-22C and as dry as possible – air conditioning is a good idea. In winter you’ll need to be in a conditioned space and in summer (at least where I live) you’ll need some air conditioning to keep things cool and dry – and from becoming hopelessly sticky and messy.
Also, wear gloves. I have not worn gloves a lot when using pre-pregs and it was a stupid thing to do. No epoxy resin is good to get on you. If you find that it is hard to handle materials with gloves on, try to find some gloves that work better. Even tight fitting cotton cloth “inspection gloves” are better than nothing. Also, your hands are greasy and gross so keep them off the material!
Laminating
Now the time has come to actually do some pre-preg laminating!
- Material is defrosted and at room temperature – check.
- Mold vacuum tested and release coated and ready to go – check.
- Laminate schedule confirmed and released for construction – check…?
- Gloves on… let’s do this.

Depending on the scale of your work, you will need to pull material off the roll(s) you’re using and cut to measure or to pattern. A big cutting table is great to have and can be set up with a roll rack on one end so you can pull material off easily. For production situations, a CNC fabric cutter is a great aid in preparing material. Assuming you are building something of manageable scale, your first goal is to laminate the first layer of material, with fiber in the correct (as designed) orientations. You may need to add slip joints yourself as often they will not be called out in the drawings – if they are, you have a fussy (that’s good) engineer! I have written an article called Slip Joints and Why You NEED Them! Trust me, you need them – read the article if you don’t know what I’m talking about. Every outside corner should have a slip joint.
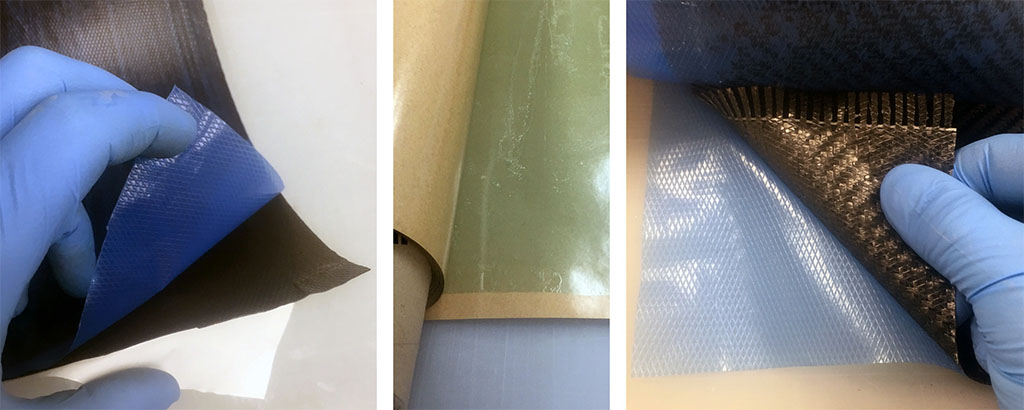
To apply material to the mold, you will have to remove the backer from one side (some pre-preg only has it on one side – in this case, leave it on). The material should be tacky but not super sticky. You should be able to place it in the mold and then pick it up again without it making to much fuss. If it is too sticky, reduce the temperature in your room. If it doesn’t stick, increase it. Sometimes I will heat up a set of molds so they are warm to the touch to help stick down the first layer. Press the edges of the material into corners carefully and use a push stick (a clean one) to make sure it is making contact with the mold. If you have plastic backer on your pre-pregs, you can leave it on. You’ll probably want to pull back paper backer. If you are using unidirectional material (not an ideal first layer…) it will split and splay out as it likes into corners and radii. This is ok. Woven material may need some little cuts to let it lay in without folds. Better a snip and a lap than a fold.
Lay in each consecutive piece until you have one layer that covers the whole mold surface. Remove the backer and make sure you get all of it – backer between the layers of material is one of the most common (and shame-inducing) mistakes in pre-preg lamination. Now it is time for a really important part of building with pre-pregs – the debulking! I always debulk the first layer. It gives you a chance to really squish the material into the corners and gets the air out when it’s easy.

If you want to watch the process of laminating some (very!) simple pre-preg parts, check out the Laminate Samples in the Material Library. Each has a video showing the whole layup process.
Video: Laminate Sample #2: Prepreg Carbon / Epoxy on 15mm Nomex Honeycomb Core
If you are using unidirectional material, it isn’t necessary to lap parallel pieces – you just need to butt them up. It is slightly better to have a gap rather than a lap here, but the best is a clean edge-to-edge trim so they lay right up next to each other. The problem with laps is that they create a bump that propagates itself up through subsequent layers causing fibers to go up and over – which isn’t strong. Gaps at least will tend to fill with excess resin allowing the fiber to bridge over a local resin-rich spot – which is less of a big deal. You are also less likely to grind or sand off a low spot – thus avoiding broken fibers where there should be continuous ones.
My favorite way to trim plies that but up (because on a compound-curved shape they will need to be “spiled” to shape like planks on a wooden boat) is to fold the upper ply back and slice with a razor knife along the crease. Next time I have the chance to do this I will make a short video! There are many other good ways to trim, and in a pinch a clean carbide scraper can be used to “plane” off laps in unidirectional material. Just remember to avoid wrinkles or folds by any means possible – even unauthorized slip joints or laps are better than wrinkles.
As ply angles deviate from parallel (0 degrees) you will at some point no longer have parallel pieces of material and a lap may be necessary. In most cases engineers will specify this (or you can ask) if there is geometry that presents this problem. A rule of thumb I have seen is that if the deviation is more than 15 degrees, you should lap by the specified amount. Another rule of thumb is that your should lap 6mm for every 100g of material – with carbon pre-preg. But don’t trust me – ask your engineer or do testing.
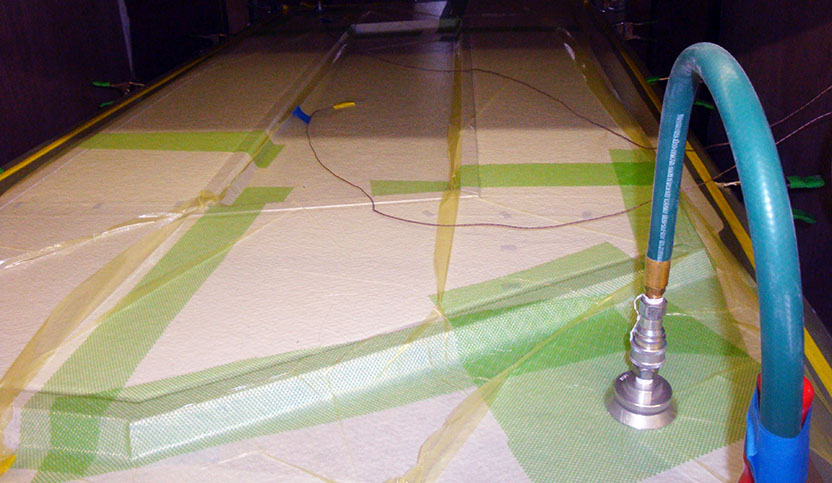
Debulking
Debulking is a critical intermediate step in pre-preg lamination. Lots of online tutorials don’t even mention it. Unless you are making parts with two or fewer layers – or are a superbadass with an autoclave and a plan – you need to debulk your pre-preg lamination every few layers. My rule of thumb for things that are simple shaped is to debulk after the first ply and after each (approximately) 1000g of material. So if I am using 300g unidirectional – every three layers I debulk. Demanding applications will require a debulk after every ply. More complicated geometry will benefit from more frequent debulks. Debulking is time-consuming, but absolutely necessary to get successful pre-preg parts.
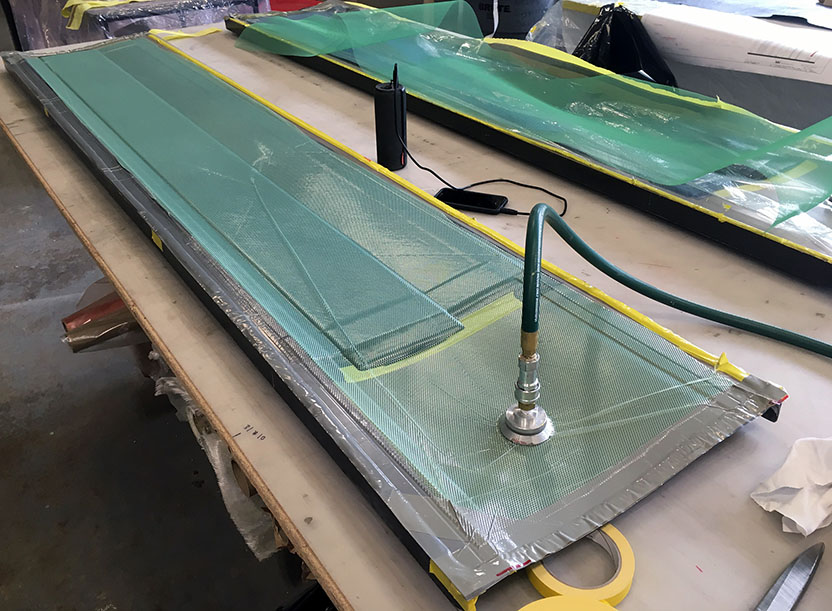
So what is this “debulking” you ask. It simply means vacuum bagging the material to compact it and remove air from between the layers. So you remove the backer on the last layer of pre-preg that you’ve laid up in the mold, place some kind of vacuum-promoting flow media on top, and then vacuum bag the whole thing for 10-30 minutes – or whatever your material supplier and schedule and engineering team agree is ok. Debulk bags should have as much vacuum as possible – more pressure = better compaction. Most places I have worked go for about 10 or 20 minutes under debulk – but in special cases (hot debulks, small patches, etc) you may need more or get away with less. Debulking works better in cooler environments where there is less runny tack to the pre-preg resin and air can more freely escape. Moisture control and tack optimization are two good reasons to air-condition your layup space. Also sweat drips in the material are sub-optimal.
Spiky rollers are also commonly used to perforate material before debulking. Sometimes you spike in place – carefully so you don’t mess up the fiber, and sometimes it is easier to spike whole pieces of material on a cutting mat before you lay them into the mold. One trick I have seen used a lot – even by fussy people – is to spike the plastic backer in a special machine made to spike roll-width material. Then when you go to debulk, you just leave the backer on and debulk through it – because it has little holes. It is the equivalent of putting perforated release film over bare pre-preg.
If you try to put a bag right ontop of the pre-preg it will stick and seal itself off and vacuum pressure will not be well distributed. You need some process material to spread it around. My material of choice to allow vacuum to cover the whole part is infusion flow-mesh. It works great – you cut pieces that fit and overlap them as needed (avoid too much overlap) and lap some out onto the mold flange where you can put a vacuum puck or a hose. You can also use breather with perforated film instead of flow media and this works ok, but it leaves little breather fuzz sometimes and is more work. Embossed vacuum bags like Airtech Airdraw 2 can also be used just by themselves – little crinkles in the bag act as a breather. I am really interested in other ways to do this so let me know if you do something else!

“Debulk bags” or the vacuum bag you use for debulking, is a disposable intermediate bag that you will need to put on and take off over and over. You may treat it rough when pushing material down with a rub stick through the bag… and you will never use your debulk bag to then cook the parts – right? If you have a small mold, an envelope bag (that encloses the whole part and mold) is a great choice. You can even make a “zipper” in a bag by adding duct tape to each side so it can be more easily stuck and un-stuck from the sealant tape. The easier it is to open and close the bag the better.
In production situations, you can get large silicone sheets and mount them to frames to make a debulking table – just put in your part (with some plastic over the flow media – or perf. film and breather to protect it from the silicone) and close the frame. The bag stretches down over and compacts the part. This only works with certain simple part geometries! Tube bag is also great for small parts – you can fold one end over itself and close it with a clip so opening and closing is a matter of a few seconds.
One quick aside on “hot/warm debulks.” This is when you put a debulk bag on your part and then warm everything up for a while. You don’t go so hot that it gets crazy runny or starts to cure, but you go hot enough to consolidate the material really well. Three times you might want a hot debulk: (1) If your parts are coming out pin-holey or have surface ugliness, a warm debulk of the first layer or two can really help. (2) Applying film adhesive for core bonding. Hot debulking adhesive film really helps get bubbles of air out from between the film and the rest of the material. You will find it helps to leave backer on and spike-roll the backer when warm debulking – it makes it easier to keep the runny resin from gooping stuff up – and besides – you need that resin to stay in the material! (3) When you are stacking up thick laminates of unidirectional material, hot debulking can make things flow enough that stacks settle and avoid waviness or wrinkles.
You will notice that outside corners tend to wrinkle and inside corners tend to bridge. This is just a consequence of changing radii as material gets pushed against the mold surface or prior layers. This is why you slip joint the outside radii (of the part – not the mold) – so that they can slide into the corner! If you notice wrinkles forming after a debulk, try to place material tighter over the outside corners where the wrinkles happen. Also try debulking every layer to see if that helps. Sometimes if it’s real bad, cutting it out and patching with a lapped ply – or adding a slip joint to an outside corner can help with wrinkles. If the wrinkle is in a random unexpected place, make sure your debulk process material hasn’t bunched up or your bag wasn’t bridging. If you are having trouble getting material to lay into the mold, try using a low temperature hair dryer to warm it a little and then push it into the inside corners and stretch it over the outside ones. Warmer material will slide better and stay stuck once it cools. In cold environments it can be really helpful to warm a mold up before applying the first ply – just enough to make it tacky.
Push sticks, hair dryers, rollers and other helpers are super useful – but don’t overdo it. Too much heat or back-and-forth rolling of an inside radius will cause a terrible mess. You want to place material so it makes contact everywhere with the previous ply – but you don’t have to hammer it in. The debulk bag should deal with that as long as it (or the debulking flow media) isn’t bridged.
Core
Key to bonding core with pre-preg is a material called “film adhesive” or “glue film” – this is just a layer of pre-preg resin without any fiber. It comes in different weights and supplies the extra adhesive to bond the skins to the core. Supplied with only a light scrim to hold it together (“supported”) or sometimes without any reinforcement (“unsupported”) it can be tricky to handle and there are some handy ways to make it easier that we’ll discuss. If you are using honeycomb cores, you will also want to consider a foaming core-joint adhesive that will fill up the areas between sheets of core, gluing them together. Foam can be treated the same way, or strips of film adhesive can be cut and placed in the joints.
If you are using foam core, it may be able to be “thermoformed” to fit any curves or compound shapes in your part. This is ideally done before you release coat the mold. I’ll try to write some more about this later, but the long and short of it is that you heat up the foam sheets until they get floppy and then hand-lay them into the mold to get the rough shape. You can fit the edges as best you can and then if you want to really have it perfect, you can vacuum bag the foam (by itself) against the (clean and not-release-coated) surface. Then run a short cook cycle to let the foam heat up and get formed perfectly to the surface by the vacuum bag. I’ve heard this called “slumping” core and “thermoforming.” It only works with certain kinds of foam – Corecell, Divinycell, Airex. It doesn’t work with Rohacell. After everything cools, you remove the foam and trim it to fit edge-to-edge. If you are working through corners and radii you may need to machine core to fit. Check out my post on Cored Pre-preg Parts in One Cook for more.

So if you are going to cook off your outer skin and then fit core, proceed to the next section and then loop back. Wait, you haven’t read the whole thing before you started laminating?
If you are going to co-cure your outer (the one against the mold) skin and core, you should debulk your full outer skin and then proceed to fit glue-film (leaving the backer on one side!) into all the places you will fit core. Use a spiky roller to poke neat holes in the backer so air can bleed out and then debulk the glue film with the backer on. Once you handle this stuff you’ll know why! It’s sticky and will make a huge mess and you’ll never get your infusion mesh unstuck if you don’t leave the backer on. Glue film should be fit with some (but minimal) overlaps. Some suggest a warm debulk for glue-film – which I think is a good idea – but it makes things sticky and if it gets too warm the glue will run through the holes in the backer and make a terrible mess. Perforated release film can really help – the tough fluoropolymer kind – so it doesn’t tear when you try to pull it off the hot sticky glue film.
Fitting honeycomb is easier than foam, because it is more flexible and you can see what is going on. But same principles apply to either:
- Make sure the core is the right density and (for honeycomb) oriented in the right direction. Honeycomb has a ribbon direction (L) that is substantially stronger than the opposite (W) direction.
- Fit the edge radii where core butts into walls so they are slightly smaller than the inside skin radius. This is better than having it bigger so it hangs up and doesn’t make good contact with the main surface.
- Use core tapers where core transitions to single-skin zones. Honeycomb can have foam edges or use a low (2:1 or more) angle taper so it doesn’t crush.
- Keep your core clean and low-moisture. Blow off dust from honeycomb cores after machining or sanding.
- Fit core joints as tightly as possible. Plan to use some type of adhesive (glue film, expanding mono-component resin, or ambient cure resin) to bond the joints.
So you pretty much just place your core down onto the debulked glue-film and then either cook or debulk. To laminate the top skin directly over the core, you have to first detail the core joints and make filled resin fillets in any areas where the core butts up to a “wall” in outside corners. The easiest way to apply the top layer of glue film is to debulk it to the back of the first ply of pre-preg that you are laminating on top of the core. If you pre-cut these pieces, you can stick them down on the glue-film on a table and then debulk the two together. This is especially helpful with honeycomb cores, where trying to debulk film to the tops of honeycomb cells would be a total mess.
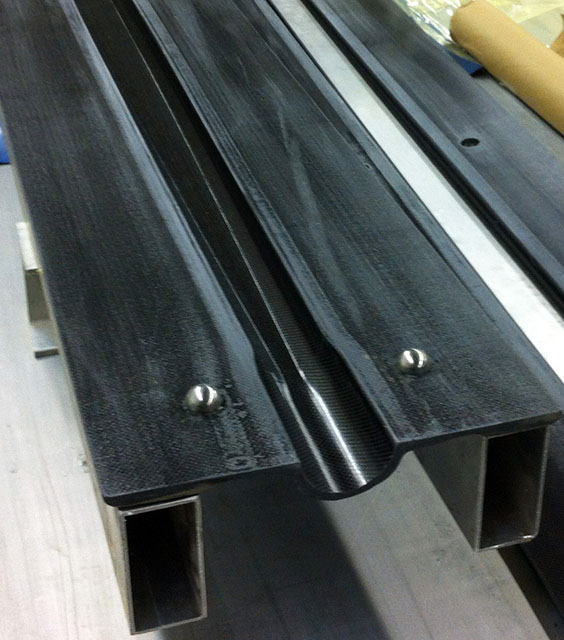
You will also want to place wood (or something non-melty) frames around your honeycomb panels at the perimeter. The vacuum will crush the edges in and it will collapse and be a huge mess. In the picture below you can see beveled wood frames around the outside of this honeycomb cored panel. These light panels got trimmed and capped, so the wood frames were just bonded to the bottom skin with the core – they protected the panel during demolding too.
If the core has already been cooked to the first skin, or if you are cooking your panel in one shot, you will need to be sure to allow air (and moisture) to escape honeycomb cells. If you don’t have a way for moisture (which turns to vapor under heat and vacuum!) to escape, it will keep the skins from bonding to the core. You can get actual bubbles of vapor that are stronger than a vacuum bag and keep the top skin from even touching the core. Bad news! So you have to make holes to let moisture out. This is most easily done by punching or drilling holes through the top skin (drilling with a 1mm pointed flute-free pin works well) so air can escape. With thick skins these vent holes fill up as resin flows. Some people believe you should do this after you have applied the full vacuum bagging process stack so the release film doesn’t choke off the vent holes. Ways to avoid this step include autoclave curing and being really careful about moisture. I am not sure how aerospace or Formula 1 fabricators handle this, but the hole punching is very common in the boatbuilding world – where process control is not as tight. If you have insights into this, please get in touch and I’ll add your advice here!
Some aluminum honeycomb materials have tiny holes between the cells to allow air to move from cell to cell. There are tools to score the tops of honeycomb cells to allow vapor to travel between cells – but I am not sure how commonly this is done. This helps with air and vapor flow. Foam tends to be less susceptible to this, but it does happen. Foams also do other crazy stuff like expand and contract – or off-gas (especially PVC) – which is concerning!
Cooking Pre-pregs
Preparing to Cook
When you’re ready to cook, you have a whole bunch of process material to stack up on top of your part before vacuum bagging and curing. You may use peel ply (probably should) and then some type of release film and a breather. If you use caul plates or intensifiers then these go either above or below the breather depending on your stack. Then maybe some vacuum connections, thermocouples – if you are an in-the-bag-thermocouple kind of person. You may even be one of those super-fancy people who laminated thermocouples into their part! Unless I absolutely need the information, I would much rather deal with a thermocouple outside the bag than inside. Then comes a bag, and lots of leak checking – the hoses and fittings too – and a drop test. You have to be especially careful if you’re using an autoclave, because a hole or a tear in the bag is multiplied by extra pressure.
So lets start with peel ply. In most cases you’ll want to use it. It will also steal about 50g per square meter of resin from your top skin if you use dry peel ply. You can get pre-preg peel ply which is very nice and is just like any other pre-preg, but it’s peel ply. There is evidence that prepreg peel ply results in better secondary bonds of the cured parts. There should always be good slip joints in your peel ply with laps of less than 3/4″(20mm). This is the biggest reason that bridging happens to inside corners – got to have the slip joints on all the layers – even the bag stack! If you decide not to use peel ply, you will ideally also be using an autoclave cure, so you can use non-perforated release film. If you use perforated release film, you should probably use peel ply. You don’t have to though – try a test.
After the peel ply, you’ll come to the release film. This is super important because it either limits, controls or completely eliminates resin bleed. There are lots of types of release film as discussed earlier in the section on Process Materials. My advice is to co-apply your release film and breather material by sticking them together off the job in bulk and then tailoring the to fit as one step. You can do this by gluing them together with spray adhesive as described in this video on Preparing Vacuum Bagging Materials. Again, sweat the slip joints and make sure you cover all your material. Any exposed pre-preg will bleed out all its resin all over the place – so cover it up!
If you did as I suggested and glued your release film and breather together – then you had to choose a breather already. I like 4oz or e-glass cloth. It works great. For thick laminates, you may have to go over top of that with infusion flow-mesh in case the resin bleeds too much and chokes off the breather. Adjust the perforations in your release film (P3, P6, P31, etc) to get the right bleed for your part.
A more complicated way to deal with limiting bleed is to separate the “bleeding” and “breathing” functions with a non-perforated ply of release film. Use a bleeder just big enough to absorb minimal resin but allow air to escape and then cover it with unperforated film. Put a breather ply above this to allow vacuum pressure to equalize all over inside the bag – but not to absorb any resin – the “breather” function.
You’ll have to find places to stick your vacuum inlets down at this point. Keep them off the laminate – they need to be well off on a flange or up in a pleat of vacuum bag. If you are “autoclaving” and have fittings in bag pleats, place hard backers over the back of your vacuum fittings so the bag doesn’t get pushed into the hole and pop. There should be plenty of fittings to both pull vacuum and monitor it. I’d say 2 fittings minimum for things you care about and one additional for every 2 or 3 square meters – within reason. As you cook really big things, you’ll need a manifold system at the edges of your part or some in-mold fittings and system. If you’re doing huge stuff and have a great system for vacuum plumbing – you’re no doubt a better judge of what your need than I am!
Bagging has to be done carefully so you don’t get any leaks. It is just as critical as with infusion, especially if you are curing in an autoclave. Make sure that each inside corner has a small pleat of bag over it so that as the slip joints slip, the bag doesn’t end up bridging and holding things up. Bag bridges in corners are a very common problem, especially with parts that have flanges or lots of inside corners. If you have thermocouples inside the bag or the part, be careful to place the wire up in a pleat so that they don’t cause trouble if they get pulled or jerked during the cook. Better to have the pleat flop around and act like a shock-absorber.
Vacuum fittings should be tightened completely and hoses lead (taped down even) so that there is no way they could get un-hooked or loosened. Make sure your hoses are rated for cooking service. Vacuum plumbing and fittings can be a big source of leaks and should be checked along with the bag if it’s hard to get to a good vacuum level.
You should ideally drop-test your bag. It doesn’t have to be super official – just unplug and monitor vacuum loss – you’ll develop a sense of what is ok. For big or valuable things, you should totally do a comprehensive drop test! First go around and try to get as much vacuum as possible by chasing leaks out of the sealant tape and tightening vacuum fittings. Your vacuum may not be perfect if there is moisture in the core or the vacuum consumables. As you reach perfect vacuum, especially if your work area is warm, the moisture will come out and slow down your process of getting to a perfect (is there such thing?) bag – it will seem like you have tiny leaks that you can’t find. Moisture boils at around 75F / 24C as you approach a perfect vacuum so if you are seeing phantom leaks that you can’t find, it may be moisture. Also as you start to ramp up from room temperature as you cook, expect vacuum to drop as more volatile stuff starts boiling and appearing to create “air” in the bag. If you have wood or MDF tooling in an envelope bag, expect this to happen at a very disturbing level! More on this in the “Cooking” section below.
Data Collection
You are going to want to know what is going on with temperature and vacuum while you cook. And if you are doing something even a little important, you’ll be wise to keep a record of cook temperatures as a basic quality control element. Monitoring vacuum is less critical, but it is good to note it down and to check it often in-case things go wrong. Often you can fix minor vacuum or plumbing-related problems if you catch them fast.
The way to monitor temperature is with thermocouples. You are going to want enough thermocouples to record part and air temperature in several places on each part. For a huge part you may want dozens! Temperature logging will allow you to verify that all the areas of the part have been run through a complete cure cycle and that you haven’t had any crazy temperature (exotherm) spikes anywhere or serious cold spots where you may not have a complete cure. Parts with core and thick and thin zones can cure at different times and reach different temperatures depending on mold construction, geometry and heating sources. It is always better to know more than less about the temperature of your parts!
More about thermocouples here: MEASURING TEMPERATURE WITH THERMOCOUPLES.

When it comes to monitoring vacuum (or setting a low-vacuum alarm) you can get along just fine without it. Even many very sophisticated composites fabricators don’t monitor vacuum except by looking at a gauge. But you can have a better finger on the pulse of your cook if you do! It is also a valuable quality control metric to keep along with cook temperature logs for important parts. And it’s not any more complicated than monitoring temperature. For a few hundred dollars you can set up a basic system. For a few thousand, you can have a dedicated logger with high precision transducers.
If you want, you can even log vacuum on the same multi-channel input device that you use for thermocouples. All you need is a converter that translates the voltage or current signal from the vacuum transducer to the millivolt range read by the thermocouple analog converter. Or you can run a logger that uses a higher voltage (0-5) or current input and use a signal amplifier to boost your thermocouple voltage.
It’s a little confusing if you don’t have a background in electrical stuff – but I wrote a very simple post on HOW TO LOG VACUUM which should be a start.
Also revisit the article on OVEN OPTIONS FOR PRE-PREG CURING (down at the bottom of the article) for some more in-depth information on logging, cold junctions and other potential sources of drama.
Cure Cycles
Your cook needs a plan. It will probably work (like, the resin will cure) if you just crank it up to the desired cure temperature and let her rip – but it won’t work well. Most resin systems will benefit from a cook cycle that is tailored to the viscosity curve of the resin – the hotter a resin gets, the lower the viscosity – up to a point where it starts to cure – and gets hard. Coming up with a “cure cycle” that works well involves playing the viscosity and the onset of cross-linking off each-other to give the resin time to flow (release air, bond core, slip slip-joints, etc.) before it starts to gel and the cure cycle takes off. Most pre-preg manufacturers will give you the data you need to understand what your resin will be doing at what temperature.
First we need some terminology – so we’ll start with the terms “ramp” and “soak” – which will describe components of the cure cycle. “Ramp” is when the oven temperature is increasing (ideally at a fixed rate, called the “ramp rate”.) “Soak” is when the temperature is held at the same level for a period of time – the parts where the curve is flat – also called a “dwell”. Graphically, these are the slope of the curves that defines temperature over time. Here’s a sample “cook cycle” showing the ramp and soak structure. This cook takes a 1 hour pause at 60 degrees before ramping up to 95 degrees for the rest of the cook:
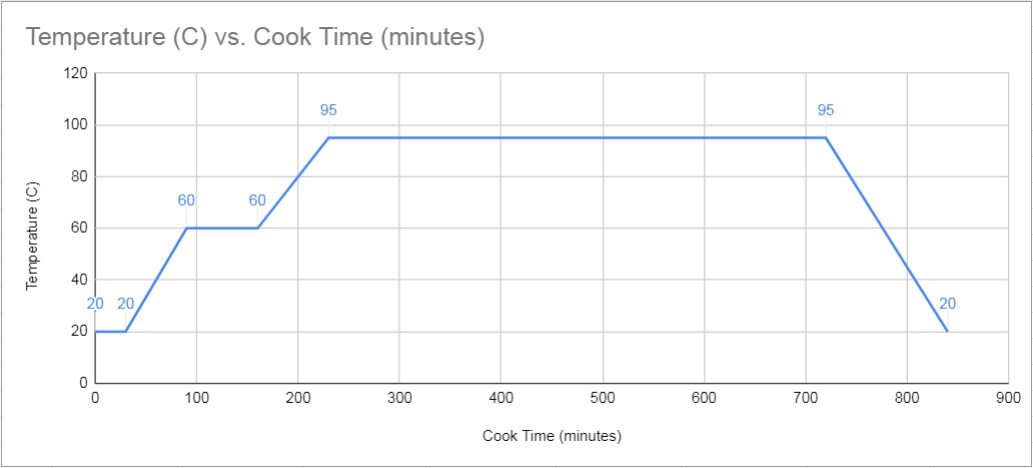
We also need to know the viscosity curve of the resin. As the temperature increases it will reach a point where the curing reaction begins the the viscosity increases again as the resin starts to harden – we’ll call this the “onset of cure” temperature. The ramp rate effects the onset of cure temperature, so with a slower ramp rate, the resin will absorb more temperature (energy) over time and begin to gel at a lower temperature. I’m going to use an imaginary pre-preg system “EC-200” here and this is the curve of viscosity plotted against temperature for three different ramp rates:

Another curve you’ll see in the literature provided by your pre-preg manufacturer is the gel-time vs temperature curve. This shows how fast the resin will gel at a given temperature. Here’s the curve for EC-200:
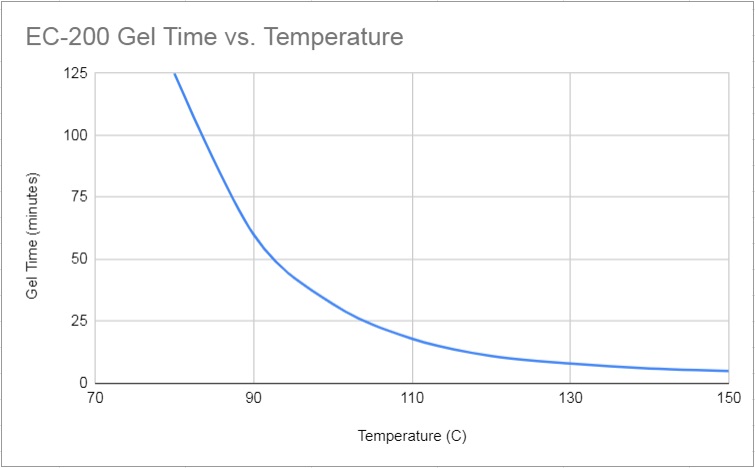
These are your goals in designing a cure cycle:
- Ramp at a rate that your oven can easy achieve. This is more of an issue for large ovens or low-powered ones.
- Soak at a temperature below the onset of cure so that the whole part can heat to the same level. You don’t want areas of your part curing at different times.
- Allow the resin enough time in a low-viscosity state to soak into cores, allow air to escape and consolidate the laminate into corners and against the tool surface. This is good reason to have a dwell/soak at a temperature that lowers viscosity but doesn’t initiate cure.
- Don’t allow so much time at a low-viscosity temperature that resin is squeezed out of the part into the bleed stack.
- Keep the cure temperature in-line with tooling demands. Don’t over-heat wood tooling.
- Limit the initial speed of the curing to keep the exothermic reaction under control. Resin makes it’s own heat as it cures and can warp parts – or cause bigger problems. This is a good reason for a dwell/soak at a temperature that initiates cure, but just. You can get through the exotherm “bump” and then raise the temperature to complete the cure cycle.
- Make the cook cycle as quick as possible.
So keeping all these in mind, lets imagine a situation where our imaginary pre-preg system – “EC-200” is being used in a cored (20mm Nomex honeycomb) part laminated in a carbon tool. The carbon skins (made with 200g twill and three plies of 200g unidirectional) are less than 1mm in all but one edge where core is dropped away and a thick (6mm) unidirectional flange forms one edge of the part. We are curing the part in one cook (because the core is tapered back from the corners and it’s simpler to discuss!) and have laid up the part neatly and debulked and slip-jointed with great care. The core is bonded with “EC-200” glue film in a 250g / square meter weight.
For our cook, we know that the skin on the back of the core (against the mold) will take a little longer to heat up, so we want to make sure there is a “soak” in the cook cycle so that the top skin doesn’t start to cure before the bottom skin. The mold is 8mm of solid infused carbon which will heat nicely – but represents some thermal mass to overcome. Looking at the viscosity curve, we can see that the resin absorbs heat like anything else – either slow or fast. You can heat up a kettle full of water fast or slow depending on how high you crank up the stove – but it takes the same amount of energy either way. By ramping up slowly, the resin absorbs more heat at a lower temperature, so it doesn’t ever get to the higher temperatures before the critical amount of energy is reached to initiate the curing reaction.
We want to ramp up from room temperature to a level that is below the threshold where the resin would begin to gel. At this point we’re pumping heat into the material and the tooling to get everything up to a temperature that is closer – but not at – cure temperature. Lets say 60-65C. We’ll wait here for a while to let the thermally isolated, insulated parts catch up. The resin viscosity is also dropped into the “wet goo” range and any air will be able to leave the part and the plies will slip and squish nicely against the mold. Of course they shouldn’t have to do much moving if you carefully debulked them into the tool in the first place!
Once the part and tooling are up to the initial “soak” temperature (60C) for the given time (lets call it an hour!) – it’s time to ramp up to the final cure temperature.
Now a bit about ramp rate – because it seems like a good idea to just hit the gas and get this thing up to temp as fast as possible… but wait – remember the effect of ramp rate in the viscosity vs. ramp rate graph. If we ramp fast (1+C/minute) the resin will get really hot before it starts to cure – and it will cure super fast – check the gel time vs. temperature graph. If we ramp up super fast with a cored panel, its possible that one skin will cure way before the other. The one exposed to all that hot air will cure fast and the one against the tool will cure slow. Our unidirectional area will go off with a bang, especially as the thick mass of material makes it’s own heat from the exothermic curing reaction. Here with a light panel and a relatively thin unidirectional capping it would probably be fine – but because we want thing to go smoothly, we’ll ramp at about .5 degrees C per minute. This is a nice compromise that will allow the resin to reach a low viscosity before curing, but not so much that the gel time is crazy fast. At 90-95C, the resin will gel in under 1 hour. Once that happens, we’ll still need to cook for a long time to keep feeding the resin the energy it needs to completely cross-link and reach it’s ultimate structural properties.
Your resin data sheet should give you cure duration guidelines. For example, our imaginary pre-preg EC-200 might come with instructions that say to cook a minimum of 6 hours at 90C, 3 hours at 100C and 1 hour at 120C. The datasheet requirements are usually calculated with some margin of error to take into account variability in the cook “experience” at different spots in a large part. Many low temperature cure systems can be cooked at around 80C (some even lower) but it generally takes a very long time. It isn’t uncommon to have 16 or 20 hour cooks at the low end of the resin’s usable temperature range.
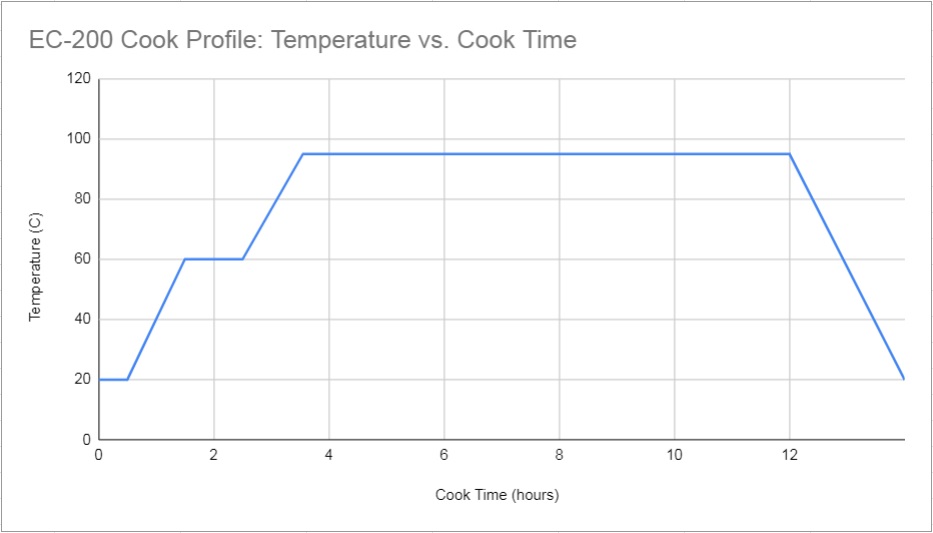
So this is our cook profile. We have a soak at 60C for one hour before we ramp up to the final cure temperature of 95C. Keep in mind that this will be the controlled air temperature of the oven – the part will lag behind the air as it warms and then may shoot up past 95 degrees (especially in thick spots) with the heat generated by curing resin. Here’s a real cook, with a different ramp and soak profile that shows the air and the part temperatures:
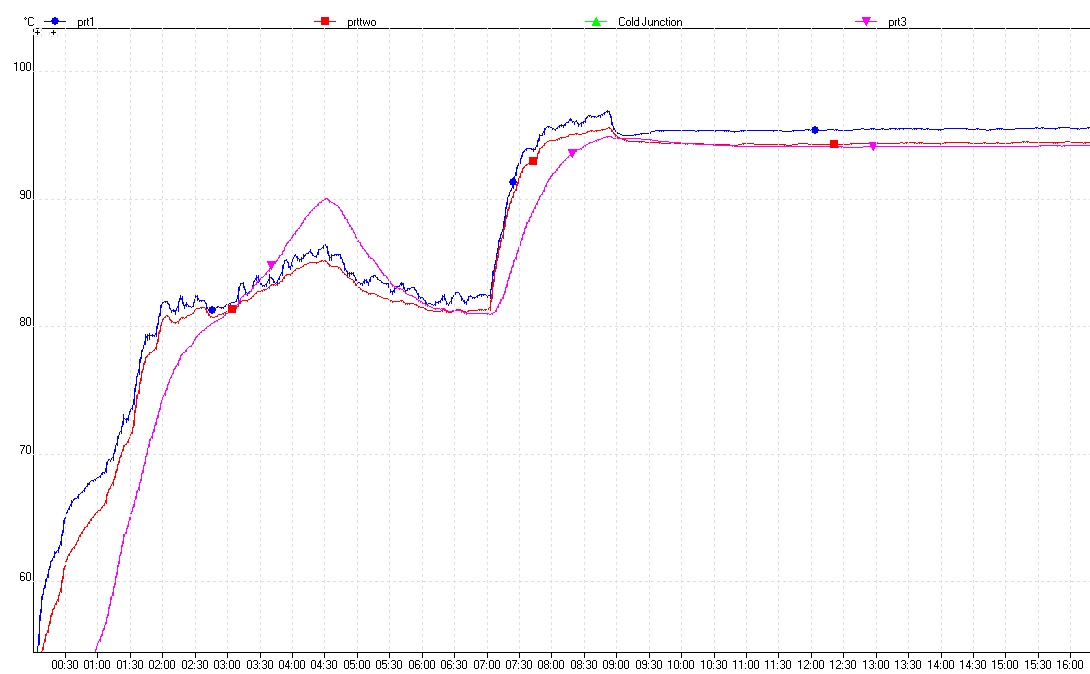
You can see the pink line which (if I remember correctly) was a thick part of the laminate on an otherwise thinner part. Once the part temperature gets past 80C, the cure starts to take off and the bump in temperature up to 90C is from heat generated by the gelling (and then curing) resin. Looking at the time along the horizontal axis, the ramp rate here was very slow, taking two hours to go 30 degrees C – for 0.25C per minute. The soak here is to absorb and reduce the exotherm generated by the curing and to keep it under control before heading up to higher temperature to complete the cure. There is no air temperature trace on this log – only three thermocouples on the surface of a part – maybe multiple parts – I can’t recall. The blue trace with the up and down cycles must have been on a very thin area, or right in the way of the heater fan because you can see the cycles of the oven heat as it goes on and off to maintain temperature.
Of course many times you’ll just be able to do a straight ramp at a given rate to your cure temperature and call it good. For single skin parts that aren’t super thick this is often just fine. You’ll need a controller that lets you say “Go to 120C at 1degree C/min and stay there for 4 hours – then cool down.” If you are using heavy metal tooling that stabilizes heat well you may just be able to crank it up as fast as it’ll go – but be careful to consider viscosity and gel time. Make sure you get enough resin flow (and not too much) before your resin starts to gel.
One more time to beat the “test panel” dead horse: make test panels with your materials and know what will work!
The Cook
Once you are satisfied with your bag and with all the plumbing, oven setup and monitoring equipment, it’s time to cook! If you have planned well, have sorted equipment, and lots of experience – this should go off without a hitch. If not, well – there’s some things you should keep in mind.
If you have a PID (programmable ramp-capable) oven controller, you should program the whole cook cycle into the controller. If you are doing a manual temperature control cook, you should write down the planned cycle and not the time when each heating even should happen. I have kept a variety of “cook logs” in my day – from a few times and numbers scratched on a cardboard box to a carefully formatted QC sheet with temperature and vacuum readings taken every 15 minutes. If you are involved in a project with a low tolerance for screw-ups then you should adjust your level of carefulness accordingly!
As your cook ramps up to an elevated temperature, you should take note of your vacuum level. Assuming you have a good bag to begin with, you may be distressed to see vacuum dropping almost directly proportionally to the increased heat. If your tacky tape has slid or your bag popped – that will be a less subtle drop! Most of the time what you are seeing is moisture boiling out of your stuff. If you have been working in an air-conditioned environment and are laminating in composite or metal molds – this may not be more than a slight dip in vacuum level for a few minutes. But if you are using wood tooling – or honeycomb, or balsa core, or even some bits of wood around the perimeter of a cored panel – you’ll get vapor (aka steam) coming out your vacuum plumbing and into your pump. Now this isn’t terrible – it comes with the territory when using sub-optimal tooling and work environment. Plenty of beautiful parts have been built in wood tooling – and at less than perfect vacuum. The key is that you need to limit the down-side to a reduced level of bag pressure – and not allow moisture to travel through your part. Moisture that gets quickly into the bleeder and then into the vacuum system won’t do any harm to your parts. It’ll F-up your vacuum pump though! If you’re a wood-cooker, be resigned to regular pump oil changes.
As your cook progresses, you should see vacuum increase again after the moisture has boiled off/out of your material. Larger vacuum pumps will be able to handle moisture more quickly, but you will still be limited by the speed of boiling and flow. As you get toward your final cook temperature, the vacuum level should stabilize and then slowly start to drop back to where it was before your cook started. I’m not talking lots of vacuum fluctuation here – less than 1 inHg – but if you’re checking a millibar gauge it can look like a big deal. Ideally vacuum should end up slightly better than it was at the start when the cook is all done and the part and mold are back to room temperature. If it’s way worse, you may have actually had a leak!
You should also make sure that your vacuum pump exhaust is vented to a safe spot (ideally outside or through some kind of filter) because it will have any volatile nasty-stuff from the resin and rest of the non-edible stuff in the vacuum bag. Worst case: it’s bad for you – best case: vacuum pump exhaust smells bad!
If something goes wrong during your cook, you have two places when you can bail out and live to fight another day. The first is before any resin gellin’ happens. This will be before or during the first ramp and soak – or up to a level that is well below the onset of cure temperature. If your bag pops or a critical piece of equipment is struggling, you can totally stop here. Make sure you leave it under vacuum until the part and mold cool back down to room temperature. The next doable stopping area is after the resin has gelled and you are sure that a reasonable amount of curing has taken place. Most (many… not sure – ask!) resins will tolerate a two-part cure, providing you keep vacuum on and don’t try to demold your part until the cure has been completed. If you stop during the initial gelling period, you will never be able to get back there – and almost certainly your part will be junk.
When should you stop, and when should you risk it an expect things to work out? This is where experience comes in – and a sense of the cost under the bag and your stomach for risk. If you are concerned that you have leaks in your bag or plumbing, it makes sense to stop and see if you can find and fix them. Even if you’re not sure if it’s vapor or a vacuum leak – it is probably worth pausing before you ramp up to your cook temperature to press the tacky tape and make sure the fittings are all tight. For large parts, it is hugely helpful to have an oven you can walk around inside. Even at 65C, it’s hot – but you can be in there for a few minutes to check on the parts and make sure that you’re aren’t assuming the wrong thing. Thermocouples will flake out sometimes or you’ll want to get a visual read on the level of resin bleed or some other gut-metric. This is one place where autoclaves are a huge bummer – you can’t just crack the door and look inside!
Once your cook is complete, you should allow your parts to cool to below 45C – or ideally to room temperature before you turn off the vacuum or attempt to demold. Demolding hot may cause part distortion or damage. There are times when you may need to do it – but those are special cases and if you’re doing that then YOU should be writing the article! No really – if you are reading this and see things that don’t seem right or come across subtleties that should be addressed – please let me know – I’d love to have a chance to learn from you.
Demolding
Wedges. Lots of wedges. Especially if you are using carbon, demolding difficult shapes can be a challenge. The great part is that carbon is stiff and if you push or pull on it one place, it is beefy enough not to just bend. The bad part is that it’s really easy to crack and damage. The other bad part is that lots of things that get built with pre-pregs are really light and easy to break. And they’re expensive and took a long time to make so you can’t break them!
When it comes to wedges, I am big believer in the very long, very shallow wedge. Commercial demolding wedges are too stumpy and do more bending than lifting. The ideal wedge would be about 1mm thick on one end, 10mm on the other and about a foot (300mm) long. It would be flexible but strong and not so sharp that it digs into the part or the mold. It would put a lifting pressure on a flange rather than a bending pressure. You don’t wan’t to wrench up flanges or corners because you can break them and it distorts the part – sometimes making it tighter! My ideal wedge may not be possible – but a thin piece of hard plastic with a bevel ground on the end is great – in a pinch a well beveled paint stir stick works great. And for bigger parts you’ll need lots of wedges!
Another thing to watch out for is static electricity that builds up when a part is removed from a table. I have worked in many places that had waist-high carbon tables and when demolding a flat part from the table the potential for a shock “below the belt” was terrifying. Just thinking about some of the shocks I have gotten demolding carbon parts makes me shiver! They’ll come as you pull a freshly demolded part up off the tool. And no, its not unreasonable to make a wire with a clip on each end to ground your conductive parts as you demold them!
Refining Your Process
You’re going to have screw-ups. It’s bound to happen and in this you will not be alone. I have thrown out lots of stuff and it always hurts. That’s one of the reasons I decided to write this all down!
My advice is to take lots of pictures, keep notes, and talk with as many people as you can. There’s not a lot of detailed information on how to actually build parts with pre-pregs available in public. Most of the people who are experienced got that way at work – and many employers consider processing information proprietary. This is changing some, and the internet and YouTube and online forums are making this kind of information much more available than it has been in the past. Please share what you learn – other people will be happy to have your perspective and you will learn tons from the people who are interested in your work.
This article is just a basic overview. My hope is that it will help you have success with processing pre-pregs and get you off on the right foot!
Updated 1/6/20: Cook section and edits
Updated 4/18/20: TOC, minor edits.
Updated 5/10/20: Edits, tooling prepregs, typos.
Updated 3/1/20: Edits, proofreading, extra details
Appendix A: Resources for Further Learning
- Professional Boatbuilder: Issue 131, p28. also Issue 153, p 20. Find Back Issues Here
- Gurit: Epoxy Prepreg Processing
- Handling Guide & Instructions – Rock West Composites: Zoltek Prepreg
- Easy Composites: Beginner’s Guide to Out-of-Autoclave Pre-preg Carbon Fibre
Appendix B: Retail Sources for Pre-pregs
Working on it…
Note:
This information is offered as a way to share my experiences and knowledge – and for fun. It comes with no guarantees of correctness, usefulness or other value. I have done my best to make EC! useful – what I wish I had come across 15 years ago – but I make no promises about it’s utility. If you encounter problems, waste materials or hurt yourself, that is your responsibility and yours alone. Please be careful!