For building one-off or limited-production parts that will get painted, there are few products that will save you more time and trouble than adhesive Teflon/PTFE film. This stuff is perfect for making a crappy surface nice enough to get good parts off of and saves the whole problem of release coatings and all the associated drama. There are a wide variety of products available but the main idea is that you have a thin sheet of PTFE/Teflon/other fluoropolymer film – often reinforced with a light fabric – that has a silicone or acrylic adhesive on the back. You peel it and stick it into your mold like a sticker. Then you make a part – just like that!
Video
Here’s a video that goes well with this article and illustrates the use of the material. You should keep reading the article though and be sure to see the links at the bottom to where you can get this stuff and who makes it.
When, What… How?
This adhesive-backed mold release film – I’ll call it “adhesive Teflon” because that’s what I’m used to calling it – has two main advantages. First, it lets you release parts off molds without using a release coating system – and does it ever release! The second huge advantage is that you can stick it to relatively porous or “sub-optimal” surfaces and it will make shiny parts. Bonus feature: no concern with release coat “transfer” from the tool surface to your parts so secondary bonding is less reliant on a good cleaning before surface prep!
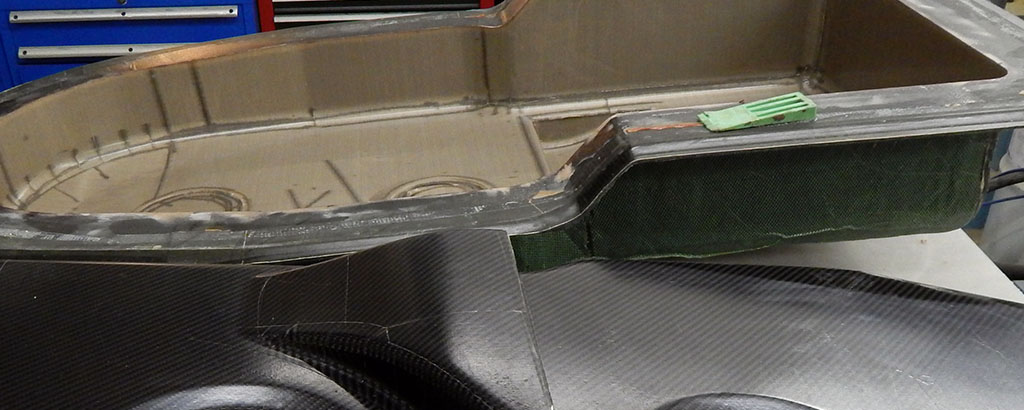
In the image at the top of this page, there is a carbon mold with adhesive Teflon release film in it. This surface was nice enough to use a chemical release coat, but there is very little draft in this mold – almost none really – and I was very concerned about getting the parts out. I knew the Teflon would have a little “give” in it and that it would help me release the part without damaging it. There’s very low surface roughness so it takes very little energy to release. I knew the parts were going to get primed and painted so those little lines in the part from the seams would sand right out. It was also fast and not-stinky.
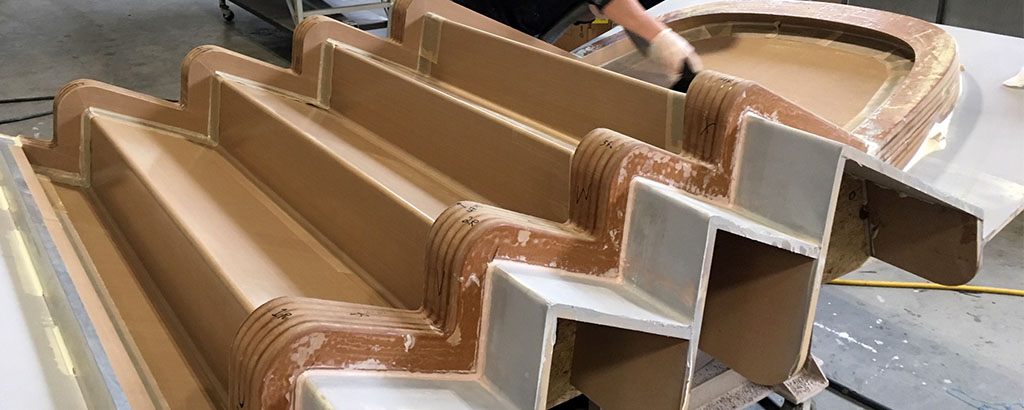
This picture shows a wood mold for a one-off pre-preg part. The gray mold surface was built from MDF sheets and was glassed over with light fiberglass in epoxy and then sprayed with primer. This created a vacuum-tight surface. The MDF “lightning bolts” around the edge form an angled flange. This was a perfect situation for adhesive Teflon because the primer surface was only sanded to 120 grit and wasn’t anything special – there was exposed filler and other things that would have been trouble with a chemical release coating. The MDF flange formers are just coated in epoxy resin, sanded a little and with the film stuck right on – no primer at all. The PTFE surface coating is very slick – the low surface energy helps avoid pinholes on the finished part surface. Even with the pretty rudimentary tooling, these parts came out shiny and pinhole-free.
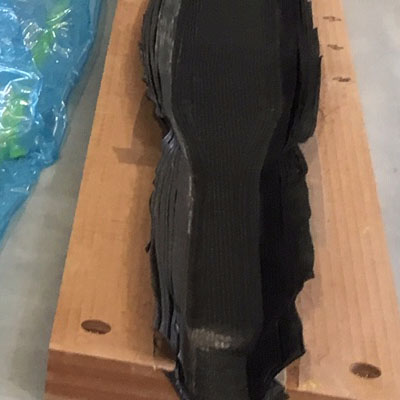
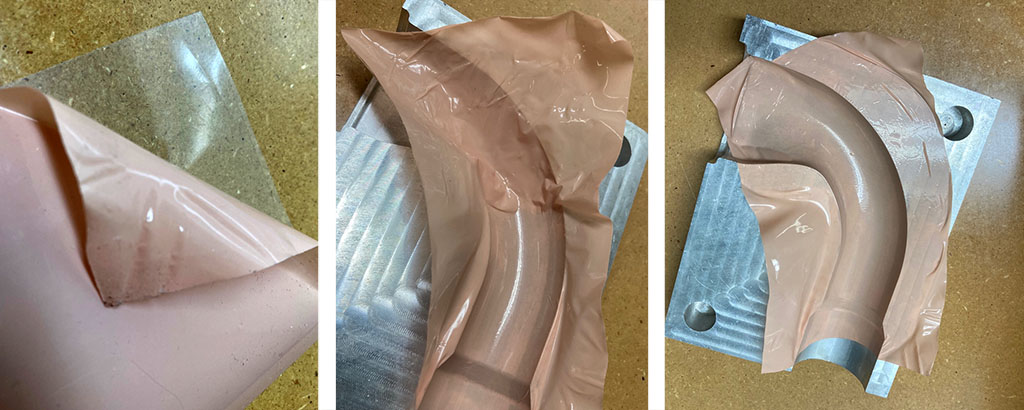
It is also really helpful with MDF and tooling board direct molds for one-off parts. Here is a very quick MDF female mold for a boat rudder stock – just coated with epoxy and quickly sanded – and you can see the release film poking out from around the layers of material. These pre-preg plies are ready to be folded over to lap onto the inside of the opposite side where the plies have been staggered back to match. The flange part of the matching mold has adhesive Teflon film out to the perimeter – but no need to do both sides! This mold was getting a part made in it the day after machining was complete – only needed to wait for the epoxy sealer to cure. If you’re really in a hurry, it can be stuck directly to the MDF… but in my opinion it is best to seal MDF first. Check out the article: Using MDF for Composites Tooling.
Adhesive Teflon film is also amazing for milking more life out of damaged production molds. If you have areas that don’t release well or are damaged, a strip of this stuff will often save a ton of trouble. You may have a little rework in the gelcoat department but it could be the difference between getting parts out of a worn out mold and having a part stuck in the worn out mold! Or worse – having to take the time and money to repair or build a new mold for a part you rarely need.
Options and Choices
There are several parameters to consider when choosing an adhesive Teflon product. Here are the important five:
- Thickness
- Adhesive
- Scrim
- Porosity
- Stretch
Thickness
Thickness will play a part in surface quality and also conform-ability when sticking the film to curved surfaces. The thinnest surface film I’d recommend is 0.003″ or .1mm – this is really thin and it is easy to tear and doesn’t do much to pad out imperfections in the substrate. Adding 0.0025″ of adhesive, you get 0.0055″ of total film thickness. My favorite is 0.005″ film, with 0.0025″ of adhesive that is still cheap enough while providing a smoother and easier-to-release surface. You pay for the thickness of the film, so thinner is cheaper.
Adhesive Types
You can often select between adhesive types. The two I am familiar with are silicone or acrylic. Acrylic is substantially cheaper, but it is really a one-use product. No way you’re going to get that stuff off or make any repairs to the surface – not neatly at least! Silicone is the nicer option and it has the huge benefit of being removable even after cooking and vacuum bagging and all kinds of rough treatment. You just razor-knife out a section and place a new piece over it and “wallpaper cut” the joint. On the “silicone” thing: I have never had any transfer problems or heard of any situations where it caused contamination or drama – but I ain’t NASA so do your own tests if you’re in a high-stakes situation.
Backing / Scrim
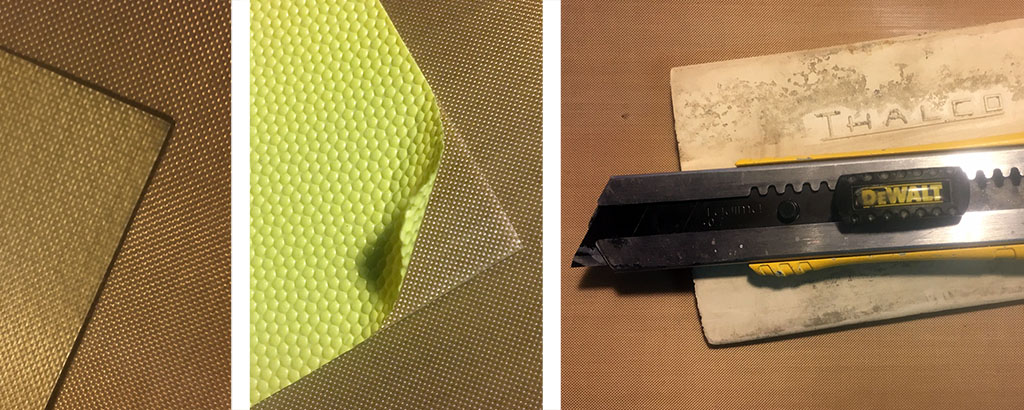
The third choice is whether to have a fiber scrim reinforcement or not. Some products have what looks like a “grain” to them – and this is a fine fiber layer that helps strengthen the film. It is great for relatively flat areas but does limit the contour-ability on compound curved surfaces. Generally I would choose the reinforced kind because it is easier to put down flat without stretching and warping and if you need to remove it – it comes up more easily. Airtec ToolTec is one common product that comes in both reinforced and more flexible versions.
Porosity
Number four is porosity. You can get air-tight films or ones that allow air (or moisture) to pass through them. There are times when porosity is helpful – no bubbles when you stick it down either – but I generally prefer the solid or low-porosity film for cheap or quick and dirty molds. MDF is enough trouble without it pushing moisture into your parts. If you are only surfacing composite molds that are already air-tight, the porosity won’t be an issue.
Stretch
And number five: stretch. The thicker reinforced surfacing films don’t stretch. To deal with contours you have to cut little darts and laps – which is a total pain. Thinner Teflon films and those without scrim can kinda-stretch – so gentle curves are ok – but you’ll do lots of wallpaper-cuts. The high-elongation fluoropolymer film like the Toolwright 3 (350% elongation) will stretch a lot but even so, there are limits. Here’s a quick demonstration of the stretch:
Actual Use
While more forgiving of crappy surfaces than other release options, it is important to understand what steps you can take to get the best results possible with as little work as possible. First off – the surface should be free of dust or any contaminant that will keep the adhesive backer from sticking. If you get dust or chunks of stuff under the film it will be super annoying to get them out (you can make a small slice and pick them out) and/or you will have to leave them in a get little indentations in your part. The material comes in rolls several feet wide and putting this down on large surfaces is a two person job. You want to have one person holding the roll and pulling off the backer while another uses a squeegee (or a wadded up rag rubbed back and forth) to put it down without wrinkles or bubbles.
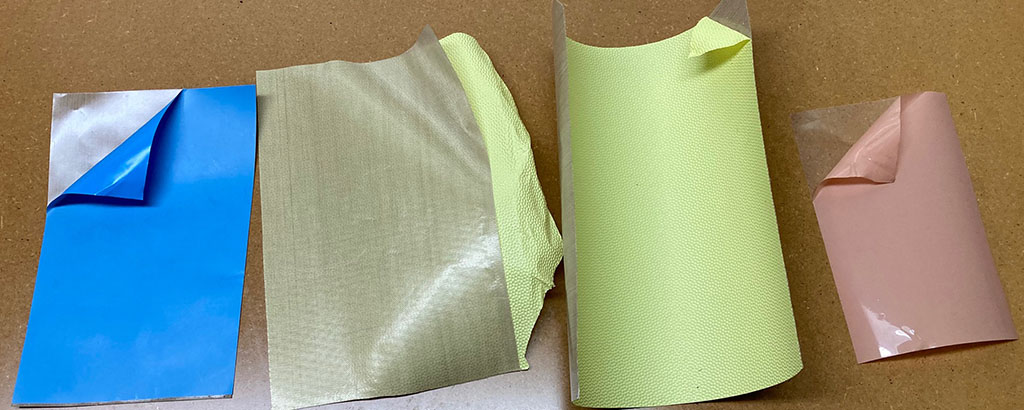
Middle: Silicone adhesive with yellow backer peeled to expose adhesive.
Right: Tools of the trade – a razor knife and a soft squeegee. These rubber Thalco ones are perfect for this.
For large surfaces that are fair and well sanded it may make sense to bring the finish to a higher finish level than seems needed to ensure better adhesion of the film. I have worked with people who would sand a surface to 320 grit and then go over it with a buffing compound quickly with the idea that the compound would smooth things out and give the adhesive a better surface to bond to… not sure I agree with this but it it worth investigating. Definitely doesn’t make things worse and there may be some wisdom to compound as a way to fill any pinholes or scratches. It also seems to make it easier to patch the film if it gets damaged after demolding several parts.
Wallpaper Cutting
The key detail to getting neat results with adhesive Teflon is the wallpaper-cut, also called the “double-cut”. This is how you get seams that butt up and not overlap, because those overlaps will print into your part. All you do is overlap the layers at the edges by around 1/2″ (12mm) or so and then cut neatly through both layers somewhere in the middle of the lap. You want to leave enough of an off-cut on the bottom layer that you can peel back the top and pull out the strip you cut off without it breaking. So you peel off the off-cut from the top and bottom layers and then the two butt up perfectly along the line of your knife cut! It takes some practice but you get these nice seams that do print onto the part but only with little ridges of resin that sand off easily. Here are a sequence of pictures from my Autoclaved Aerated Concrete test video – where I try to use adhesive Teflon on part of a sphere – and struggle!

Compound curves and corners are the hardest part and you can expect to take some time to get it nice. Sometimes you’ll have to leave little tabs that overlap that you will sand out or fill later – they’re only .007″/.15mm or so so not a huge deal if you’re painting. One trick that I use with reinforced film is to cut strips on the bias – so the fibers in the reinforcement are at +/-45 degrees to the strip of film. Just like biaxial fiber or peel ply, this makes it stretchier and more able to go around corners – but also more likely to come unstuck.
Cheaper Alternatives
One alternative that is much cheaper than adhesive Teflon film, is standard release film (the non-perforated kind) stuck into your mold with spray adhesive. This is only really a good idea with pre-pregs but if you are planning to put peel-ply against your mold surface or you will do some sanding and painting on your part, it can be plenty nice. The release film is super thin so folds and wrinkles only push a few thousandths of an inch into your part surface. It looks like crap but the price is right – remember that making something nicer than it needs to be is waste too!
Also: Packing tape. If you don’t mind little ridges where the tape overlaps, a good cheap (thin) packing tape can be a great quick and dirty mold release. It gets even better if you apply a little wax or solvent-free chemical release agent. Be careful not to get it too hot because it can wrinkle and make a huge mess.
Vinyl-wrap: like for cars. I have not tried it myself, but I understand that it can work. The conformably is there and if it stands up to the solvents then it would probably be fine. It will be safest to use a release agent over any random adhesive film – because who knows what’s on there. Wax would work, or a water-based release agent like Zyvax Watershield – and maybe the solvent borne release agents will work too. Please test!
Conclusions
There’s a time and a place for everything – and if you are trying to make high quality composite parts as fast as possible and you don’t mind lines in your part-surface then this might be the stuff for you! There are drawbacks and it’s not cheap but for prototyping or custom builds it can be a huge benefit. Pre-pregs are often challenging with one-off molds and adhesive Teflon will let you get the best parts possible from inexpensive tooling. If you buy a little and have it around you’ll find that it will get used up faster than you thought it would – and chances are you’ll be ordering more!
Brands and Sources
- Airtech Tooltec CS5: An un-reinforced material that will conform to curved surfaces well. Silicone adhesive.
- Taconic Tac-Tapes: PTFE adhesive tapes with fiber reinforcement. Available with silicone or acrylic adhesive.
- CS Hyde Company: Range of adhesive PTFE and other films with a variety of adhesives.
- Dewal DW134: Many options and good way to see what this stuff is used for in other industrial situations.
- Airtech ToolWright 3 and 5: A thin fluoropolymer high elongation film.
- Composite Envisions (USA): Teflon Coated Release Film with Silicone Adhesive.
- Freeman Supply (USA): Airtech Tooltec – two of options are available. A005 has reinforcement, CS5 has none.
- McMaster-Carr: PTFE-Coated Fiberglass Fabric Sheet with Adhesive Backing – sold in small quantities so an easy way to try some.
There are numerous sources of this material, and it is worth trying out different products to see what you like. It is called many different things by different suppliers but in general if you go with “Teflon” “PTFE” “Adhesive” “Film” “Pressure-sensitive” “Tape” and things like that you’ll find what you’re after. If you find a good supplier (or are one) that isn’t included here please let me know and I’ll add it to the list. These are just ones I know or have used.
Changes
Updated 5.12.21 – Resized images and added video link vs embedded