This article is about the stuff between your vacuum pump and your part: the hoses, fittings and connectors. My goal is not to tell you exactly what to use, but to show you what I use and explain why, and point out the key ingredients to successful vacuum systems.
For more on vacuum bagging, see: INTRODUCTION TO VACUUM BAGGING
Vacuum Pumps and Vacuum Processes
For a lot of composites technologies, vacuum is an essential part of the process. There aren’t really any other good ways to apply huge amounts of pressure to large irregularly shaped areas!
If you are looking for a pump too, please check out: HOW TO CHOOSE A VACUUM PUMP FOR COMPOSITES
Different processes have different requirements. For bagged wet-layup, you may not need much overall vacuum, but you have to be able to regulate it and there’s all that resin to not suck up. Infusion is all about vacuum – as much as possible in many cases. Pre-pregs bring high heat to the mix and potentially lots of extra pressure in an autoclave. Your vacuum stuff has to match your process.
Hoses
You have got to have a hose. What kind of hose you use depends on what you are doing and what kind of conditions you’re doing it in!
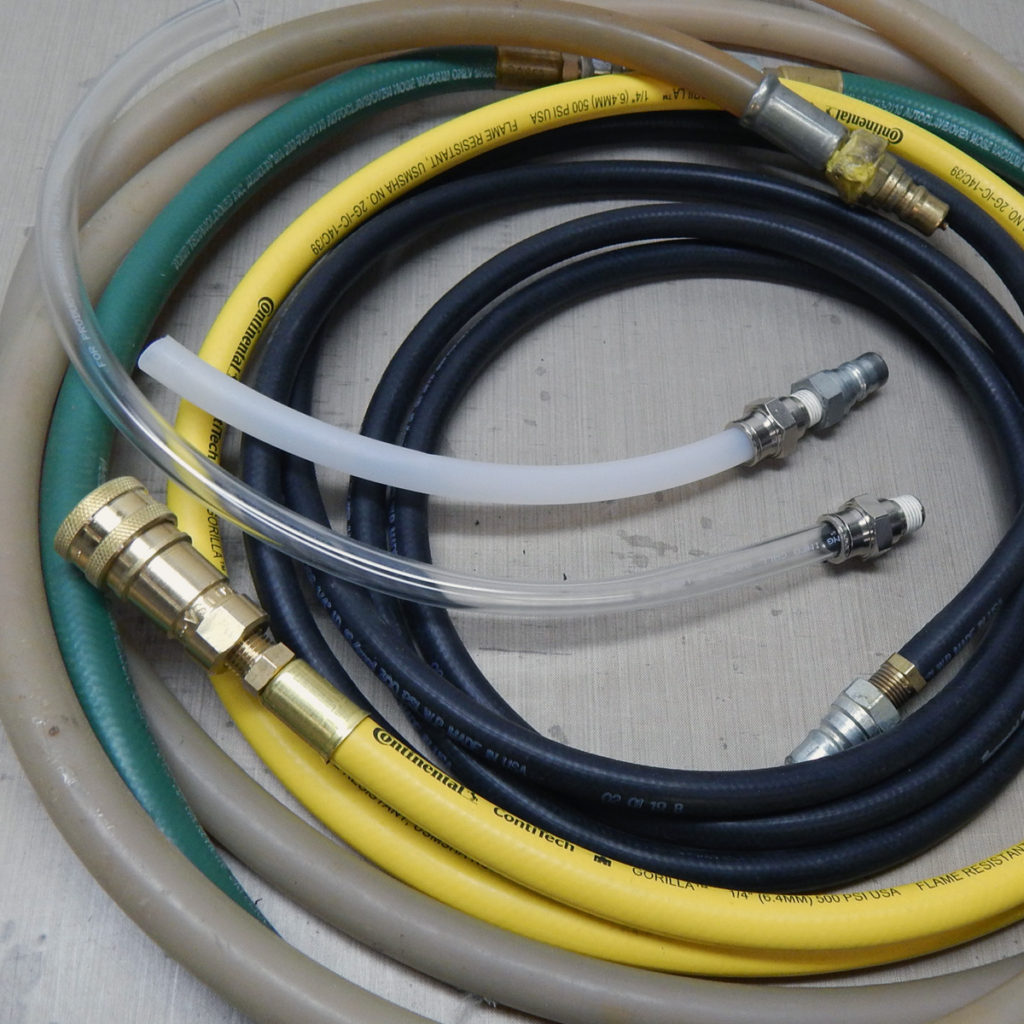
White: Polyethylene infusion hose
Clear: Tygon-type PVC hose
Black: Heavy duty air hose
Yellow: Vacuum-rated Gorilla hose
Tan: Airflow 65R oven hose (Airtech)
Green: Autoclave hose (Torr Technologies)
The picture shows the six most common kinds of hoses you’ll find in composites shops. These are small-diameter ones, which is generally what you’d need for individual parts. For most processes, you (hopefully!) don’t need a lot of flow except when first pulling down a vacuum bag, so small hoses are fine.
The cheapest is a plastic (polyethylene here – regular infusion hose) that is stiff enough not to crush and flexible enough to handle. You can use it in disposable fashion, but it can also be fit with barbed or push-to-connect (shown) fittings and made a more permanent option. It won’t take pre-preg heat but it will be fine up to 140F / 60C or so and good for post-curing.
Avoid the more flexible clear (Tygon type) PVC hose because it crushes easily and will choke itself off if bent around tight corners! I see lots of people use this for infusion and it is a poor choice – at least for the vacuum side. All the professional “infusers” I have ever worked with or seen use polyethylene or (sometimes) silicone hose.
Moving up to a more permanent solution, we have the rubber coated “air-hose” style black hose. This is a very tough and long-lasting hose for room temperature use. The black hose here is a pre-made 300psi air hose with vacuum fittings instead of air fittings. You need to have a wire reinforced hose, so ones rated for higher pressure work best – and these will usually take moderate heat up to 180F / 80C or so.
My favorite of this kind is Gorilla Hose (a Continental or Goodyear Brand) which is a 500psi-rated hose – and it’s yellow which is cool. You can either buy pre-made hoses and add fittings or have them made up by a hose shop locally to your specifications. Any place that makes hydraulic hoses to order can make you air or vacuum hoses too – and it can be much cheaper than McMaster-Carr or your local equivalent!
Heat adds another level of complexity, so for your pre-preg cooking adventures, the air hose won’t cut it. The most basic type of hose for oven use is silicone “radiator hose” or “coolant hose.” This has a silicone cover with wire reinforcement and can be made up with barbed fittings and hose clamps. You can buy this hose cut to length if you want to make your own or have a hose shop make up hoses to your specification. Typically these are rated to take heat in the 150C / 300F range – which is fine for most non-aerospace pre-preg work.
The tan hose in the picture is Airtech Airflow 65R – which is an oven hose for use up to 450F / 230C. It will handle low pressure autoclave use too. This hose has a metal core with a silicone rubber cover, so it is moderately flexible and easy on vacuum bags when laid on top of parts to be cooked.
The green hose is an autoclave-rated vacuum hose capable of handling high temperature and external pressure to 150psi / 10bar. This is the low-end of autoclave hoses and fancy metal ones are available that handle up to 1000psi of pressure and 1000F / 500C. The cost of low-end “cook hoses” is about double that of good quality room temperature hoses – maybe $10-$12 US per foot. As long as you don’t goop them up with resin – which is less easy to do with pre-pregs – they’ll last a long time.
And one last note on color and service type: If you’re running a facility where many people use the hoses, try to color-code them to help prevent mistakes. This is especially important if you do oven or autoclave curing, where mistakes can have high stakes!
Big Hoses
Unless you make huge stuff, I’m going to try to talk you out of hoses bigger than 1/2″ / 12mm inside diameter. There are plenty of cases where they are necessary and if you’re doing that then you know what you’re doing already. The best solution in my opinion is either several cell or station-specific vacuum pumps (ideal) or a larger factory-wide vacuum system.
The problem with a large vacuum system is that it isn’t robust when it comes to problems in one area impacting other areas. Sure you can have backup pumps, and from a maintenance perspective it can be a big benefit – but vacuum is critical to lots of composites processes and having your vacuum level drop because somebody else is doing something somewhere else can be really bad. If you go the hard-plumbed vacuum system route, try to use a few accumulators around your facility to buffer drops in vacuum and smooth out the system. You can use heavy gauge PVC in large diameters and have they vacuum plumbing be the accumulator!
Small pumps local to different work areas are good because they are reconfigurable and provide local control over the system. Your hose plan with small local pumps is going to rely less on big hoses and more on manifolds and small hoses.
If you do need large diameter hoses to handle the vacuum distribution, you can use them to place manifolds at areas where smaller hoses can connect to parts. Large air hose with wire reinforcement or hydraulic hose can work great for this. Clear wire-reinforced PVC hose is good for this and reasonably inexpensive. You’ll need big fittings to go with… more on that next.
Connectors / Quick-Disconnects
With all those nice hoses, you’re going to need some way to connect them to each other and to you pump and bag. Hard plumbed hoses are ok for things that are staying in one place – and unlikely to get gooped up – but for most situations removable hoses will be much better!
First a bit about connector types… the image to the right shows five different options, and only three are really good for composites-level vacuum work!
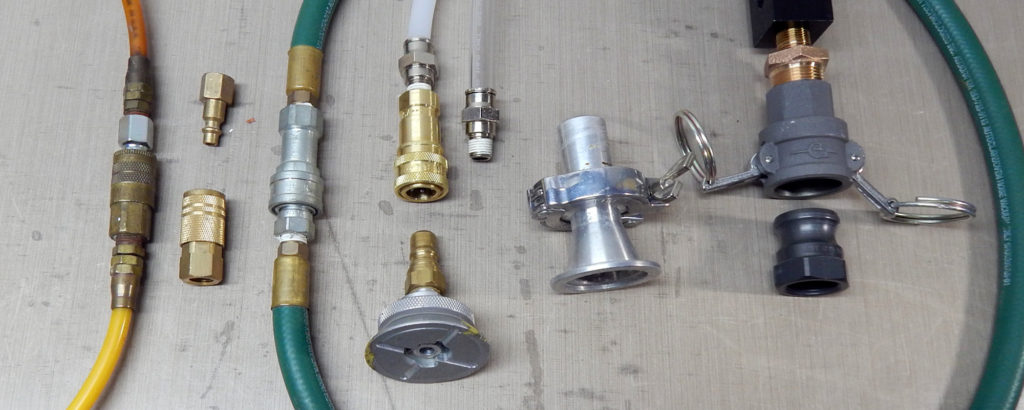
At the left we have regular air hose fittings – which can work but are meant for pressure instead of vacuum and so they can leak and give you all kinds of trouble. They are cheap, and some types will work ok for a while. Because there are so many kinds of air pressure quick-disconnects you may find ones that work ok. This will probably be fine for low-vacuum wet layup work where there’s lots of wet resin flying around and the likelihood of gooping up fittings is… real.
Next in from the left (on the green hose) is my go-to vacuum quick-connect. This is a set of 1/4″ “ISO 7241-B” or “Parker ISO-B” style fittings with 1/4″ NPT thread. Typically these are use for hydraulics but work great for many things, including vacuum. They are available in steel, brass and stainless steel – steel and brass (on the plate fitting and clear hose) are about half the price of stainless. I like brass because of the reduced likelihood of rusting when in contact with moisture – and they’re cheap.
There are other more expensive types of quick connect fittings used for vacuum and I have used them working in other shops and they are great – the main thing is finding something that is reliable, economical and good enough for what you’re doing.
Right there in the middle are two little silver-colored push-to-connect fittings for use with the plastic hoses. These can be good for cheap connections for room-temperature wet-bagged and infusion work.
Further right, the cone shaped item is an example of a high-vacuum fitting that uses a set of flanges and a compressed sealing ring. This is often the type of fitting found on high-vacuum pumps and this is one I used to interface with a Leybold pump I used to have. If you look at very high vacuum systems used in lab / science / fancy industry work you’ll see these are the standard for vacuum. For composite work they are just overkill. You may need to use them to interface with pumps and filters though so they are good to now about.
For larger hoses, cam-lock style connectors (far right) are a good choice. They are secure and when you get ones that are rated for it – can handle vacuum very well.
Sealing Threads
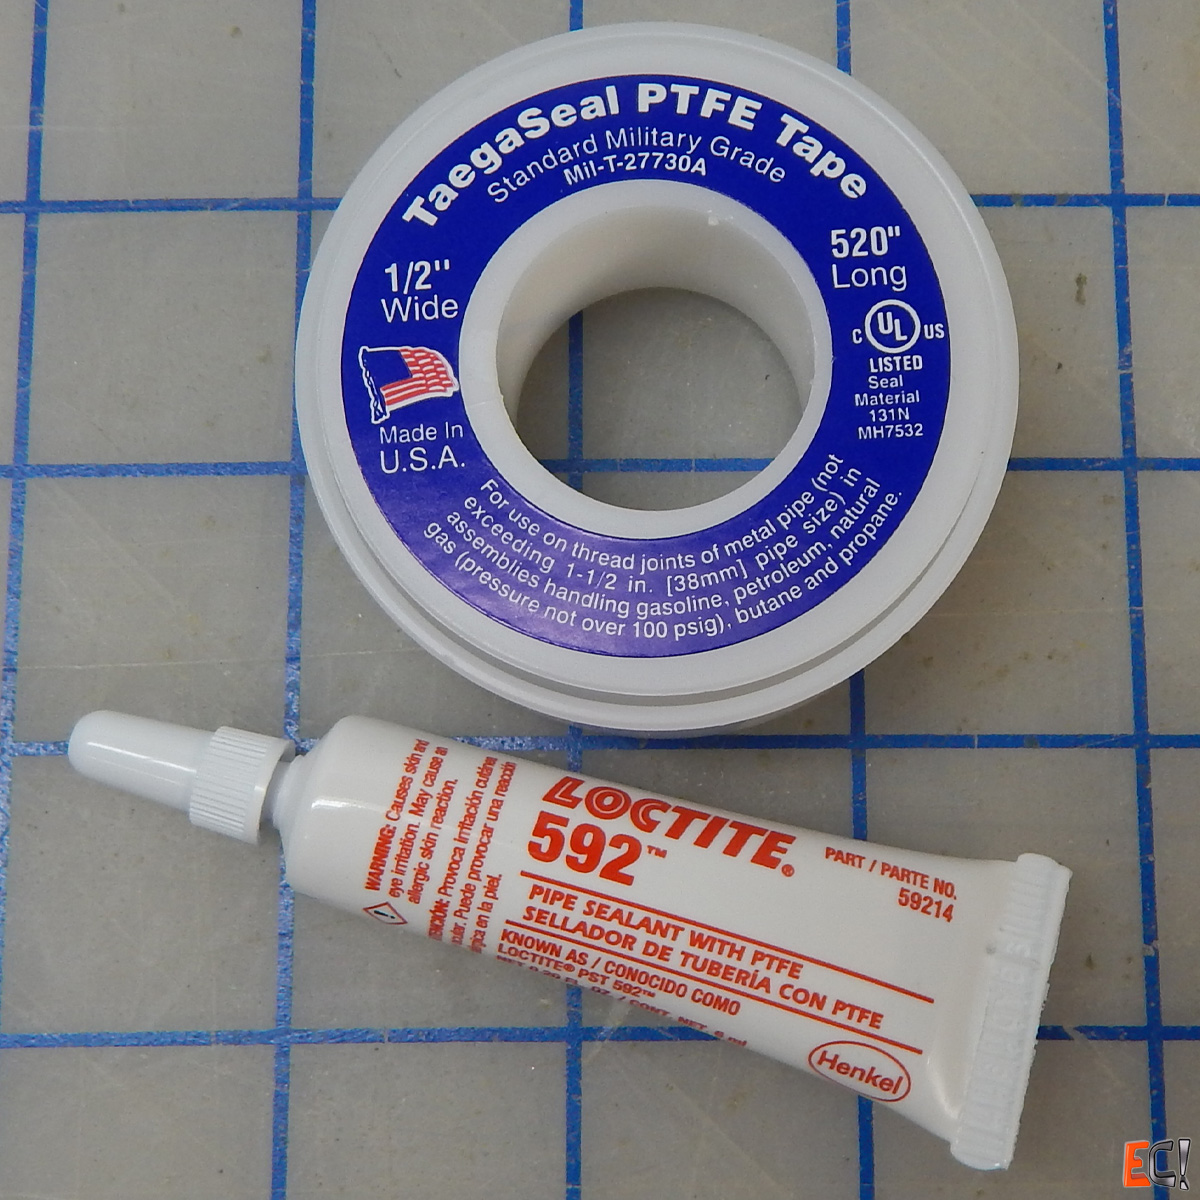
Pipe threads are designed to get tighter as you screw them in – but they also need some thread sealant to make them fully vacuum-tight. Both PTFE tape and liquid thread-sealant work ok. Brass fittings are nice because they are softer and less likely to corrode – and they are cheap.
A lot of time you’ll see fittings with vacuum bag sealant tape wrapped around the threaded connections. This is usually done as a precaution or when chasing down leaks without yet knowing where they are… you know – seal the lowing hanging fruit first. Lots of my fittings are like this. If you use thread sealant properly and tighten your threaded connections well, leaking shouldn’t be a problem.
Bag Penetrations
You’re going to need a way to get that vacuum through the bag! This section is about how to do it, and what fittings are commonly used. For vacuum infusion, this is a different story – this here applies to bagged wet layup and pre-pregs work. Don’t use these nice through-bag fittings for infusion because you’ll ruin ’em!
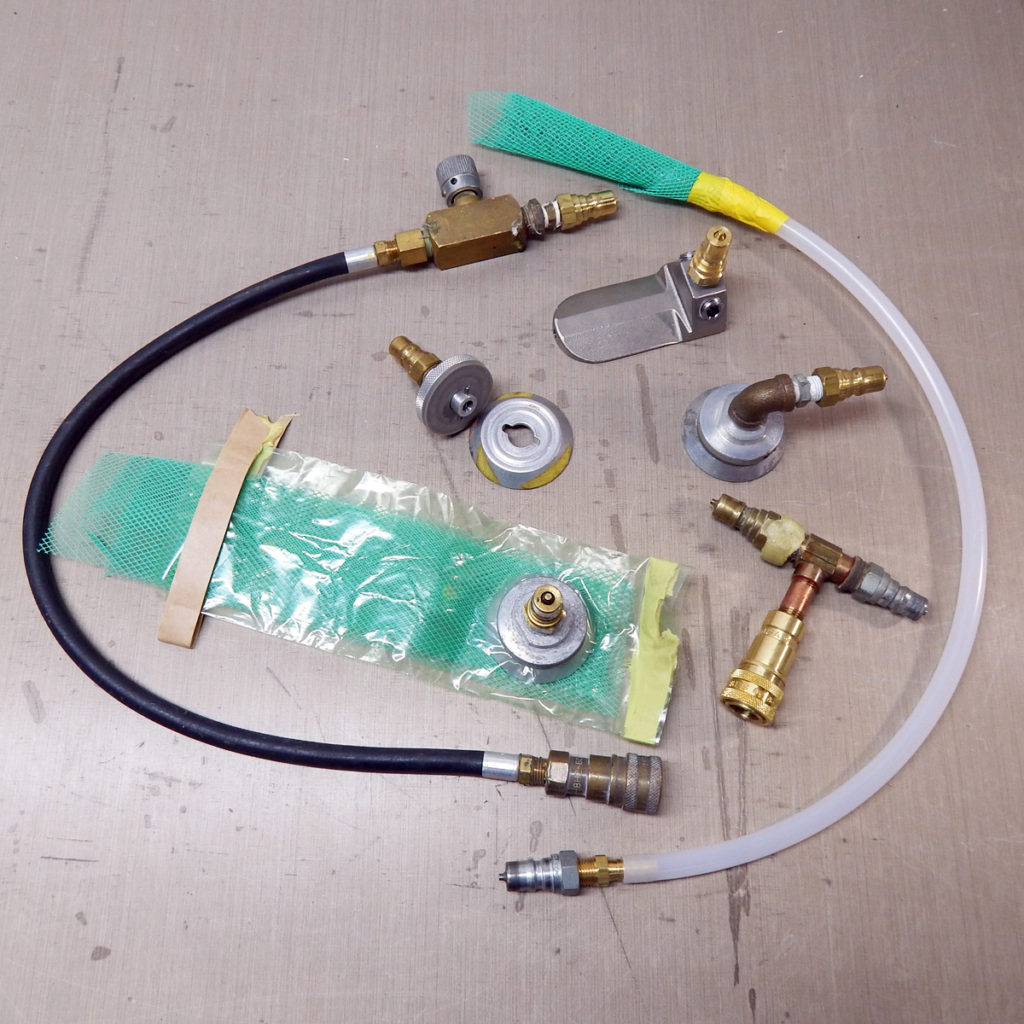
In the middle of the picture you can see two of the common type of through-bag connectors – one with a 90-degree fitting. These are called: “plates”, “frogs”, “vac. connects”, “pucks” and probably many more things depending on who you hang out with! These are great for tidy bagged wet-layup and pre-preg, where you can place them out of the way of resin. You’re talking about $50US worth of stuff there with the quick-disconnect so gooping them up with resin is bad! You also want to be sure to remove them from the bag before disposing of the film – too many of these get thrown out by mistake. Ask me how I know!
One more way to protect your vacuum connectors – check out the piece of tube bag assembled in the middle with infusion mesh and a fitting. This is a great way to handle situations where you don’t have room for a fitting under your bag. So you place your vacuum fitting inside a secondary piece of 4” tube-bag that has strips of infusion flow media inside. It’s like a remote vacuum port. The infusion mesh is held together with a few dots of bag sealant tape which keep it from sliding out. The vacuum port is on one end and the other end sits under the perimeter bag seal with its own extra tacky-tape seal.
There is another type of through-bag connector in there on the upper right that goes through the sealant tape at the edge of the bag. It sits on top of a strip of sealant tape and the bag goes over on another strip. Breather covers the end where there is a hole on the bottom face. These are patented and sold by Earth and Flight Sciences.
Finally the simplest vacuum connection of all – that big curvy guy at the right – a hose with something wrapped around the end and a quick connect fitting on the other. This is just polyethylene vacuum infusion hose with a barbed fitting and some infusion mesh taped on. Breather fabric works ok too. Don’t just jam a hose under the bag without some distribution medium over the end because it will suck the bag into the hose and pop it – or it will fill up with resin and choke off the flow. If you are brave, you can just plumb a barbed fitting right to your vacuum pump and use this method to avoid hoses and connectors all together – but don’t suck resin into your pump or it will become an ex-vacuum pump!
The last thing to look at here is a vacuum regulator. This is the knob-equipped brass item connected to the back hose. You can use a regulator to dial back your vacuum level. This is really useful for bagged wet-layup where you want to limit resin bleed, and in some cases for infusion too. You’ll want an in-line gauge to see what your vacuum is as you adjust the dial.
Gauges
You have to know how much vacuum you have got – or how much air is not in your bag. For this a gauge is key.
You should start with an analog gauge – they’re cheap and they give you a pretty good idea what’s up. Get one with a big enough dial to read and ideally an oil-filled one. This should be fine for almost anything you want to do on a hobby level. They are also good for hard plumbing onto manifolds, pumps and catch-pots so you get an quick read on the vacuum level without touching buttons.
Digital ones give a more fine-grained read on your vacuum level – and more importantly – changes in your vacuum level. If you find yourself doing pre-preg or infusion at any commercial level, a digital gauge will really give you a better feel for what’s going on – especially an absolute gauge.
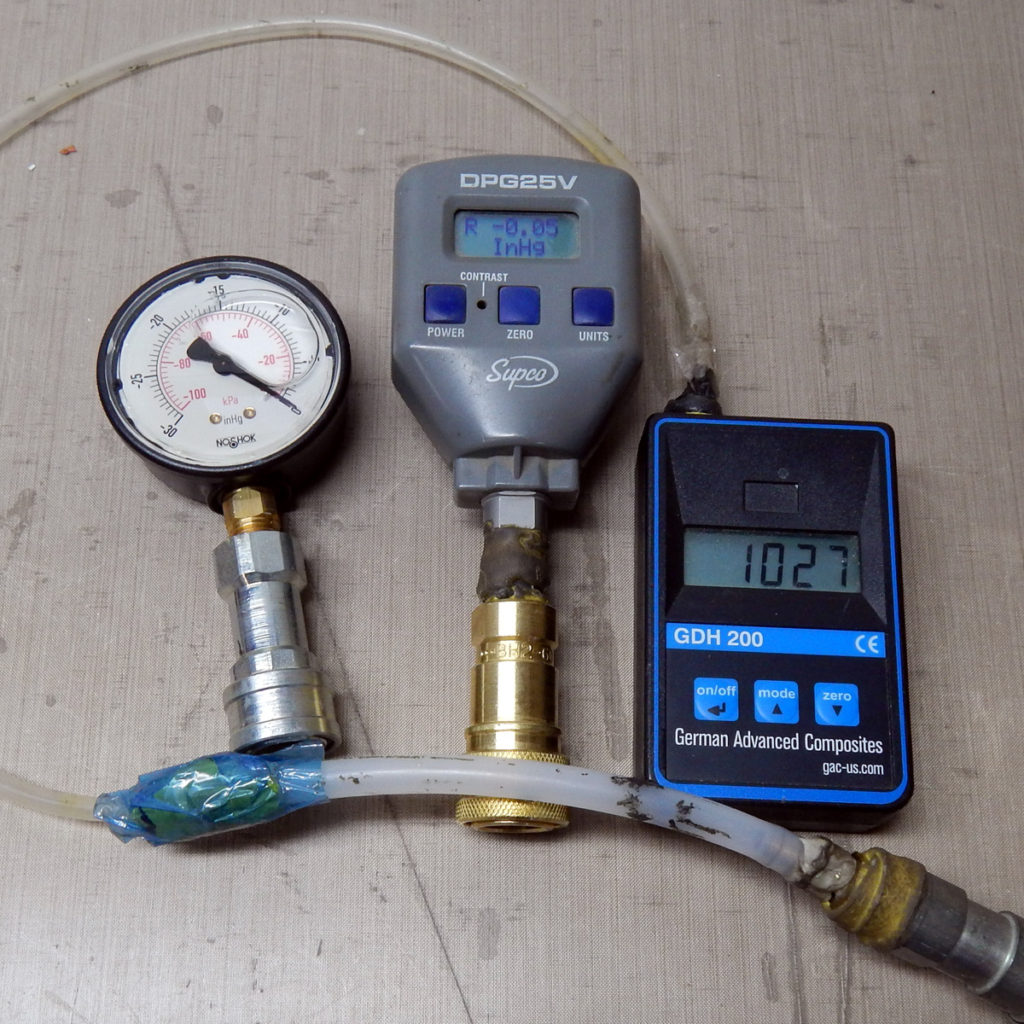
The gray gauge in the middle is a standard digital gauge that works pretty well as an upgrade from a dial-type analog gauge. It reads vacuum (in inches of mercury – “inHg”) relative to the ambient atmospheric pressure – so you’ll get somewhat different readings dependent on the weather. Seeing the numbers to a decimal place or two is very helpful and it makes quality control measures easier to implement – there’s no skill required to read it. This alone is a really good reason to use digital gauges in manufacturing environments.
The black and blue GDH-200 one on the right is a low-end absolute gauge. It reads vacuum relative to absolute pressure, so it is not swayed by the atmospheric pressure. This one reads in millibar (1/1000th of an atmosphere) and zero millibar (mbar) is equal to full vacuum – or no air. When you use this kind of gauge, the best you can do is get down to “0” – so as your bag gets better it is like a count-down. The resolution is much better too, so you can get a great feel for infusion drop tests or your efforts to find that last leak on a cook bag. At $300US or so, its not cheap, but totally worth it if you routinely put thousands of dollars worth of material and labor under vacuum bags.
Catch-pots
If you’re doing bagged wet-layup and especially infusion, you need to have a catch pot between your bag and your pump. The catch-pot is there to keep resin from getting into the pump!
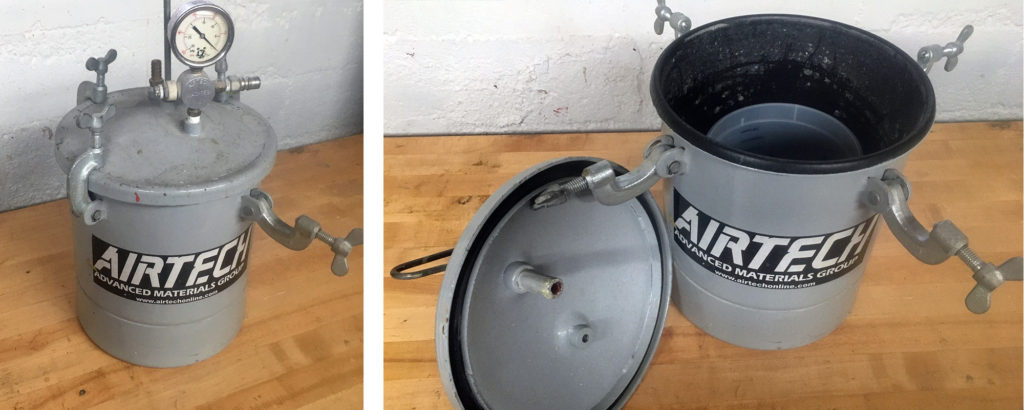
Here’s a catch-pot made from a paint pressure pot. This one has a gauge and a small regulator on it and was sold by Airtech. I didn’t buy it new (came with a used vacuum pump) and I don’t suggest you buy a fully assembled version if you want to save money. Any painting pressure-pot will do as long as the gasket is in good shape. You can put a paint pot inside to catch any resin that flows in. The vacuum port connects through another hole, so resin will drip into the pot and air will pass through to the vacuum pump free of resin.
If you don’t want to spring for a fancy pot you can make catch pots from PVC pipe for about $20US each. I made some of these for small infusions and wet-layup and they lasted for years. Brass barbed hose fittings will glue nicely into PVC pipe caps with pipe cement. When in doubt – add some bag sealant tape! Best to tap the holes, but if not – it’ll probably be ok if you drill holes slightly undersized and make the threads engage. Vacuum will tend to pull things tighter rather than blow it up – which is handy!
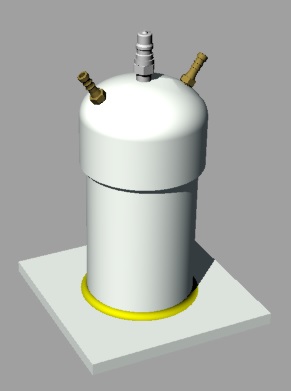
The sketch shows my basic design which is far from perfect – but worked for me. The pipe is 4″ PVC with a cap glued on and some barbed hose fittings of the right size for the polyethylene hose that works best for disposable infusion and wet-layup hose. No sense using expensive quick-connects on a catch pot inlet – though you can add multiple inlets and it does make sense to use whatever type of fitting you use for vacuum hoses to connect the pot to the pump. The base is a piece of PVC (or metal, or something vacuum-tight) that is held on with tacky tape (yellow). If you overflow your job and get resin in the pot, you can bust open the base and clean it out after the resin cures – or you can just leave it if it’s a small amount. Either way – mission accomplished – no resin in the pump.
This one has two inlets – the “brass” looking ones to the sides and a single vacuum port on top to connect to the pump. You can make one with only one inlet – or more than two. You’ll just need a way to plug the unused ones.
Hard-plumbed Systems
Working on it!
PVC pipe is ok, metal is better. I’m not a fan of big complex vacuum systems, but in many factory situations it is really important. Going to talk to a few people and get a better idea on what works and what doesn’t. Let me know if you have opinions!