This article is about choosing and using machinable tooling boards for making composites tooling. Machinable tooling boards are designed specifically to be CNC machined or manually carved to make plugs or direct molds. Ideally they machine smoothly, finish easily and remain stable through whatever molding operations are required. They’re pretty amazing to work with because they are engineered to do just what you’re asking for – provided you choose the right one! And there are numerous products to choose from – each addressing a specific range of process and market demands. This article is about choosing the right one and how to build your tooling to make good parts.
Uses
You’ll find these products called everything from “modeling board”, “tooling board”, “styling foam”, and a bunch of other similar types of names. This stuff is used in many industries – for example:
- Foundry patterns
- Styling and prototype models
- Thermoforming molds
- Weather-resistant signs
- Composites tooling!
Examples
Here are some examples from my stash of reference materials. I find it helpful to keep similar material around and to write notes on the samples – stuff like density, price, temperature range, and where to buy it. Having that information handy makes it easy to compare options!
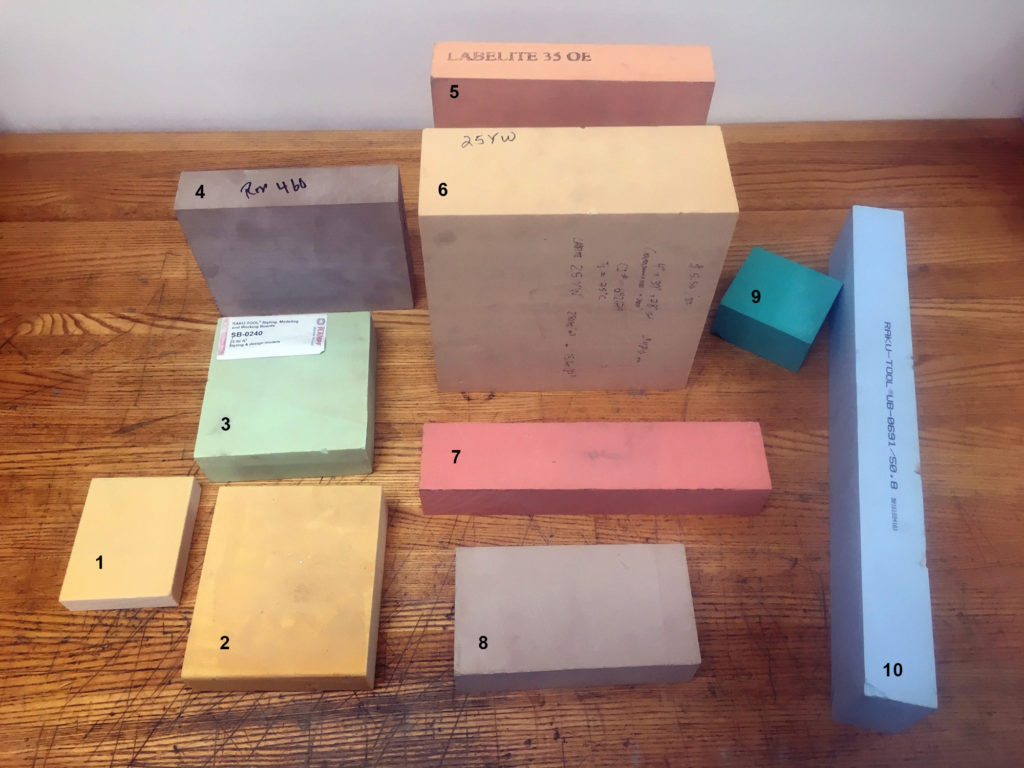
And this is what they are:
- Trymer Polyisocyanurate “volume filler foam” (6lb) – PET foam is good too.
- Precision Board PBLT (12lb)
- RakuTool SB0240 (15lb)
- RenShape 460 (48lb)
- Sika Labelite 35OE (22lb)
- Sika Labelite 25YW (16lb)
- Sika Labelite 35OE (22lb)
- Sika M600 (38lb)
- Sika LAB975 (43lb)
- RakuTool WB 0691 (43lb)
When you go to buy it, you will see that similar types of materials are marketed to do very different things. It is worth understanding what your fundamental parameters are for your project and then shopping around to find the least expensive material that will give you good results. If metal or laminated composite tools are too pricey and wood/MDF is too crappy – this stuff is just the ticket!
Video:

Here’s a video showing some examples of tooling board materials in order of density – I also tap on them with a big screwdriver!
Details and Options
There are three main considerations you’ll need to think about: density, material type and temperature performance. First density – because its the easiest!
Density
Densities for tooling boards range from 6 to 60 lbs/cubic foot (100-1000 kg/cubic meter) and are available in a wide variety of densities in between. Typically the price is closely correlated with the density – so you want to use the lightest material you can and still get good results.
Anything under 12-15lbs/cubic foot (200-250kg/cubic meter) will sand and machine easily but will be hard to finish well because it is so easily damaged. You can do it, but it will be frustrating if you have any complicated features to your part. For low density board, it is typical to spray a high-build primer or sealer to smooth the surface and allow for a release system to work. You will find that any spots where you “burn through” the primer while sanding will be hard to fix because the low density foam will sand away much faster than the surrounding primer. You’ll have to go back and fill and carefully reshape any areas where this happens. I’d only recommend low density foams for one-off parts where the surface finish doesn’t need to be excellent and/or you will be painting the finished surface. They will be very easy to damage during the demolding process.
For more on building larger tooling with very light foam as a substrate, check out the article BUILDING BIG WITH TOOLING PASTE
I’ll call any board products between 20 and 40lbs/cubic foot (300-650kg/square meter) “medium density” tooling boards. These are the go-to densities for making plugs and short run molds. You’ll find that they machine very well and can be finished to a very nice surface. Depending on the geometry, you may be able to get significant tool life out of a mold machined out of board in the 35-40lb range. This is also the most readily available density of material because it is ideal for so many things. Most suppliers will stock something in this range – even if they only stock one material.
High density tooling boards – over 40lbs/cubic foot (650kg/cubic meter) – are used mostly for tooling with high levels of small detail, or for higher temperature service tooling. These are still cheaper and faster to machine than aluminum but they are not cheap by any stretch! It’s all relative though – and it is often way faster and less expensive to glue up and machine a high density tooling board than it is to machine a plug from lower density material and then laminate a composite mold. The higher density also means that they can be sealed directly with a mold primer, sealer and then a release coat, eliminating the need to apply coats of conventional sprayed primer. Or you can stick adhesive teflon right to the unsealed tooling board surface and laminate right away.
Material Type and Temperature Performance
Almost all common tooling boards are either based on polyurethane or epoxy chemistry. There are more exotic kinds, and we’ll look at those a bit later – but for now lets focus on the standard stuff you can get easily that will cover 95% of your composites needs. But first a note on names: many times “urethane” will be used to describe the basic type of chemistry – polyurethane being a polymer made with multiple urethane groups. Just recognize that when you see “Urethane”, “Polyurethane”, “PU” – it’s all the same idea on the resin matrix side. The resin is one key part, the filler is the other. Fillers vary by application and density. Most are a mix of microspheres and industrial modifiers and solids – engineered to cut nicely and be stable.
Generally speaking, polyurethane tooling boards will be suitable for lower temperature use than epoxy boards. They’ll also be way cheaper. With polyurethane, you get a stable, easy to cut material that can handle up to 150F (65C) – or maybe a little more. There are “high temperature” products (Precision Board PBHT, Obomodulan 652HT, RenShape 472 and others) that can handle more than 250F (120C). The higher temperature polyurethane boards have a higher coefficient of thermal expansion than epoxy boards of similar density – they are cheaper though so you have to weigh the demands of your project. I have heard that urethane boards have some cure-inhibiting or out-gassing tendencies when used with epoxy at high temperature. I have not personally had this problem, and I haven’t investigated it thoroughly. If you have experience with this please email me because I’d love to learn more!
Epoxy boards are more stable (modestly) and are usually made of a mix of fillers and microspheres. The microspheres give the material a foam-like (well, it is foam!) quality that is referred-to as “syntactic” – which just means there is an orderly distribution of density because of the size of the microspheres. Density is adjusted by modifying the microsphere properties and any additional fillers. I guess the polyurethane materials are made this way too but none of the manufacturers describe them as “syntactic” – if you know more about this please email me and I’ll put your explanation in here!
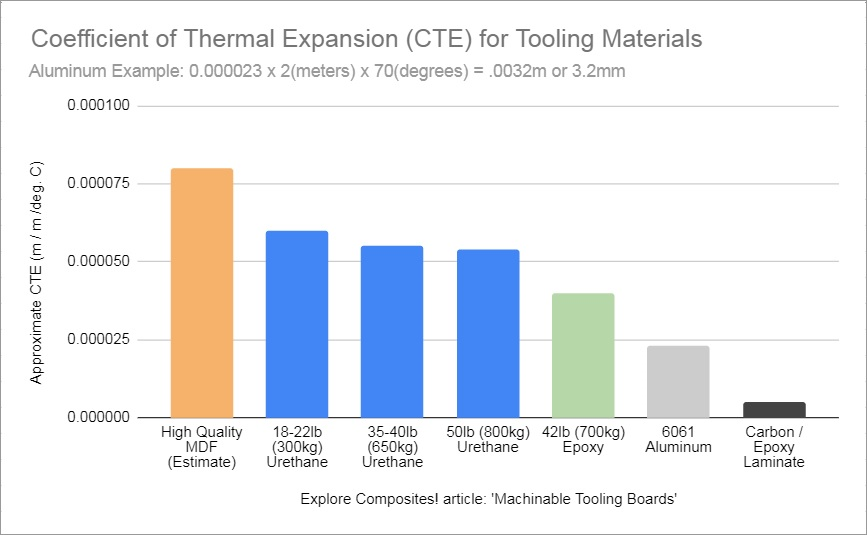
Thermal Expansion
Thermal expansion of tooling is worth thinking about if you plan to cure your parts at elevated temperature. Here are a few examples of the CTE’s of common tooling materials:
Wait, what? CTE? What’s that? The “Coefficient of Thermal Expansion” is just a measure of how much bigger a material gets when it heats up. Most things get ever so slightly bigger when the temperature increases – some do it more than others. The CTE is a standard measure of this so you can compare things.
| Carbon Fiber / Epoxy Laminate | 0-5 x (10-6 m/(m oC)) |
| 6061 Aluminum | 23 x (10-6 m/(m oC)) |
| Epoxy Tooling Board: 43lb Raku Tool WB-0691 | 35-45 x (10-6 m/(m oC)) |
| High Temperature Urethane: 40 lb Precision Board HDU | 45-50 x (10-6 m/(m oC)) |
| Urethane Tooling Board: 38lb SikaBlock M600 | 55 x (10-6 m/(m oC)) |
| MDF (estimated – depends on moisture content and MDF quality) | 40-80 x (10-6 m/(m oC)) |
| Compotool (see below) | 6 x (10-6 m/(m oC)) |
So just as an example, if we take some Precision Board HDU with a CTE of 45 x ( 10-6 m/(m oC) – which is .000045 m/(m oC). So if we have a 2m long mold and we heat it from 30C to 100C (total change of 70C) then it looks like: 0.000045 x 2(meters) x 70(degrees) = .0063m or 6.3mm – which is no joke! Even a 2m long aluminum mold would expand about 3mm at 100C, compared to its length at 30C!
This is the reason that people build composite molds from the same materials that will make the parts – and why most carbon pre-preg parts are built in low-CTE tooling. If you are building a cavity mold of some length and using an elevated cure temperature, consider that your part will cure at the high temperature and then as the mold cools the mold material will fight the composite – and one will break or bend the other. I have definitely had things pop out of molds after cooking because the mold contracted and the part stayed the same size it had been at 100C! This problem (like many others) is amplified when you are building big things. Beyond a few meters, there’s a reason most carbon pre-preg parts are build in molds of a similar material – and that’s CTE compatibility!
My recommendation is that you stick to urethane for things that are room temperature – or only require a post cure up around 150F/65C. If you are curing pre-pregs, the consensus seems to be that epoxy board is the best choice – but keep in mind that it too has a higher CTE than you are used to with composite or metal tooling. You may struggle with things more than a few meters long. If your tooling doesn’t constrain the part then you may be fine. It is a good idea to seriously consider a cheap composite tooling option like infused carbon, built over a lower cost plug built from urethan tooling block, MDF – or a tooling paste system for larger parts.
Gluing Up Blocks
I’m going to refer you to my article Introduction to CNC Machining Surfaces for information on how to design stock models for your tooling so you don’t have to waste extra material AND machine time by starting with a big ol’ rectangular solid. One tooling board-specific trick I use is to build up the inside parts of blocks of tooling board with lighter – therefore cheaper – low density foam. The idea is to draw up your stock model and then replace the inner blocks that never come closer than 1″/25mm (or some tolerance you decide) from the finished machined surface. That way you have a pretty surface and cheap volume. You do have to be sure that the lighter foam will withstand vacuum bagging or cooking! I generally don’t go lighter than 6lb density for this – see the Trymer 6lb “filler foam” – #1 in the image up top. Here’s a picture:

See that cheap stuff underneath? This block was mounted on a piece of 3/4″ plywood as a base and all the tooling board was vacuum bagged down in epoxy. I recommend always vacuum bagging blocks of material together. For small pieces, there are good adhesives – often specifically matched to the board product – that work well – but for higher density boards in large glue-ups I like epoxy and a vacuum bag. Note: for lower density foams, the hard glue line you get with epoxy will make sanding a disaster. For foam lower than 20lb in density – try some urethane adhesive.
More about glue-ups…
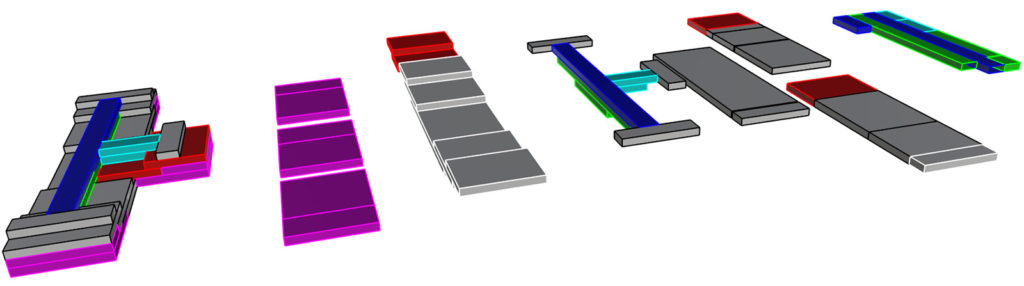
Here’s the glue-up model for that plug up there. The light “filler foam” is purple/pink – whatever that color is. On the far right I broke out the higher density (this was Sika M600) into a cut “list” modeled into the stock size of the board. This made it faster to glue up and saved as much material as possible. The little pieces were color coded so the block could be stacked up before gluing and labeled. For complex glue-ups, I always stack up and trace the outsides of each layer on the one below in permanent marker – so I know where to put the glue!
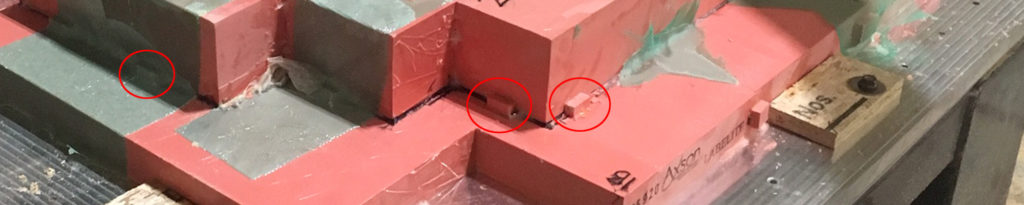
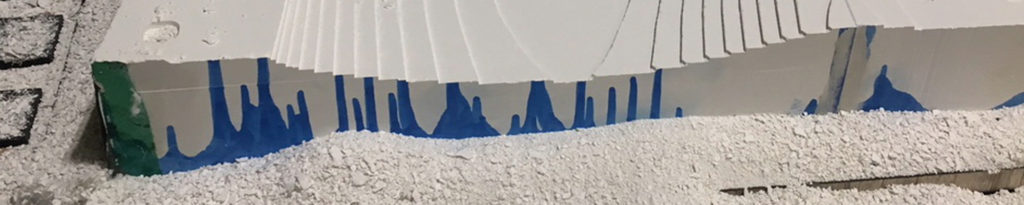
Even with marker outlines, it is still hard to keep complicated glue-ups aligned under a vacuum bag. My favorite trick is to cut up small blocks of tooling board (1 cm cubes maybe) and glue them down with 5 minute epoxy to each layer to corral the blocks in the layer above. This gets done when the dry stack is assembled to test-fit – before you mix any real glue! You have to be careful not to glue them to the upper layer – just on the bottoms of the little blocks – and they also make it more awkward to handle the blocks before gluing – but they save so much time because each piece “snaps” into place even with slimy glue on the surface. Here’s a picture:
When you machine, the stock model should be quite accurate and you can usually just ignore the little alignment blocks. It is a good idea anyway to offset the stock model (1/2″/12mm horizontally or so works for me) for the machining operation to account for some glue-up error. You’ll machine a little air, but save crashing hard or burying your cutter in a misplaced block. You can tell I also leave the green infusion flow mesh from the bagging stuck to the blocks while machining. You only need to remove the dry mesh because it will get wrapped around the cutter and “helicopter” – which is no good. The fully glued bits just machine away.
Also none of that peel ply and breather stuff here for gluing blocks. You just need strips of infusion mesh that run down over the edges of the blocks and intersect the joints to pull air out. Of course, you can use breather over perforated release film, but this will be messier and more likely to clog up with resin.
Compared to MDF you really don’t need much glue either. I would start with .75oz of epoxy per square foot of bond area (about 200-250g/square meter). Too much resin will keep the blocks from fitting closely together. Unlike with MDF or plywood, the closed cell foam will not soak up resin. Sometimes it makes sense to use slightly thickened resin for the edge joints, but avoid it for gluing layers together. You want those glue-lines as tight as possible!
Machining
You can read my article Introduction to CNC Machining Surfaces for a basic guide to machining 3D surfaces from tooling board – or anything else. Most material manufacturers provide machining guidance which is worth getting and reading. Order of operations is important and so is avoiding situations where cutters take huge gouges out of the surface.
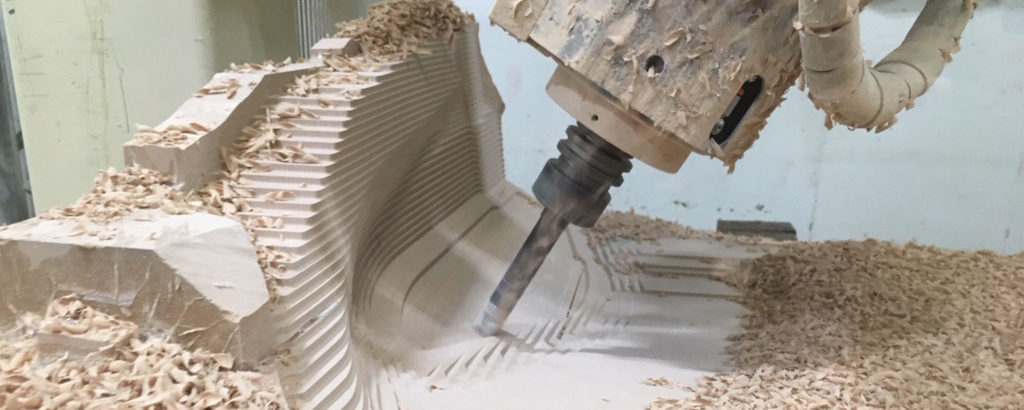
My primary advice is to use carbide cutters. You can get away with more flutes than with MDF because the board products are designed to make chips instead of dust – check out those flaky chips in the image below! This is 38lb urethane (Sika M600) being machined with a carbide four-flute Iscar Multimaster insert tool. This is a long 3/4″ (20mm) cutter with a removable end – it just unscrews and you put a new one on. This is great because you don’t have to buy a huge chunk of carbide 8″ (200mm) long just to use the tip. It forces you to use a shallow depth of cut and a high feed rate, but it’s pretty fast. I am not a huge fan of “Adaptive” or “Dynamic” milling with tooling board because chip clearing is a problem – for some geometries it is faster though – but you need a tool with some longer flutes!
Many people I have talked with suggest roughing with a larger diameter tool (2″ or 50mm diameter or so) and a shallower depth of cut with high radial engagement – a shallow wide cut. This works well with face-mill style tools with removable inserts. The goal is material removal and good chip forming – and then clearing. You don’t have coolant or air blast (unless you love dust flying everywhere) so it is important to cut light flaky chips that can be vacuumed up with a minimum of fine dust. With a powerful machine, and depending on the density of the material, larger diameter milling cutters can be run deeper, increasing material removal rate.
In terms of feeds and speeds for tooling boards, this stuff is generally about 1/3 the density of aluminum – so in a pinch you can start with aluminum cutting parameters and speed up from there. Many of the tooling guides offer very conservative (in my opinion) chip loads per tooth and surface foot per minute numbers. With a router, the recommended RPM may be too low to get reasonable torque from your spindle. It may be necessary to run much faster RPMs and feed rates than suggested. You can reduce the chip load per tooth, but not so much that the chips turn to dust!
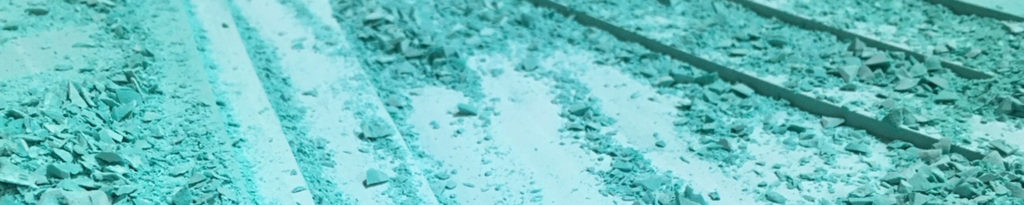
Epoxy board can be harder to machine and will not always give you the same pretty chips that you get with softer polyurethane. Sharp cutters help, but it is brash stuff and is easier to finish with ball-end or corner radius cutters. Here’s some bad chippyness – probably caused by me being cheap and over-using a worn cutter:
I am a fan of the “pre-finish” pass with almost any surface you want really nice – and the harder the material, the more it helps. With epoxy board, I would machine a roughing pass and then a pre-finish leaving maybe 0.5-1mm or so on the surface. The final cut will have a much more even load on the cutter, which will make for a nicer surface especially if your machine is not super stiff or you are using a long cutter. Inside corners can be pre-finished with a small finishing tool and stock left so there aren’t big globs of material left in there for your smaller finishing tools to deal with.

You will get a very smooth finish if you get your step-over tight. This one above was finished with a 0.125″/3mm ball end cutter in the corners and it was very smooth and ready to go right to 320 grit sandpaper. I tried to crop out the dodgy hold-down but yes, that is held with blocks glued down to a vacuum table – necessity being the mother of… sketchy setups!
Finishing
You can use a conventional polyester or VE primer like Duratec, and get a finish that’s as good as you can sand and polish. For building production molds or very high quality surfaces, this is the best way to prepare a plug to a glossy finish. It’s tons of work though! Unlike with MDF, you can go right to a primer without any resin-coating and the surface will be uniformly hard and easy to sand. I always found that it was roughly half the labor to get a tooling board surface to 400 grit than with MDF. In short – totally worth it if you are paying for your labor! It also responds better to buffing, with less likelihood of surface bubbling from the friction because there is no moisture in the board itself. It also tends to print lift (layer) lines much less than MDF.
You can use a priming/sealing system like Chemlease® MPP 2737, Marbocote HP1000N or HP2002, or Easy Composites S120 Board Sealer directly on the surface of a higher density board product. These are all clear lacquer-like systems that require lots of applications but dry fast and can be sanded gently with fine paper (or Scotchbrite) along the way. This type of primer is especially nice for epoxy board, because you have a hard surface already and you don’t lose any definition through spraying and sanding higher-build primer. You have to sand the surface to a high level of finish before applying the first coats of primer though. Some of these primers can be sprayed, others applied by hand with a rag or foam brush – they’re milky or clear and very low viscosity. The process is labor intensive and requires some practice. You also have to use a release system with both a sealer and a release agent (so 3 products total!) instead of plain old wax (please don’t use wax directly on tooling board – at least not without testing it first!) or adhesive teflon. As always, test first with products you’re not familiar with – not that it won’t work – but just sayin’ – you’ll wish you tested if you stick a part on an expensive tool. For a great explanation of this process – and the whole tooling board thing, check out this excellent video from Easy Composites: Precision Patterns and Moulds from 3D CAD – CNC Machining Epoxy Tooling Board
Or you can use adhesive release film – read all about it in its own article: Adhesive Teflon – It’s Awesome. It’s a pain to put on crazy surfaces but the best way to go from machining to layup in a few hours instead of a few days. Surface finishes are nice and if you are going to do any painting on the final surface, the cut lines will disappear pretty fast.
Fancy Stuff
Now if you need some machinable media that really takes heat, there are a few options besides metal. I have only used these a few times and there are definitely some drawbacks but in terms of temperature tolerance and low CTE – they can’t be beat. Not cheap though!
The first is graphite. Yeah – straight nasty dusty miserable graphite. You can buy it in expensive pieces from EDM suppliers or you can get more industrial grades in larger volumes for less money. I don’t recommend it. It’s conductive and generally miserable to deal with – but it makes beautiful matched-CTE, high-temperature tooling. Heavy too. Sometimes it makes sense to laminate a “shell” of carbon fiber around the back of your block of tooling or bond the graphite to a carbon backing plate. You can vacuum-bag to this backer – and it keeps the graphite from cracking as it it handled. If you are set up to machine it safely then go for it – but if not it is probably best to avoid it or job out your machining.
The second is a product called Compotool – which is a chalky machinable ceramic (I think!) board that has a CTE around 6 x (10-6 m/(m oC)), and can be used up to 850C (!)- and is much nicer to deal with than graphite. It comes in two densities and can be glued up into a block and machined. It machines well – it’s dusty for sure – but it cuts nicely with carbide cutters. After machining, there is a liquid “densifier” that gets brushed on to seal and harden the surface. It’s neat stuff and worth looking into if you are doing high-accuracy pre-preg carbon parts and don’t want to spring for composite tooling.
I have also just recently come across a product by Duna Group called Corintho (Blue and Black), which is a polyurethane board with a very low CTE and temperature tolerance to 400F. I haven’t used it but I have a sample and will look into it and report back.
Another product I haven’t used but looks interesting is CFP Composites’ CFP360 which is a low CTE board product with a Tg of 240C. They have a video showing the machining and claim it machines much cleaner than graphite and doesn’t need to be sealed. It appears to be a high temperature thermoplastic with a carbon fill. Have you used this? Get in touch and let me know – this is one I’m interested in!
Two other potential thermally stable tooling materials I have heard about but not tested extensively are calcium silicate insulation board and autoclaved aerated concrete (AAC). The AAC I have tested in a very small way and it handled low temperature but the surface porosity required filling to get a decent surface. Haven’t tried the high-strength calcium silicate board but I would like to… let me know if you have any other ideas for thermally stable low cost tooling materials!
Price and Value
Uh-oh, now for the serious part: how do I find the best product for the price? Price is important – because it’s always somebody’s chips you’re playing with: yours, your boss’s or a customer’s. There are lots of situations where a tooling board product will be the most economical choice. There are others where it won’t. But first, what are the relative prices of the different options?
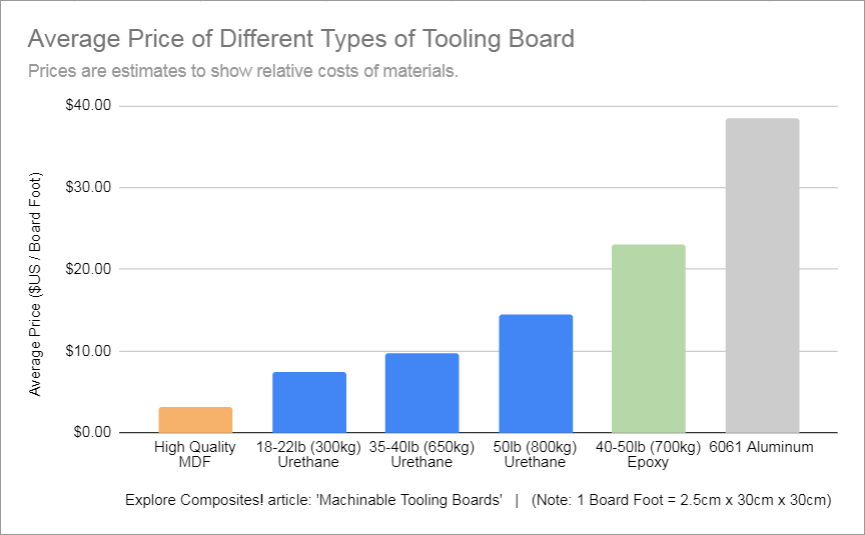
For reference I have included 6061 aluminum and high quality MDF on the chart. These are to better place the other options in context.
Why nothing less than 20lb per cubic foot? Because it is really hard to finish. You can do it, but it’s more work and you have to be careful. The reduced price becomes less of an issue if you sink tons of labor into it. It is great for “filler” as discussed in the section on gluing up blocks – but if you are making a nice surface I would avoid it! Even the 20lb material will be harder to take up to a really good shine. Glue lines are more likely to print and sanding becomes a challenge if you are using a primer – the primer surface being so much harder than the foam.
My two go-to products are the 35-40lb (650kg) urethane and the 40-50lb (700kg) epoxy tooling board. These two categories of tooling board offer real value for parts of a certain size – up to maybe 3-4 meters in the longest dimension. Anything much bigger and you start getting into issues with CTE mismatch if you are cooking pre-pregs or the cost of board products pushes you into the tooling paste realm. Tooling boards really shine for small short-run parts that need high quality finishes out of the mold.
The price of the epoxy is 2.5 times that of the urethane and for that price you buy some reduction in CTE and the ability to subject it to temperatures above 175F (80C). This really only makes sense for pre-pregs. The alternative is to use the cheaper urethane to make a plug and either infuse or use a low temperature tooling pre-preg to make a mold. This mold can be cured initially on the urethane plug and then de-molded and given a careful unsupported post-cure to get the resin’s Tg up to a useful range for making parts. Either method is good and the cost vs. labor vs. time is one you’ll have to make.
And when it comes to the “Fancy Stuff” category, you are really competing with full composite tools – or metal tools: aluminum maybe but probably steel or Invar. All of these options are expensive. The real benefit of the board products is in saved labor and shorter project turn-around. If you are saving 50 hours on a job, you can afford to use an expensive product to do that – and it reduces the number of (potentially variable) operations to manage. In this context even very expensive things can actually be cheap!
Other Uses
Besides machining molds or plugs, tooling boards are great for other things too!
Lower density boards are often sold as “modeling boards” for making mock-ups and fixtures. Dimensional stability and ease of finishing make this a great use – way less work than finishing wood or even 3D prints.
Vacuum fixtures and “soft-jaw” type hold-down setups are a great place to use tooling board. Because they are closed-cell (unlike wood!) they can be used with gasketing for vacuum work-holding: part trimming fixtures, vacuum tables and custom fit machining cradles for second operations. Even without vacuum, tooling board cradles and soft jaws are awesome. Check out this article: Fixturing with 5 Minute Epoxy and “Cradles”
Thermoforming tools: when you can’t make parts cheap enough with composite and the situation is right – thermoplastic thermoforming is a great option. You may want to job out the actual forming, but if you can machine your own molds – tooling board is a great option. Ask your thermoformer what kind of molds they need first – there are details that aren’t always obvious – at least to me!
Conclusions
If you build composite parts and machine your own tooling (or hire it out) you are going to want to know about tooling board products and how to use them. I discovered years ago how much nicer it is to machine tooling board than MDF – and how often it ends up cheaper in the end because it’s easier to finish. Turns out those engineers and chemists designing these tooling products know their stuff! I hope this introduction is helpful and gives you something to work with as you try out products and develop you own preferences. Good luck out there!
Appendix A: Manufacturers
This is a list of the manufacturers of common tooling board materials. You should be able to find distributors in your area, but be forewarned – it can be a hassle to get and you may have to wait and/or pay freight. If you are a manufacturer and would like to be on this list please get in touch!
- Sika Advanced Resins (Labelite, SikaBlock)
- Coastal Enterprises (Precision Board)
- RAMPF (RAKU Tool)
- Obo Werke (Obomodulan PU)
- Huntsman (RenShape)
- General Plastics (Last-A-Foam)
- DUNA-USA (Corafoam and Corintho)
- Base Materials (Epoxy and Urethane Board Products)
- Trelleborg Applied Technologies (Epoxy Tooling Boards)
- PolyTek Development (TekBoard Epoxy and Polyurethane Boards)
- CFP Composites (CFP 360)
- ebalta Distribution (ebaboard Products)
Appendix B: Manufacturer’s Product Guides
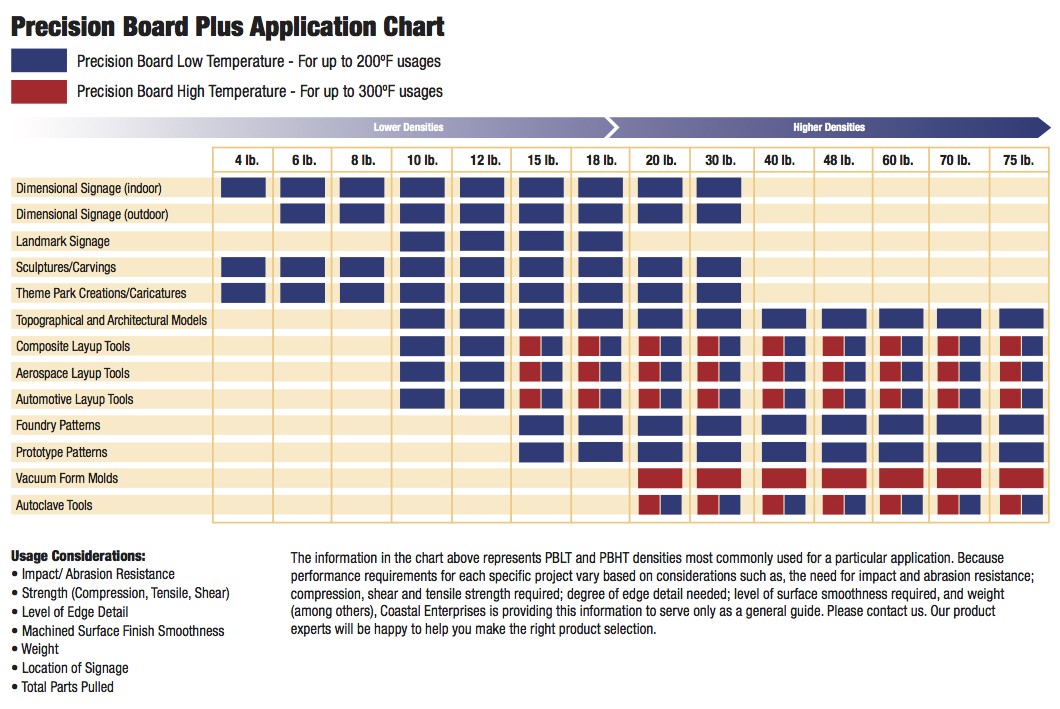
- Precision Board (HDU) Application Chart
- Freeman Supply Machinable Media Selection Guide
- Mccausey Obomodulan Guide
Appendix C: Where to buy small quantities
- In the US I have bought plenty from Composites One – even individual sheets.
- Easy Composites (UK) – Sells small quantities of polyurethane and epoxy tooling board.
- Alro Plastics (USA) – two types available under “Tooling Board”
- Haufler Composites (DE) – Range of Sikablock products
- Coastal Enterprises (USA) – Precision Board Distributors Locator
- McMaster has high density board but I don’t know what kind is is…
- Freeman Supply (USA) – RenShape distributor, also sells small quantities through their Miapoxy online store.
- Ebay – sometimes you can find good chunks cheap.
If you use other suppliers (or are one) who will sell small quantities to individuals please let me know and I’ll add you to the list.
Article Updates:
Updated 2.6.19 – sealers, little things
Updated 5.15.20 – Price and value, edits.