I haven’t found a lot of user reviews or performance information about Markforged Mark 2 composite printers – so here is my perspective after getting to know the machine, software and materials. Short answer: it’s expensive, but I’m impressed with the print quality and ease of use.
About a year ago I got a Markforged Mark Two (2, II) 3D printer. Actually I got a broken Mark One – their first version – as part of a trade involving a CNC machine, and had Markforged upgrade it to a Mark Two. I had been aware of the Markforged since its debut in 2014 and seen the machines at trade shows. I even considered buying the $3500 Markforged Onyx One, which can’t print fiber – but it seemed like a lot of money for the small work envelope, and I wasn’t ready to spring for the full $14,000 or so it would take to get a full-on Mark Two.
My only 3D printing experience before the Markforged was with a cheap Monoprice machine that I got to play with and make small test-fit parts and prototypes. It was great to dip my toe in the water but soon I was looking for something more accurate – and able to print something besides PLA. So I was pretty green at actual 3D printing, but had plenty of experience with CAD and CAM software and was excited to learn.
When I first saw the Markforged that would become mine it had a giant mass of melted Nylon all over the extruder and I had no idea if it could be fixed. What struck me immediately was the quality of the mechanical design – it’s beautiful! The tiny linear rails and blocks, clever belt tensioning system and elegant machined parts – its all very well thought out – and explains why the prints are so accurate and smooth.
Over a few emails, the technical support people at Markforged figured out what was going on and presented the option of upgrading the machine. The upgrade was just under $2000 including shipping. They sent me an empty box to mail my machine to them – and I waited six weeks or so until it came back looking pretty much identical except for a new extruder assembly and some cleaning up.
Setting up the machine was relatively easy and intuitive. The hardest part was getting it to use my wireless network – and that was a me problem! The bed is manually leveled, but they provide a kit of tools with the machine and that includes two precision shims for adjusting the print head and the fiber head. This needs to be right and I messed it up at first – but I returned to re-do it after two not ideal prints. A few tweaks and things started working much better on the fiber depositing end. Loading filament and fiber is simple and the control interface is very clear – you are prompted to follow the steps and it lets you know if things go sideways.
Software
The software, called Eiger, is proprietary and runs in a browser window – you can transfer files with a USB stick but you need the internet access to program the prints. I understand there is an offline option but I haven’t used it. If you are interested in the printer, you can trade your email address for a test-drive version of Eiger. Overall it is an impressive piece of software and the interface is intuitive and easy to use. It is slow sometimes to upload and download things from “the cloud” but it keeps you notified about whats going on and the browser tab can be minimized and you can go do other things while it does cloud stuff.
My prior printing was done using Simplify3D and Cura to generate the program code for the printer. Eiger is comparatively low-choice. There are fewer customization options and that is frustrating at first. After a while you realize the value of proprietary materials and limited settings in delivering successful prints – and that’s one of the two main values of the Markforged system – it just works.
The section of Eiger where you define fiber layout is the only one where I wish there were more options. You are limited of course to laying fiber in planes parallel to the printer bed, and the two options are concentric fiber (around the edges) and isotropic fiber (full coverage back and forth in one direction per layer). There is a limit to the shortest fiber path you can lay (40mm I think) and to the cross section that can contain fiber (roughly 1/8”/3mm). You can’t just lay fiber – it has to be surrounded by Onyx material on all sides.
One of my favorite features is the live update of part material price. You can see how long prints will take, what they will weigh and how much they will cost as you adjust parameters like fill volume, wall thickness and fiber properties. Other software does this, but it seems very intuitive here – and maybe more important given how much the material costs!
Materials
There is a very limited material palette with the Markforged. Onyx material is the only one I have used extensively. It is Nylon mixed with carbon powder/very short fibers and prints beautifully low-gloss and uniform parts. There is a white Nylon filament without a carbon fill which is relatively new. I’m still on my first roll. It looks very nice and is noticeably stiffer than Onyx. I have printed it with fiberglass reinforcement and it is very nice. Costs about the same as Onyx and it is very nice to have a non-black alternative to the Onyx.
For fiber reinforcement the options are carbon, Kevlar, high strength glass and plain e-glass. These are very fine strands of material with Nylon binder. To the best of my knowledge, these are like a thermoplastic pre-preg material that is laid down and cut by the second head of the machine. These materials are the second primary value of the Markforged system. They allow for plastic parts with unbelievable mechanical properties – as long as the part geometry allows for placing fiber in a helpful way.
The fact that you can only use material bought from Markforged is both good and bad. The good part is that it works very well. The bad part is that it is expensive – but only compared to other brands of plastic filament for FDM printers. Compared to resin for SLA or even higher end FDM (Stratasys ABS for example) it is very reasonable. Compared to aluminum and the machining it takes to make useful stuff it is incredible! The Markforged really shines for making useful stuff – and it fits in perfectly between PLA or ABS and machined metal or thermoset composites. Looking at it with ease of use, reliability and mechanical properties of the material – the price seems very reasonable.
In Action
Printing and printer management is very easy with the Eiger web-based interface. If you have multiple printers (set up with different reinforcements maybe) you can select the one you want and manage setups of multiple parts per print. The “parts” are managed individually which is very helpful, and are then assembled into “prints” which can be made up of many separate parts. Different parts in a print can have different fiber and fill properties – as long as they all use the same materials.
The build platform is black G10 fiberglass sheet with a very nice (patented) locating feature. You just reach in and drop the bed in place and it snaps into locating features held in only by gravity. To remove parts or apply glue stick (which works almost too well) you can just pull the bed out of the machine. This is super helpful and you avoid rough treatment of the mechanical bits if you have a well stuck part and have to lean on it a little. You can even clean the glue residue off in the sink but you have to let it dry thoroughly before re-glue-sticking it. Not sure they recommend that but it works!
One thing that bugs me is the noise. The steppers sound like steppers! It is a low whine that starts, stops and changes pitch – and it gets really old after a while. You can hear it through doors and I can imagine it would be a bummer in an otherwise-quiet office! I understand that the X series machines – starting north of 30 grand – are quieter. My Fusion3 machine which also uses steppers (but with a kevlar cord drive system) is nearly silent…
I also have the feeling that the printing is slow. That may be because the default layer height is .1mm, which is much less than I use on other machines. Eiger tells you how long prints will take and it seems quite good at predicting. Even if it is slow, the quality and “fire and forget” nature of the process makes up for it.
Output
So my two main reasons to like the Markforged system are:
- It works very reliably – beautiful prints with no drama.
- The addition of long fiber gives the parts remarkable mechanical properties.
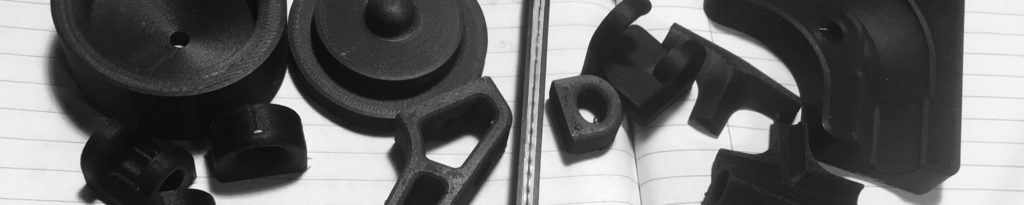
The part finish is as good as anything I have seen come off an FDM machine – with the exception of areas where soluble support would make things better. Support material comes off easily and leaves a usable surface. The parts are smooth, relatively void free, and very accurate. They can be sanded or tumbled and painted if need be.
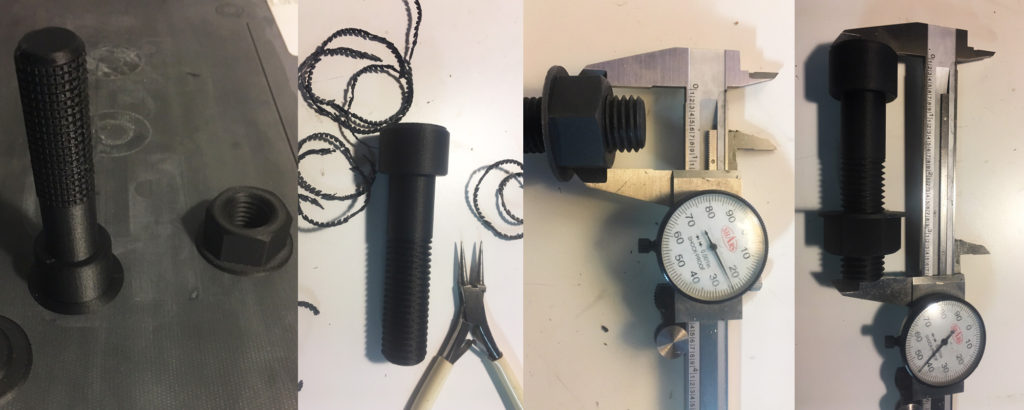
I am going to use a 3D model of a 3/4”-10 cap screw and nut downloaded from McMaster Carr as a quick demonstration. This won’t have fiber in it and is printed with default settings – 37% triangular fill and 0.1mm layer height. Together the two parts weigh roughly 27g, cost $6.00 and took just over 6 hours to print.
Accuracy
I am impressed with the accuracy of the parts relative to the dimensions of the 3D models used as input. For the nut, the measurement from one face of the nut to the other is 1.125” and the print was between 1.121” and 1.123” across. The overall length of the bolt is 3.75” and the part measures 3.744” – or .006” too short. This was printed on a raft too. The nut, which was printed directly on the bed is .001” shorter than the model. That is really, really good for an FDM printer! Support from the threads came off easily. And the nut threads on just fine – a little tight but that is probably the overall shrinkage of the parts that we are seeing in the outside dimensions.
Strength
Strength is hard to quantify for me without a suitable testing setup. I’ll work on it!
The Onyx/carbon combination feels unlike any plastic printed parts I have ever flexed. The Nylon alone is not a stiff material compared to PEEK or some high performance thermoplastic, but with the carbon fiber, it feels very rigid. Its not an “I’m gonna be really stiff and then shatter like glass” feel, but more of a “I will be stiff and strong but forgiving, and will yield without drama or a huge bang.” Anthropomorphize away buddy…
To test the strength of the carbon, and to make a demo part that would show this off, I drew up a truss-like rectangular tube with some holes and just enough room for fiber. This part looks like this:
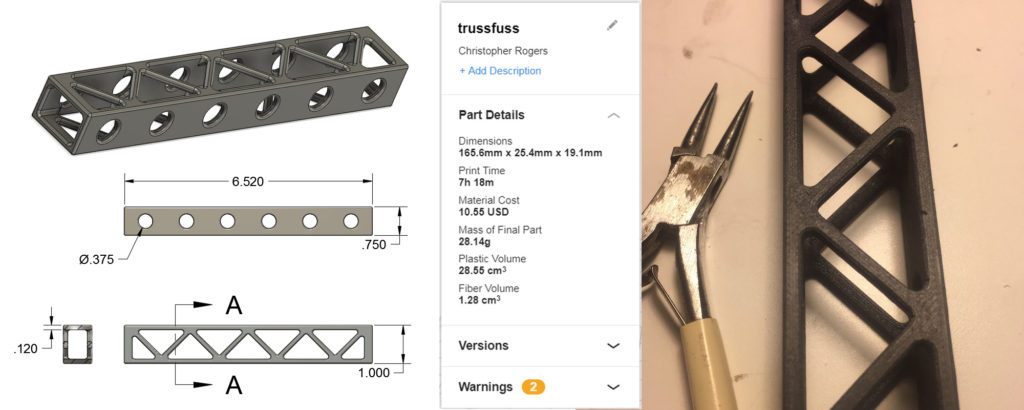
Eiger predicted it would take 7 hours and 18 minutes, cost $10.55 and weight 28.14g. This seems like a lot of time and money until you handle the part. It has fiber in all the paths possible across the top and bottom faces (ones with the triangles) and Onyx only on the sides with the holes. This part is seriously stuff!
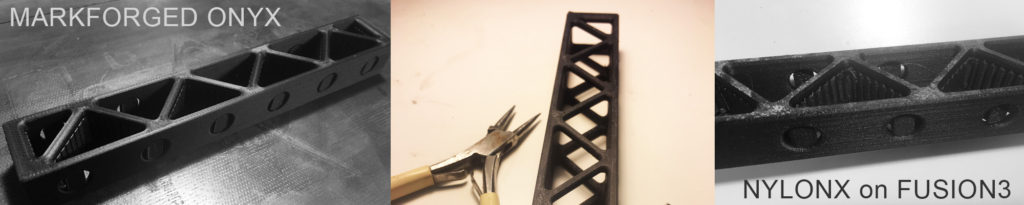
For comparison, I printed the same part on my Fusion3 F410 printer with 3DXTech NylonX filament. The material cost was less than half of the Markforged, and it printed faster. Similar settings in Simplify3D made the output shown below. It wasn’t bad – but it wasn’t anywhere as good as the Onyx. Support material was harder to remove too… and it was much more brittle and nowhere near as stiff. I guess you get what you pay for.
Applications
I am not going to get into this too much. Markforged shows examples of soft jaws, fixtures and end-effectors in their marketing materials, and all these seem like good applications of the technology. I have made a few sets of soft jaws and they work ok. The accuracy isn’t what I get from aluminum and they deformation is noticeable. Without on-machine probing so this is problematic, but for small volume parts where each can be probed or zeroed in it is great. And there are no scratches and gouges from the clamping.
My main use has been for actual machinery parts and for test-fit and prototype components. It is great for this and the claim of replacing aluminum is valid in many cases – especially if the lower stiffness of the Markforged parts can be an asset. Often aluminum is the default “cheap and easy” material for assemblies, and often these parts are cheaper and easier to make with 3D printing.
My experience has been that once you have access to a technology, you will use it for things you didn’t imagine before you had it. Same goes here.
Value
I think of the Markforged system as a stepping stone on the way to automated composites manufacturing. Composites are a tricky set of materials with awesome potential – Markforged makes basic thermoplastic composites an option for one-off parts. It isn’t perfect, but it is a huge step in the right direction. For designers, engineers, and prototype builders, it lets you print actual useful stuff in hours, and for not much money. It won’t replace your composites manufacturer or your machine shop, it will create a new kind of category all of its own. You may not have known this category existed, but you will find an ever-growing list of applications where the Markforged system is a good fit.
Markforged has patented a bunch of technologies that go into this system, and I think some are very fair and others are a bit too free with incorporating thermoplastic prepreg and automated fiber placement prior art. As a venture-backed company, Markforged has turf to defend and investors to create value for – understandable. I am not aware of any efforts to defend these composites related patents – though Markforged got very publicly mixed up with Desktop Metal over some IP disagreements in 2018. Some people seem upset at the “aggressive” patenting of the composite additive concepts but there’s still plenty of room for new ideas. We’ll see how Markforged behaves in the future as these innovations are brought to market.
So should you buy one? My answer is “it depends.” If you can use the process to save time and bring costly operations in-house, then it is a great resource. If you don’t really need the carbon fiber, then the Onyx One ($3500) is a lot of printer for the money. The Onyx Pro lets you use the fiberglass reinforcement for $7000 – which gives you everything but the extreme stiffness of the carbon and the option to use white nylon. Realistically this is probably plenty for most things.
On the other hand, there are many very nice printers with much larger build volumes and cheaper materials that can be bought for under $5000. You may fuss with them more, but that is getting better and better as material suppliers and software developers improve their game. My other printer is a Fusion F410. It has a big work envelope, runs about twice the speed and handles ABS, PETG, Nylon and more without a problem. The print quality is nowhere near as good as the Onyx. If I slow it down, white ABS or PETG looks almost as good a Markforged White Nylon. They are both nice machines, but the Markforged is the one I use when I need dimensional accuracy. For a big fixture or test-fit part the Fusion3 machine gets it done in half the time and 1/4 the price. They’re a nice combo but if I could keep only one it would be the Markforged.
If you need to turn the switch and have professional quality prints come out perfect time after time – it is a really good choice. If you are doing work with fixtures, soft jaws or end-effectors and you can use the strength that the composite reinforced material provides, then the $14,000 isn’t going to be a huge deal to you and this will probably pay for itself very quickly in time-savings alone. Your clever engineers and technicians will no-doubt find plenty of added uses for it and if you’re lucky you’ll be paying for thousands of dollars worth of filament instead of paying thousands of dollars for smart people to be frustrated! It looks expensive from a hobbyist perspective, but if you are paying somebody to use a 3D printer, you want to give them something high quality and effective – this is a really good choice.
I am not sure I’d buy the $14,000 Mark Two if I had to pay for it outright – including it in a trade meant I paid for it but in an indirect way so it didn’t hurt as much! I would probably (and may) buy an Onyx One because I use the machine in Onyx-only mode a ton. So if you can use the strength and reliability and you currently pay outside vendors or take expensive machines out of production to do one-off and prototype work, the Markforged system is worth a serious look. Get Markforged to make you a sample part – or five. If you want to try something more involved, send me a model – I’ll print it for ya!
Note:
This article contains information that reflects my opinions – I make no promises about its usefulness! It may contain mistakes (please let me know if you find some!) and will include prejudices based on my limited experience. If you disagree with anything here, please get in touch. This is not just for me to share what I thin, but to learn from others. I will gladly insert additional information and differing opinions so readers are more aware of the diversity of “right” answers!