Are you looking for a way to CNC-machine cheap patterns, plugs and molds for fiberglass or other composites projects? MDF (medium density fiberboard) isn’t the best but it may be just what you need. This article is about building MDF tooling for composites!
There are so many ways to build composite tooling with beautiful specialized products that cut like butter and finish like glass… and yet, so much MDF. It’s popular because it is the cheapest decent material to use for small plugs and direct molds – and it works well enough. I have cut literal tons of it and would not hesitate to recommend it for a great many applications where money and time are tight and you need something that’s just going to work.
This article is the distillation of years of failure and success with MDF tooling.
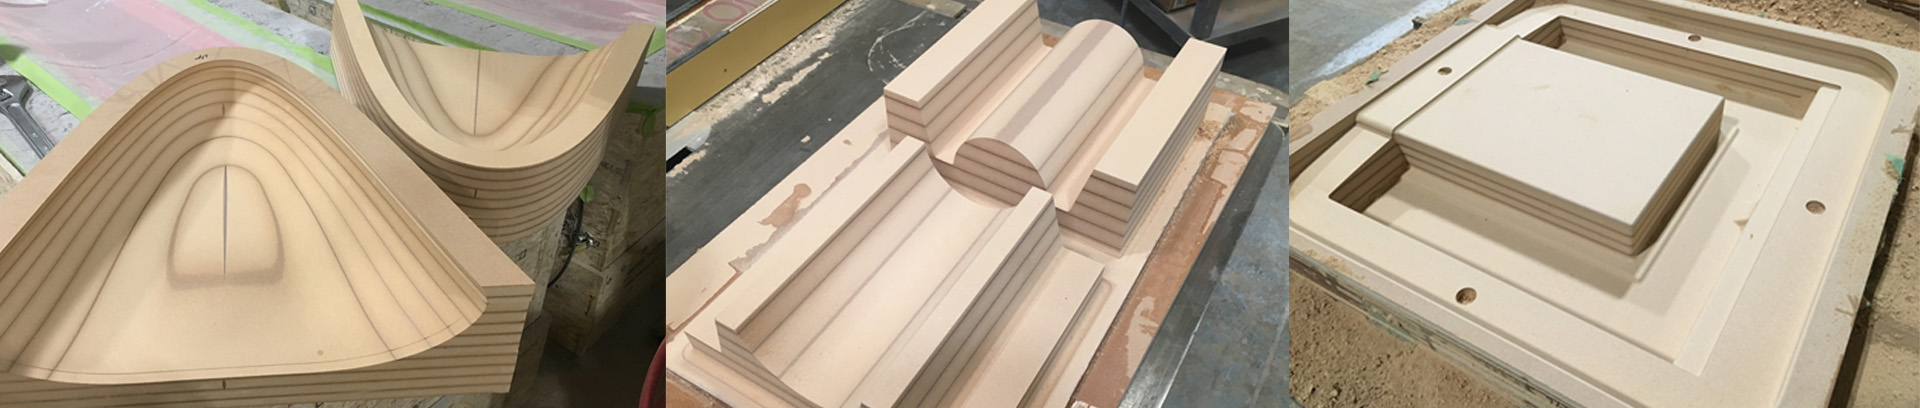
Table of Contents
- What is MDF?
- When to Use It
- Hand-Built MDF Molds
- Choosing MDF Products
- Gluing Blanks
- Glue, or Better Yet: Resin!
- Designing the Stock Volume
- CNC Machining
- Assembling Multi-part Tooling
- Finishing
- Conclusions
What is MDF?
Medium Density Fiberboard is just wood fiber mixed with a resin and pressed into sheet form in a monster heated press. There are lots of varieties – lots of resins and densities. It is available from 1/8” up to several inches thick. It is traditionally made with a urea-formaldehyde glue but there are formaldehyde-free options available. MDF is more dense than most plywood and is quite heavy and hard to deal with – especially in 1” sheets or giant glue-ups. One major factor is that being a wood product it has water in it – sometimes a lot. It is fundamentally renewable and in theory it will biodegrade – but not for a long time once we goop it up with resin.
When to Use It
For small molds, MDF can be a great cost-effective and quick tooling option. For larger things it is often a good option but there are things to consider and to watch out for – these are what this article is about. From now on I will use the word “mold” to mean a shaped surface – if you substitute “plug” or “pattern” in its place that is fine.
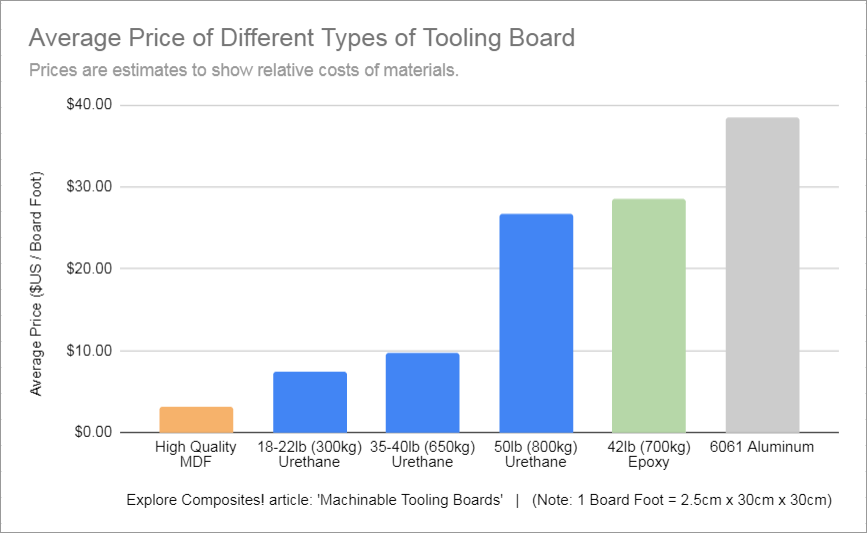
I have some rules of thumb for when to use MDF, and like most rules of thumb, there are exceptions and “rubbery” areas where you can get away with stuff if you’re careful. The big benefit is always cost. Generally if you can afford something better, go for it. See the chart for an idea how much cheaper even high-quality MDF is compared to other common board-type tooling solutions!
MDF works well for molds that are small enough to be bonded together in single vacuum bagged “glue-ups.” If you can bag it together and get it on the machine, it will probably be ok. For me this has meant a practical maximum of 5’x12’ (1.5m x 4m -ish) and rarely more than 12” (300mm) thick. The bigger you go, the more problems you will have – especially the thickness-direction!
MDF is good for one-off prepreg parts that don’t have to be beautiful right out of the tool or extremely geometrically accurate. It can be cooked as long as it is envelope bagged and not heated above about 200F (95C). You can totally go hotter but it will get less excellent the further past 212F (100C) you go… because water. It will shrink in all dimensions when you cook it, but most noticeably in the “thickness” direction of the stack. For tall stacks this will result in a measurable scaling of your part – and as moisture leaves it can crack too. Don’t count on a nice surface finish unless you use release film or adhesive teflon – and even then expect to see lift lines at the glue joints. Also don’t count on your molds lasting more than a few cooks – especially if you are autoclave curing.
For plugs that do not have to be vacuum-tight, machined blocks can be assembled into larger volumes, but there is a risk of joints printing into parts if heat from curing resin gets too high. This falls into the realm of “cheating” and you can get away with tons of stuff as long as you have a good feel for the materials and the process. You can also have big expensive mistakes!
You can also convert the surface of a large mold into a vacuum-tight layer by heating it with fiberglass and epoxy. A layer or two of cloth, well saturated and finished with a primer, should yield a nearly perfect air barrier. It may not be beautiful, but it should work – just make sure you use plenty of resin and minimize voids and dry spots!
Hand-Built MDF Molds
While most of this article focuses on CNC machining MDF to make composites tooling, it is also a very versatile material for hand-built tooling. MDF is designed to build low-cost finished furniture and cabinetry and to give nice shiny stable surface finishes – just like we want for our molds. Many of the same sealing and finishing details apply just as well to hand-built molds as to machined ones. Because MDF has a hard surface layer, using it to form flat panels or gently curved shapes works very well. It can be used as strip planking and can be found in thin 1/8″ (3mm) sheets that can be bent and laminated easily. And of course it will machine beautifully using standard manual wood tools like routers, saws and shapers. So while this article is mostly about CNC-related workflow, please use what information you can to inform your “stick built” tooling plans as well. MDF is a great choice!
Choosing MDF Products
Not all MDF is created equal. Some of it creates very unhealthy dust from the formaldehyde used to glue it together. Cheaper MDF products tend to have a variable density across the thickness of the sheet. The edges are hard and dense and the middle is like fluff and can split easily.
I strongly recommend that you buy a formaldehyde-free moisture-resistant premium grade of MDF. There are several brands producing similar products, but the one I am most familiar with is Roseburg Medex. Your lumber dealer should be able to point you toward a high-grade MDF product with similar properties. Higher quality MDF can be twice the price of lumberyard / big box standard stuff but if you are going to finish it to any sort of sealed, sanded painted finish, it will pay off dollar-for-dollar in labor savings. The bonus will be safer dust, more stability and less tendency to fracture. If you want to compare mechanical properties, take a 4” (100mm) wide strip of each and break it over a sawhorse or the front of your dumpster. Feel the difference in stiffness and look at the structure of the break. Then leave the pieces outside for a month or two and watch what happens when they get wet.
But don’t believe me, buy some of each and see what you like better. Keep track of all the variables and don’t just buy more of the cheap stuff because it’s cheap – and don’t let your boss or the people in purchasing do it either. You get what you pay for – and nobody should be breathing formaldehyde. So avoid construction-store (Home Depot, Lowe’s – I mean you) MDF and get your local lumber yard or wholesaler to order you something decent.
Thickness is another decision. I have found that ¾” sheets are as big as I want to handle. If you have a panel saw and two people, 1” is probably ok too. Check the price per sheet vs. the actual volume of the material because it is often not at all equal per unit volume. The one problem with thin stock is that it takes more glue joints to build a given thickness – and more labor to cut the stacks. Calculate and decide.
Designing and Preparing Stock
Layer-cake or One-piece?
If you have a 3-axis CNC router with limited z-stroke, gantry clearance or cutters of limited length, you may need to machine your mold in multiple layers (“lifts”) and then glue the machined lifts together. Your tallest block can only be a bit less than half the z-travel of your router – because it has to lift the cutter up and over the block. It is best not to push this too close! Many routers only have z-strokes of 6″-12″ / 150-300mm, leaving you with the necessity of making anything remotely tall in multiple lifts.
You’ll need to plan a way to align these. Many people use dowels and holes, but I have found that with careful clamping you can use screws and clamps and alignment blocks and get this done more easily. Dowels are great when everything works perfectly, but drilling deep holes and getting the alignment 100% is not always super easy to get right. If your dowels are out-of-wack you’re back to doing it with screws and clamps.

I like to design the tooling to have outside or inside faces where block edges align and can be held in place with temporary alignment blocks 5-minute-epoxied (or hot glued?) to one of the blocks and bearing against the machined surface of the one above or below. Clamps on a slight angle can be used to put light side-force against the blocks to keep things aligned.
Getting things aligned dry and drilling pre-bores for screws is a good method too. You’ll want to be careful leaving screws in place, and counterbores can leave big globs of filler to shrink or swell and print into your surface. My preference is to use screws until the glue cures and then pull them out. A small hole is easier to putty neatly than a big one! Just be sure you have a 100% reliable way to find and locate ALL the screws after – because machining them is no good.
Designing the Stock Volume
I will assume you are going to be machining your MDF blocks with a CNC machine, so you will be working from a 3D model. You can use this model to design the geometry of the MDF glue-up you will create, and then you can use the 3D model of the MDF as a stock model for the CAM operations. If you broke the mold you’re machining up into lifts in the “layer-cake” way, then you have a 3D model for each separate lift. There is a lot of judgement involved in choosing how closely to approximate your final tooling surface, and how much effort you are willing to put into the glue-up vs. how much rough machining you want to do. Roughing MDF is relatively slow, and sometimes it pays off to spend two more hours on the block glue-up and save four hours on the CNC.
You have to make the glue-up bigger than the finished surface model, so choose a minimum oversize amount and make the layers come no closer to the surface than that. If you cut it too fine, small mistakes in alignment will leave you under size when you machine – and you’ll have to come back and glue chunks in and wait for the glue to cure before finish machining.
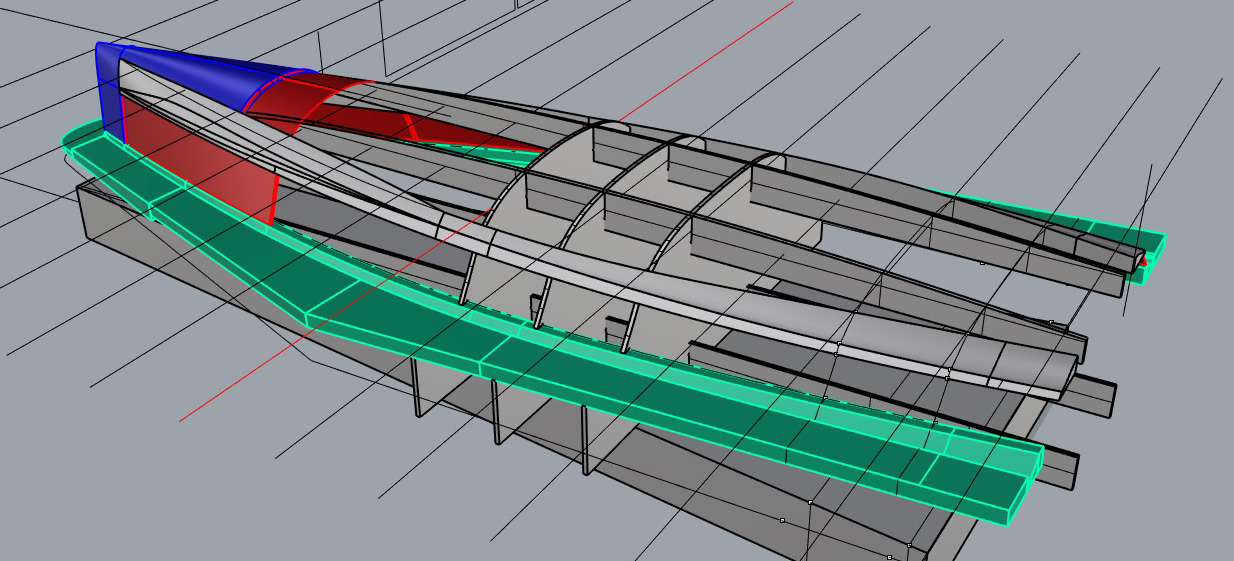
Here is an example of a 3D surface (yellow) and a stock model:
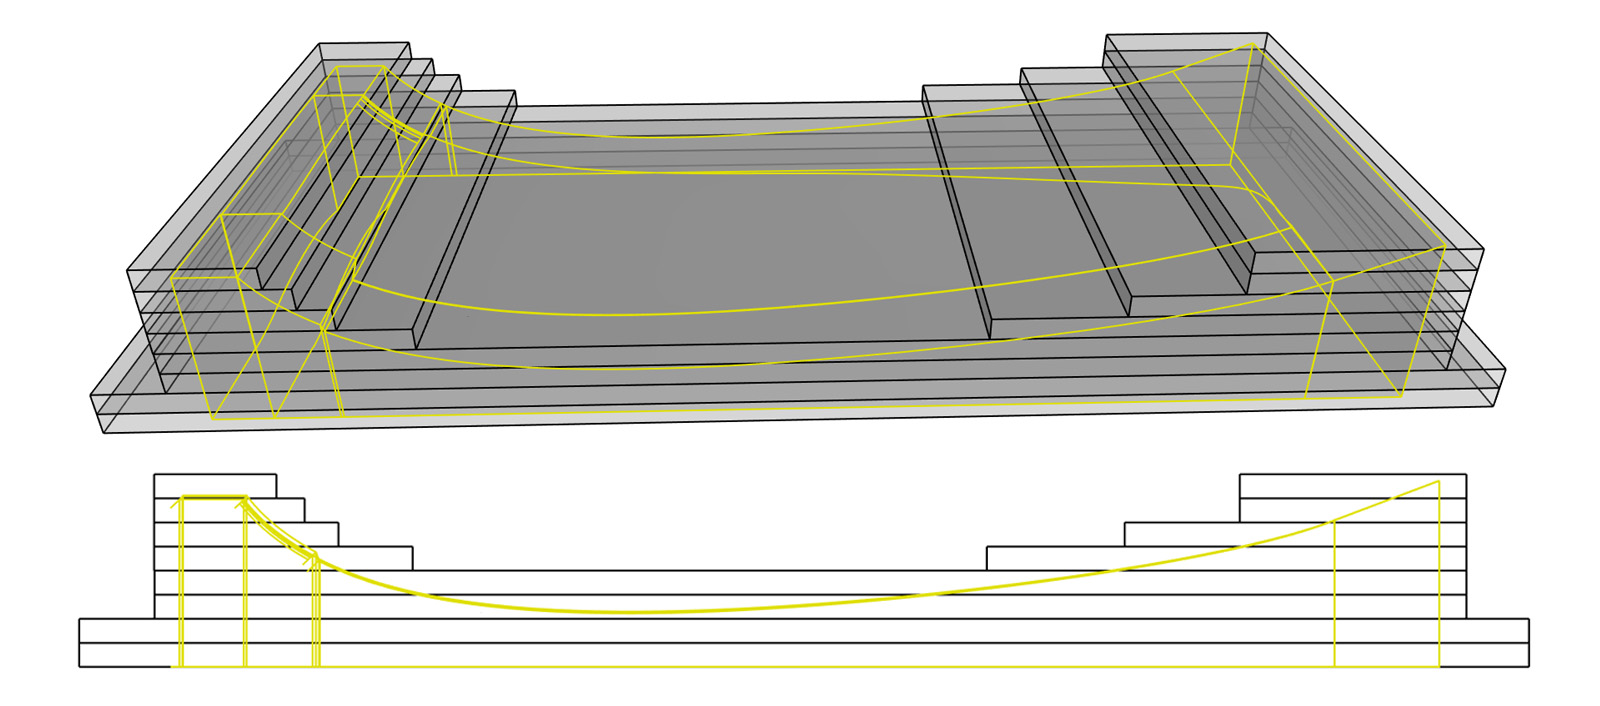
The stock is modeled to be both easy to assemble and close to the final surface. On the model above, the bottom two layers are left long at the ends for clamping to the machine bed. It is good to think about how you will fixture your material on the machine and this is a good time to plan for tabs or extra material for strap clamps or screws or whatever you use.
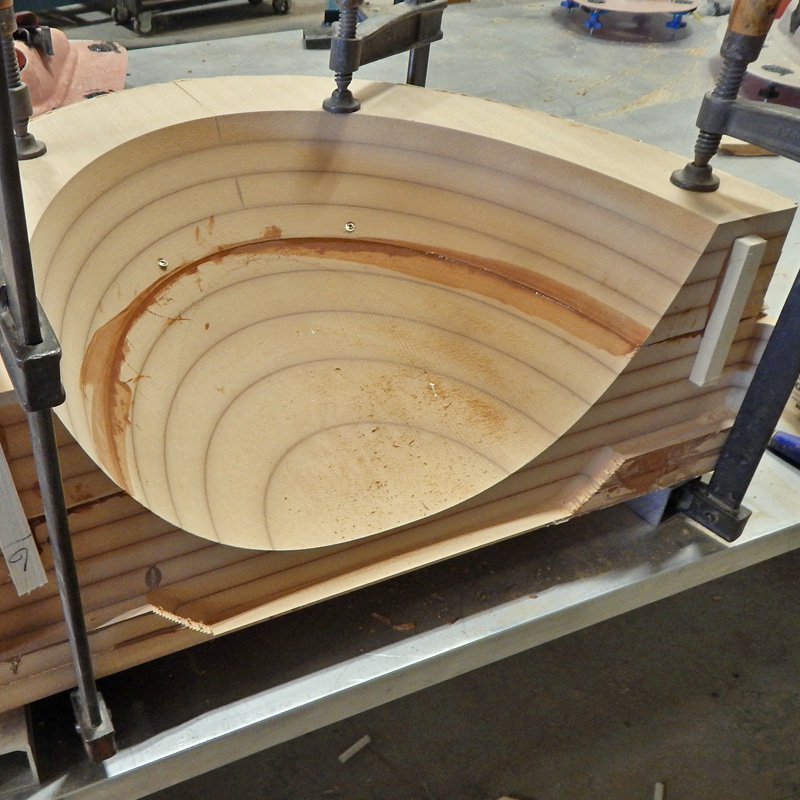
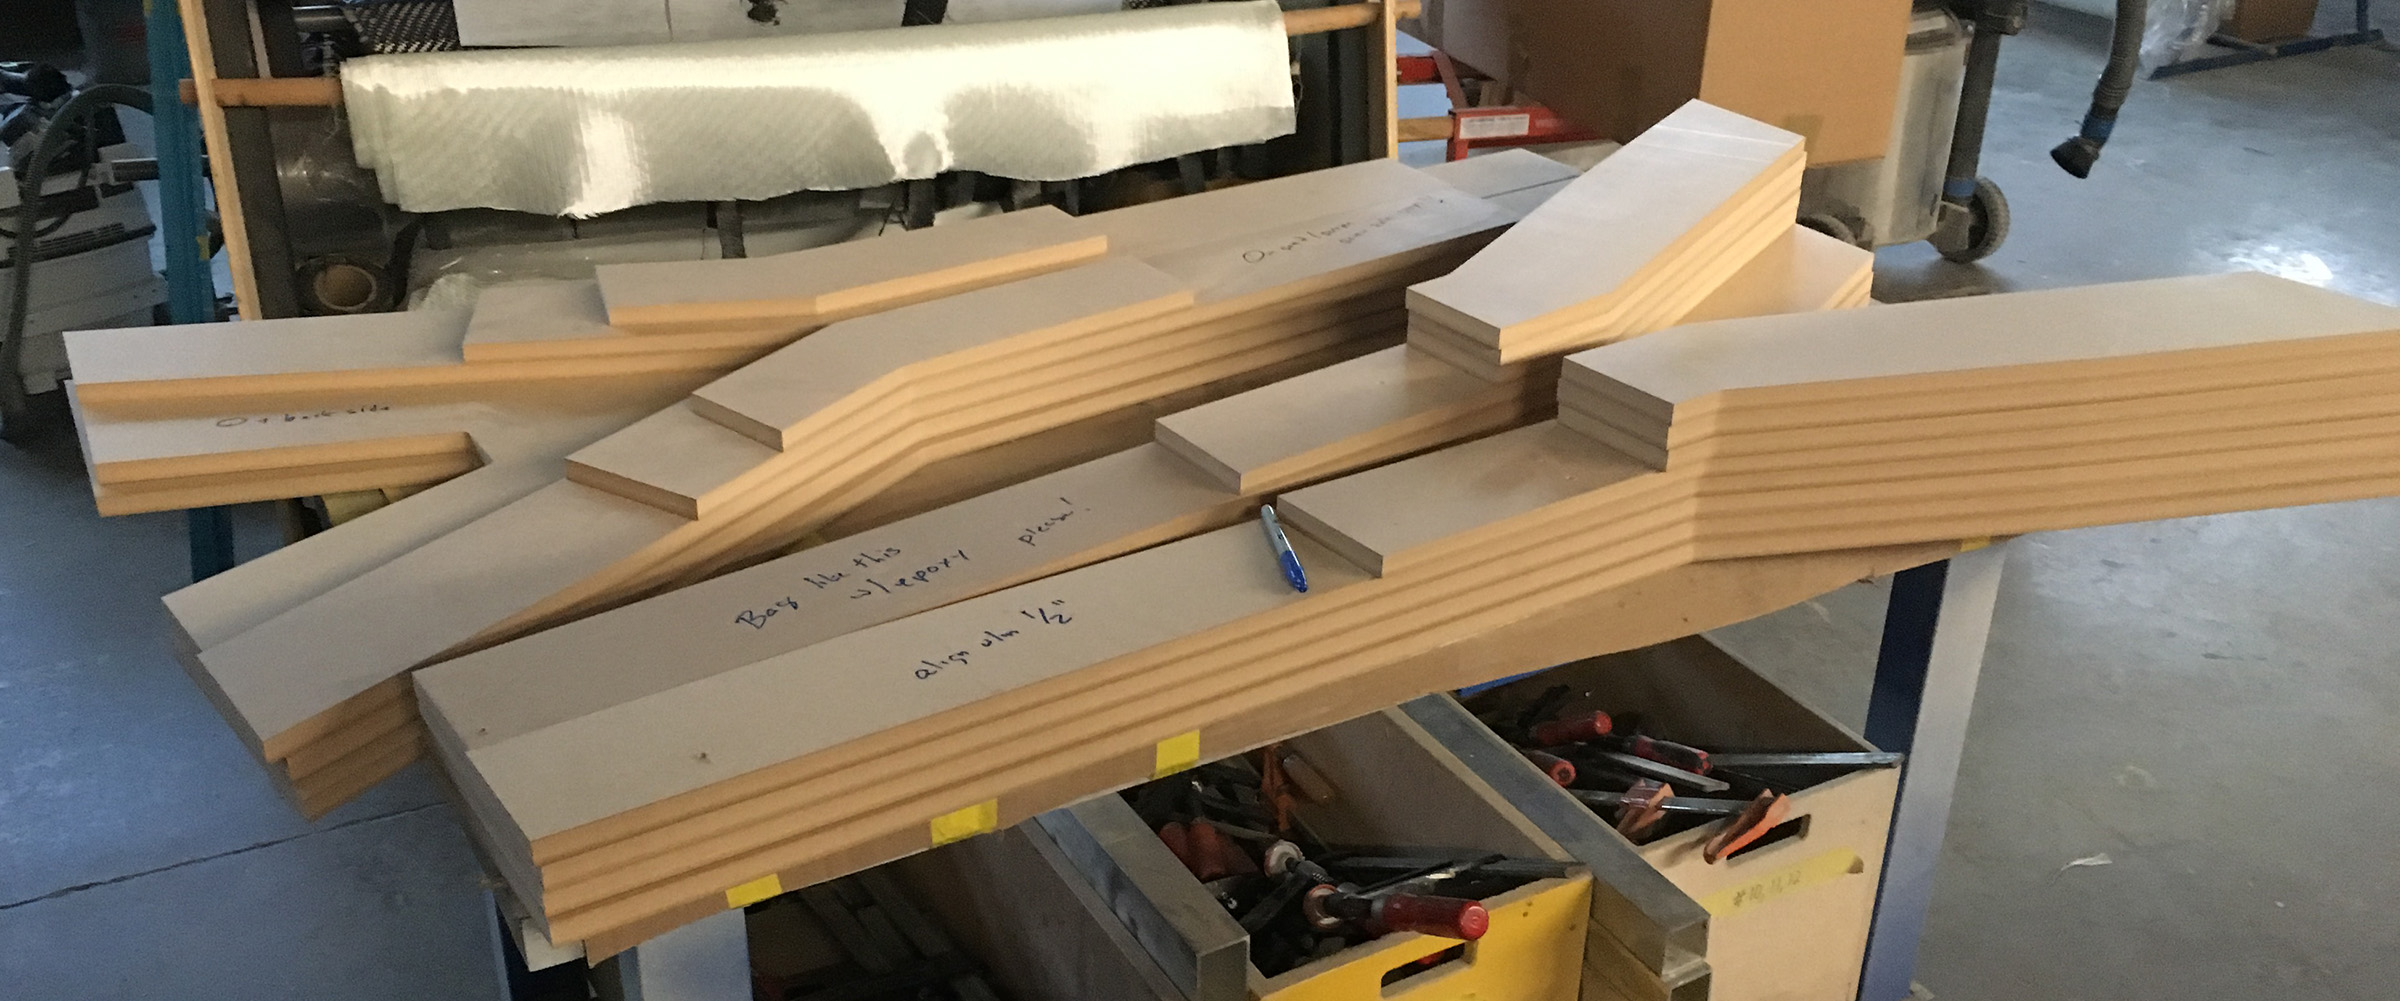
Sometimes I have found it worth actually cutting the layers out on the router – and using puzzle joints to align the multi-piece layers. This is usually only worthwhile for strange shaped parts where there is a lot of volume that would have to be roughed out of pockets in the geometry. Usually it makes sense to stick to assemblies of rectangles that can be cut on a tablesaw or panel saw. Here’s a bowsprit mold before glue-up. These layers were machined out on the router to keep the block light and save glue-up and roughing time:
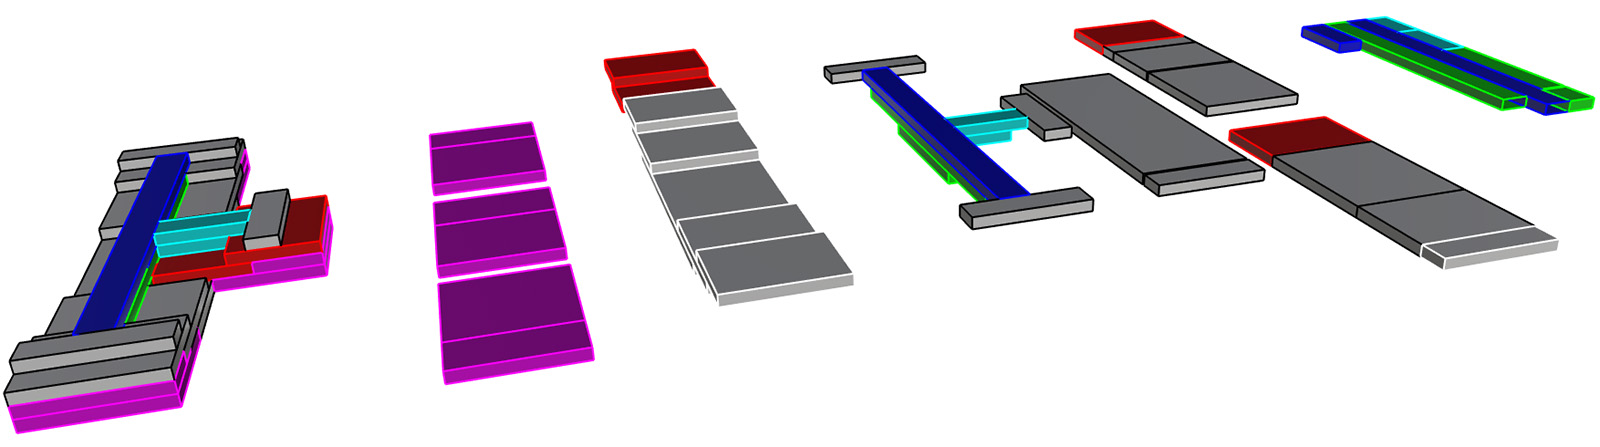
Once you have modeled the layers of the block, and have a set of sheet pieces and a 3D model of the block, the challenge is to present the glue-up in a way that will make sense to whoever is gluing it. I have often gotten an earful for giving somebody a sketch for a glue-up that is not clear to anybody but me. This isn’t a good strategy and will end up causing mistakes as well as costing time and making people cranky. Having a 3D model of the stock you are machining is no good if it doesn’t very closely resemble what is actually on the machine – ask me how I know! If you are going to get fancy, make sure there are enough measurements and it is clear what is intended – perspective views and color coding seem to help a lot. It is often much easier to nest the parts from sheets on the computer even if the cutting will be manual – and it saves mistakes and confusion.
It’s not MDF, but here is an example of a glue-up and some color coded parts and guidance for nesting parts out of sheets:
If vacuum isn’t going to be a thing for the parts you’re making you can get away with all kinds of hollow things. Here’s a case of perhaps “more trouble than it’s worth” in the hollowness department. This is an “egg-crate” structure with CNC cut lifts of MDF glued to it. These plugs were machined as one piece on a large machine. It went together quickly and cost a few hundred dollars in material instead of thousands for paste or tooling board. There were two of these – mirror images of each-other – so the modeling was almost half-price:
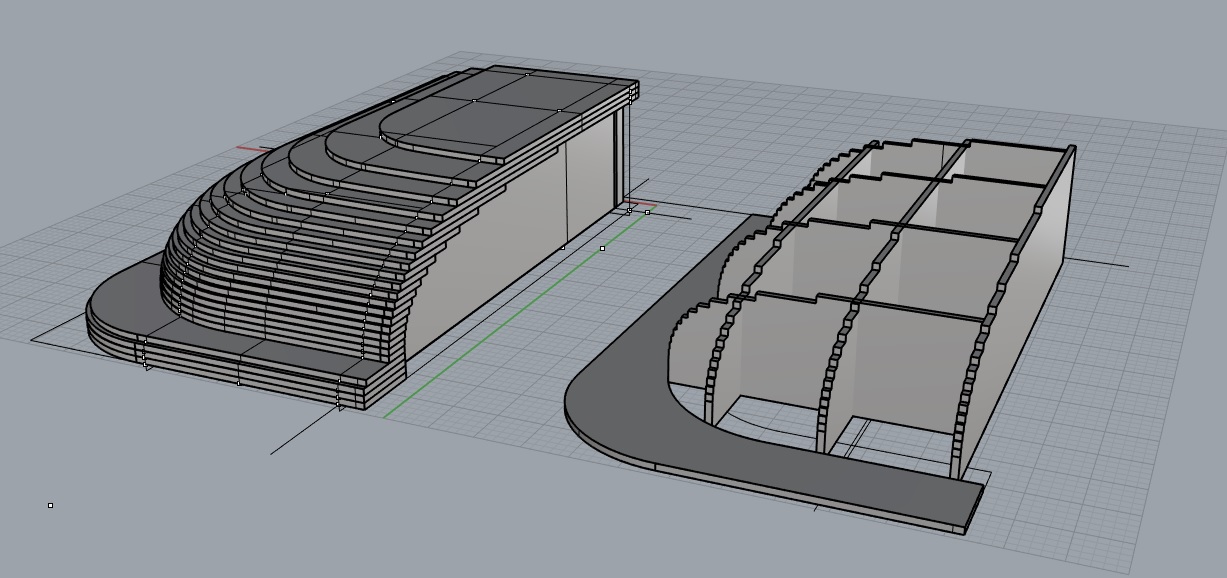
One other nice thing about this process (besides being cheap) was that the machining of the finished blocks was really just a finishing operation. All the roughing was done while the sheets were sheets!
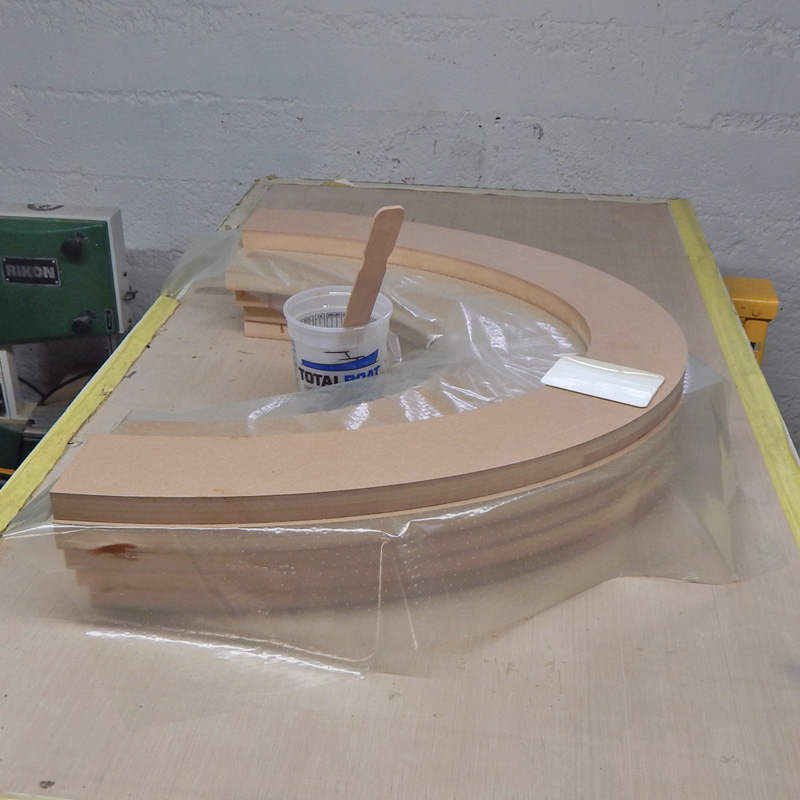
Gluing Blanks
I call the multi-layer blocks of MDF that you glue up “blanks.” Not sure why but probably I worked somewhere and they called them blanks. I also call them “glue-ups” but only if they are more involved and not rectangular solids.

Want to see me glue some blocks up four times faster than normal?
Check out this video: Vacuum Bagging MDF Blocks for CNC Machining
You’re going to want to glue blanks with clamps because it seems easier. I have always wanted to do this too – and unless it was for something very small and low-priority it has always been a bad idea. Vacuum bagging is the way to go. Once you have a system down it’ll be faster and cheaper when you take labor, material and the risk of screw-ups into account.
The problem with clamps is that they do nothing to pull air out of the glue joints. There are never enough clamps and they provide uneven pressure. The clamps also make the layers slide around and everything gets covered in glue. You will end up with big flat bubbles in there and when you machine through the glue joint lines the bubbles will be unbonded areas. You really can’t fix this. You can inject resin in there and it will be ok but it is almost always poor use of time and if you vacuum bag and/or cook the stack of MDF later it will make all those un-bonded areas move around or puff up with vapor. Also try to avoid the temptation to screw the blocks together and come back and remove the screws later. Sometimes you have to, but if you’re like me, you will absolutely forget at least one screw and you will hit it with an expensive carbide end mill.
Vacuum bagging is relatively clean and it keeps the glue off people a little better. It also allows you to pull the bag down slowly and make sure all the layers are aligned. If your blank is simple, you can put cardboard packing angle over the corners and that will align things automatically. You don’t need peel ply or breather fabric – just a few strips of infusion flow media in a grid over the part. You can machine it off as long as you remove the dry bits that aren’t saturated and glued to the part. Dry stuff wraps around the cutter and “helicopters” – bad news. Use the cheapest vacuum connect there is – a piece of infusion hose wrapped in flow media or breather. If you are a wizard at not gooping up the expensive aluminum fittings, hoses and quick connects then go for it – I have ruined more than I care to admit!
If you are gluing up multiple stacks of MDF to accommodate limited tool length or z-stroke on your router, it is possible to glue more than one with the same vacuum bag. By putting a layer of perforated release film between the stacks so the groups of sheets don’t get stuck together, you can get a bunch of glue-ups in one bag – provided they stack neatly with no overhangs.
There is the question of bagging the stack of MDF sheets down to a table or envelope bagging it on a flat surface. I’m a fan of envelope bagging if things are small or thick. It saves release coating the table and the risk of gluing the MDF to the table by mistake. The blank can also be glued up well before it will be machined and left in the bag (with or without vacuum) relatively safe from any moisture that could cause warping. If you have a large or complex glue-up, or it absolutely needs to be flat, bag it to a table – but put some thin painter’s plastic underneath the first layer (and release coat the table!) to help when you do “demold” it from the table surface.
Some handy things to do when you have a complicated glue-up and you need to keep layers organized and aligned:
- Assemble it dry and run a Sharpie marker around the edges of each layer so you know where to put the glue and a have a visual reference for placing each layer.
- If you have layers that have to land accurately away from an edge, use tiny blocks of MDF (or tooling board) glued around the edge of each layer with 5-minute epoxy while the glue-up is stacked dry. Avoid gluing them to the upper sheet – just the lower at each joint. You only need three to index the next layer up but a few more are ok. You’ll have to be careful handling things to not bust them off but it is very easy and intuitive.
- Carefully lay out the layers in the order you will need them and label the pieces by layer. Once the glue starts to fly things get less obvious.
- For complicated glue-ups, consider machining each layer from sheets and joining the pieces with loose-fitting puzzle joints. This can save lots of time and hours of roughing down oversize blocks of material.
Glue, or Better Yet: Resin!
I recommend using epoxy for bonding MDF blanks. Ideally you’d use a resin system of medium viscosity that can develop a full cure at room temperature. You can mix in batches if you’re worried about resin curing too fast – once the resin is in a thin layer between the sheets you’ll have plenty of time. Obviously there are limits – so test your resin and don’t get caught gluing a big job on a hot day and having it gel before the bag gets sucked down. My default resin is a room temperature cure 5:1 epoxy like WEST System 105.
You can also save some money using yellow carpenter’s glue. This isn’t as good as epoxy but it is ok for things that will get laminated over or that don’t need surfacing beyond a sheet of release film or adhesive teflon. You don’t need as much yellow glue as epoxy because it doesn’t soak in the same way. If you use too much it will leave fat, partially dried glue lines – which are bad.
How much glue do you need? I have settled on 1.5oz/ sq ft. (about 450-500g/ square meter) of joint area. Less can work but it’s risky – you’ll get a feel for the resin and MDF you use and can set a standard. Don’t leave this unspecified if you are delegating the labor – this is not the kind of variability you need!
So if you’re gluing a 3’x2’ block with three layers (so two layer joints to be glued) you’d have:
1.5oz x (3′ x 2′) x 2 joints = 18oz of mixed epoxy.
Or a 1.2m x 2.4m block, 5 layers high:
450g x (1.2m x 2.4m) x 4 joints = 5.2kg of mixed epoxy
Be sure to put it on relatively evenly and stay back an inch or so from the edge. You need only apply resin to one surface. Leaving the other side (bottom of the sheet you’re adding to the stack) uncoated allows a way for the air to escape the joint – up into the dry sheet and out the edge. This is important – I have seen problems where people coat both sides of the joint. You’d think it wouldn’t be a problem and would actually be better – but that’s not my experience. Your results may be different.
Infusion resin seems like a good idea but I am concerned that it gets sucked up into the MDF and starves the joint. I haven’t done any science to test this but I have seen instances that made me worry. Also, don’t add fillers or thixotropic modifiers to your resin. If you have a good reason to use additives, please let me know what it is because I may be missing something – but I have never had good results.
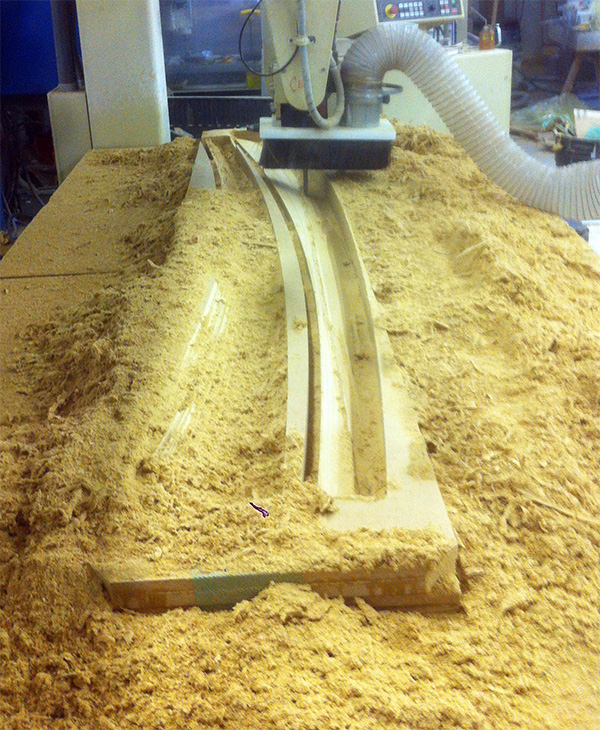
CNC Machining
Check out my article Introduction to CNC Machining Surfaces for more on CNC machining surfaces. There’s some overlap but it goes into more depth on the details.
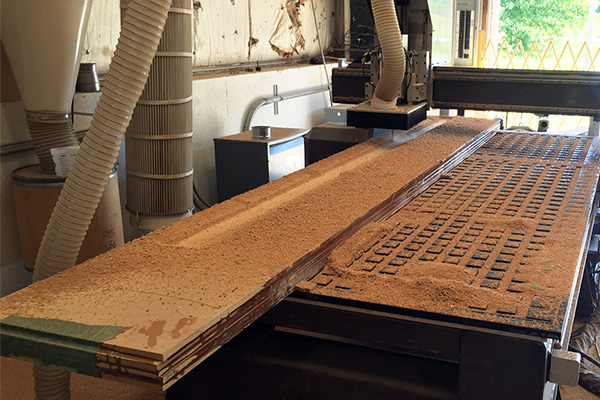
Be careful of the dust. There will be lots of dust! You don’t want to breathe the dust. Even without formaldehyde in there, wood (and whatever other mystery stuff is in your MDF) dust is bad to breathe.
You need to use dust extraction to clear chips and dust from the workpiece. If you are cutting and there is a layer of chips several inches deep, you are creating an insulation blanket for the hot chips coming off the tool. Fire is a real risk!
Cutters
MDF machines pretty nicely. I only ever use carbide cutters. It is pretty abrasive as wood goes but a carbide cutter run with a reasonable chip load so it doesn’t heat up will last tens of hours in the cut. Make sure you are not running cutters with too much RPM and too slow a feed rate (making dust not chips) – this will wear them out fast. Avoid HSS cutters even if they seem cheap – for any serious milling they will wear out and put excess load on your machine and leave a crappy surface.
I have also found that it is most economical to buy cheaper standard-quality cutters but to opt for coatings for longer cutter life. There are plenty of places that sell cheaper carbide end mills – here’s one in the US that I’ve used and they have a good selection of long and extra-long cutters: End Mill Discount.
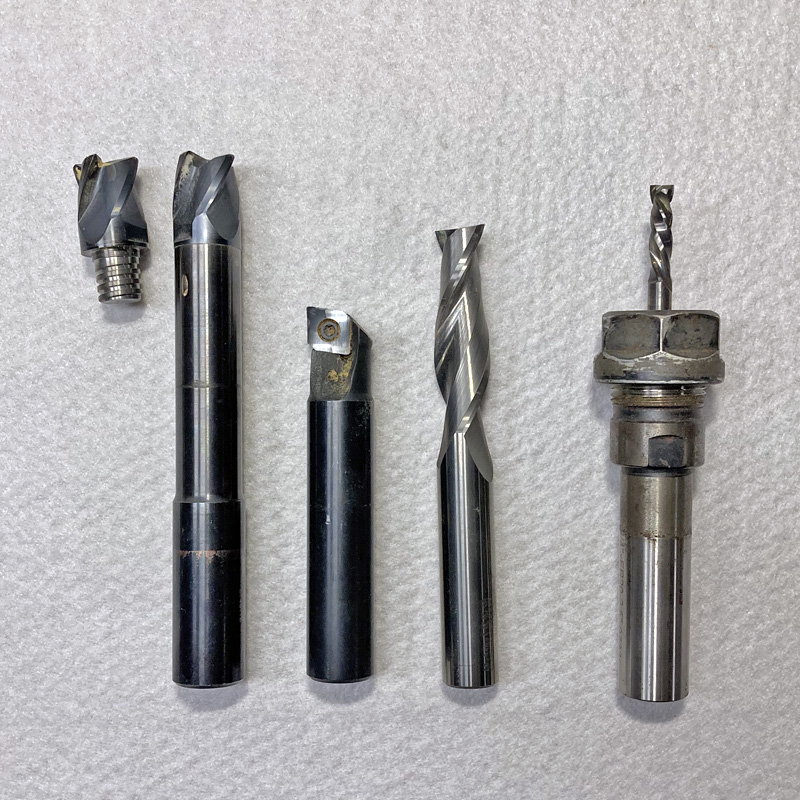
For 3D machining you will have roughing tools and finishing tools. For roughing, square end mills are typical, but a radius corner mill will be more resistant to chipping and will be quieter running. They’re not as common though and more expensive. Indexable/insert mills are great as long as you are certain to cut only with the insert – rubbing a shank or trying to “cut” deeper than your insert can cause lots of problems – including fire. Insert mill bodies are expensive, but the inserts are cheap and can be rotated several times to expose new cutting faces.
My go-to for machining large volumes of MDF is a large (relative to machine Hp) two or three flute carbide upcut spiral end mill. It only takes a few spindle horsepower to swing a 1/2″ (12mm) cutter and a standard 8-10HP industrial spindle will have no problem with 3/4″-1″ (20-25mm) cutters. More than three flutes and the chips don’t clear. Two flute cutters are probably the best choice overall for roughing MDF.
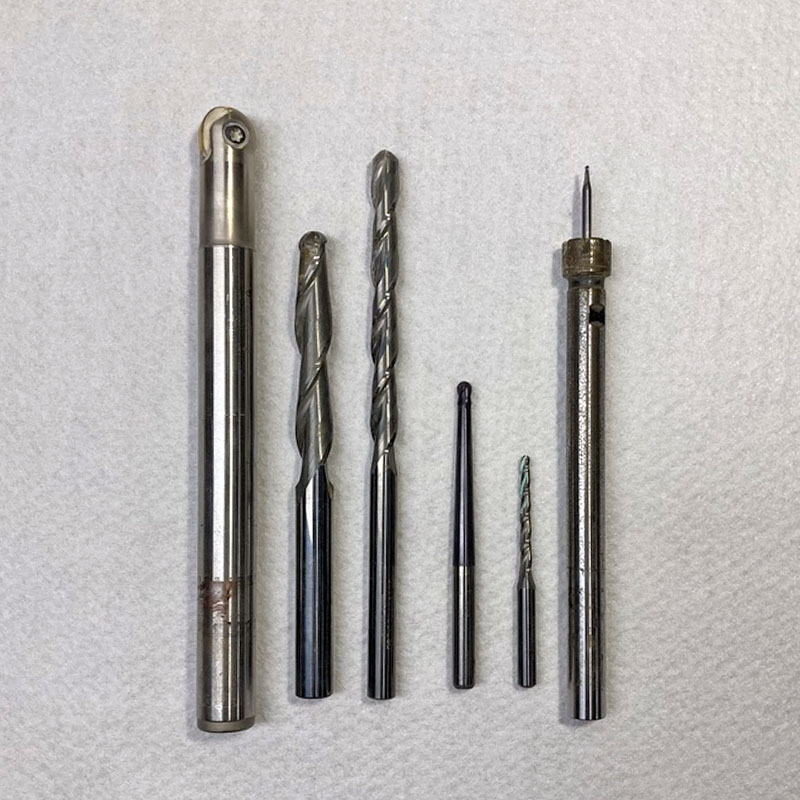
Standard ball-end mills are ideal for finishing. You may need long lengths – and it can be hard to find 6″ (150mm) long cutters that are 3/8″ (9mm) in diameter. Long cutters are prone to chattering like crazy, so use that fattest one that will work and don’t let it stick out any more than the deepest (plus a little!) that you have to machine. Tapered finishing cutters are nice but typically way more expensive! Consider using extensions for machining small details deep in cavities – because sometimes you need an 1/8″ (3mm) cutter down 4″ (100mm) in a hole – and there’s no option besides an extension or a crazy long tapered cutter. Sometimes, depending on geometry, a corner-radius cutter will work.
You can get away with three flute finishers but four flutes still seems to load up too easily. They’ll work, but two flutes is till my go-to. You lose a little cutter stiffness (more flutes = more stiffness) but practically it doesn’t make much difference.
Feeds and Speeds
This is only a start, but cutting MDF with a router isn’t an intuitive thing, especially with 3D surfacing. You can take a pretty heavy cut with sharp tools and the optimal speed and feed range for a tool is more aggressive than you might think. For slotting MDF or plywood, it is common to run quite fast, both feed and RPM with a relatively small 3/8″ or 1/2″ (9-12mm) cutter. Modern routers can really move and if you have 24,000 rpm, it is nice to use it.
When roughing, the goal is material removal speed. My suggestion is to run a larger diameter cutter at a lower RPM. For two flute carbide end mills, a 3/4″ or 1″ cutter (20 or 25mm) at 7000-9000 rpm is a good start. This will use a bit of power and you can start at 300 inches per minute (7500mm/min) and go up from there. The depth of cut is best kept to less than the bit diameter, because chip clearing can be difficult. You should be abler to calculate the chip load per tooth (how big a bite each flute of the cutter takes) and then actually grab a chip you’ve cut and measure it with a caliper. Your cut should be generating primarily chips or flakes of MDF, not powdery dust!
For finishing, you can really wind it up, but you’ll be limited by your machine’s ability to not jerk around and make a mess of the surface. Very nice high-end machines can totally rip, but your average entry-level wood router is probably going to finish around 200-400 inches per minute even if it could theoretically go faster! Cutter chatter and deflection is a big deal.
Cutting Strategies
Conventional and climb cutting are the two options in terms of the direction that a cutter moves relative to its rotation. Climb milling is a better general strategy for MDF. The chips start thick as they are sliced off and taper to thin as the cutter spins through the material. This seems to make for a smoother cut and better finish than conventional milling.
Try to rough within ⅛” (3mm) if the final surface before running a surfacing pass. The uneven load as the finishing cutter runs through the thick and thin of the roughed surface can flex the cutter and leave uneven-ness in the finished surface.
You’ll need to choose a “step-over” for your finishing operations. Bigger cutter diameters can take a wider step-over and still leave a decent surface. Try 0.02″-0.04″ (0.5-1mm) step-over for a 1/4″-1/2″ (6-12mm) ball end to start. You can fix little steps with sandpaper, but you have to weight the time cutting vs. the time sanding – and the quality fo the surface your machine can make. Small diameter tools need a smaller step-over to deliver a similarly smooth surface.
For finishing contoured surfaces a ball-end mill is usually the way to go. You can figure out a step-over for each pass by estimating the cusp height of the overlapped ball profiles, but usually it is ok to just estimate a standard step over for a given cutter diameter and desired finish. Finishing is typically broken up into the “vertical part” and the “horizontal part” of the surface. You might use a contouring or “waterline” finishing strategy for the areas of the surface that are from 45 degrees to vertical, and then another parallel strategy for the 45 degree to flat part. Do the vertical part first so you don’t risk bumping the bit into vertical walls of material at the edges where the roughing pass hasn’t cleared all the way to the finished surface! You’ll also want to program some overlap so there isn’t a missed spot or ridge right at the 45 degree line.
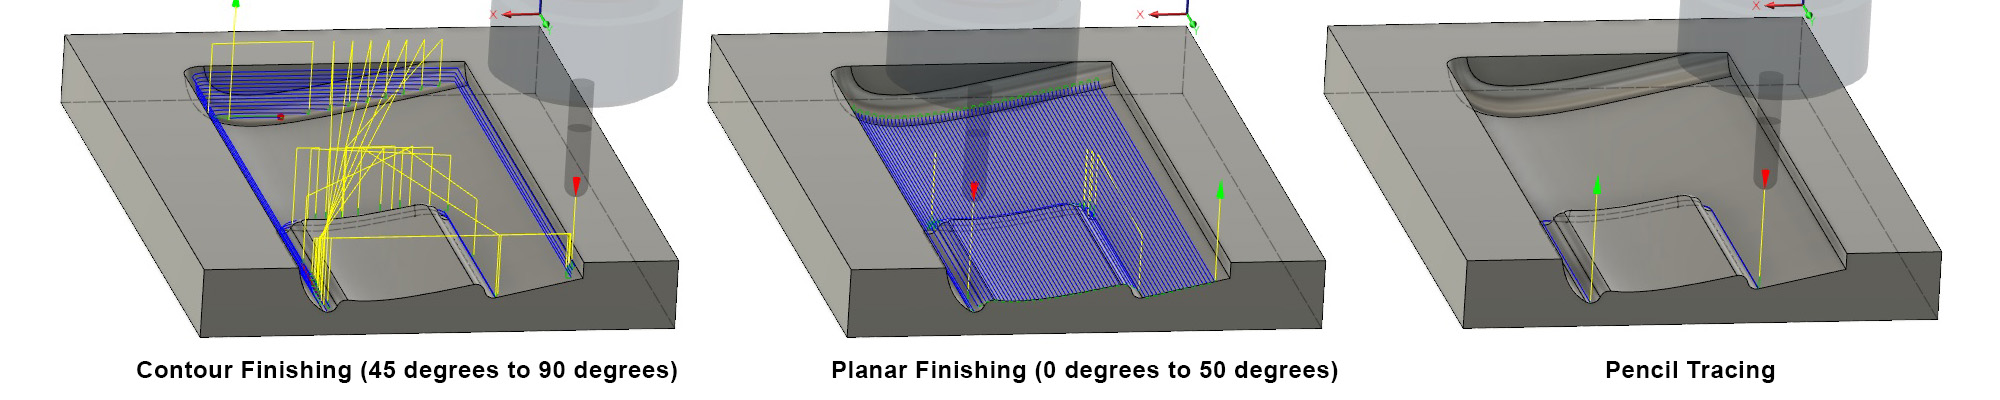
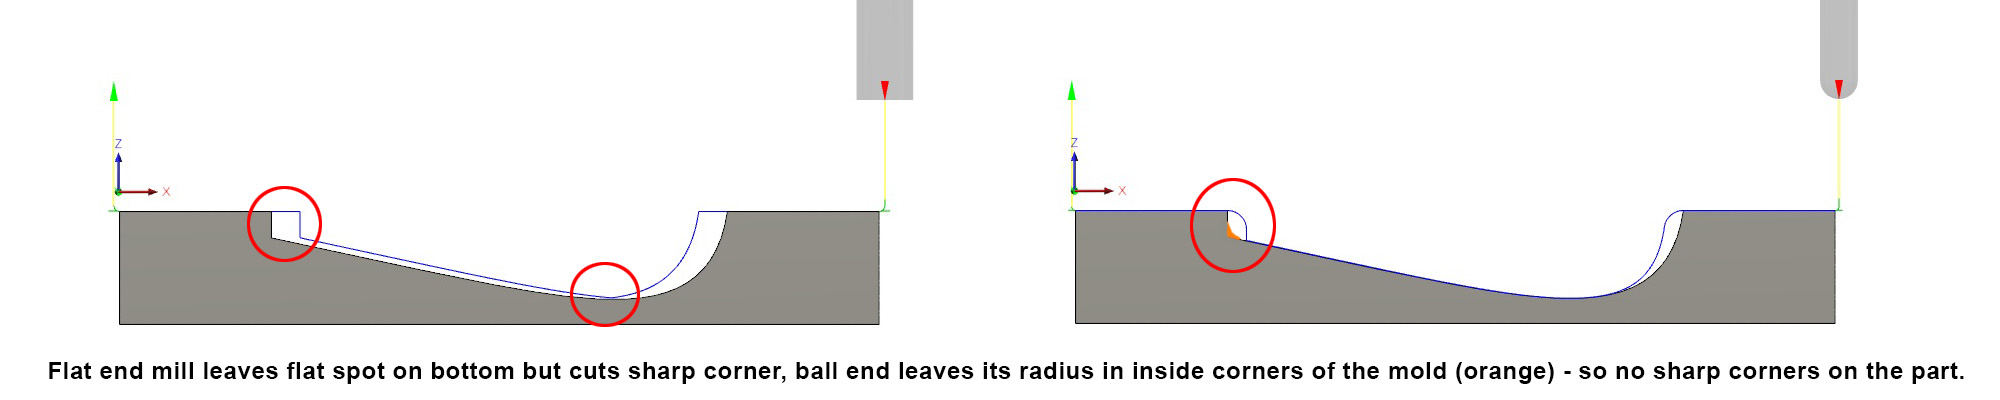
If you are cutting an extrusion-like profile (say a wing, tube or foil-shape) and finishing back and forth across the section – here a square end-mill can take a wider step-over and the flat spot is leaves at the bottom may be ok.

Here’s a video showing some MDF machining including some basic 3D operations: Hyperloop Shell: CNC Machining MDF for the Mold (Part 2)
The videos from this MIT Hyperloop 2 Shell project show some simple MDF machining and tooling work and may be useful. There are 8 total videos, and the first 6 are about tooling – which is pretty much how composites works!
Now if you want to try a real pro (like Josh) maneuver and have a little time on your hands, you can rough your MDF very close to the final shape and then coat it with resin. Thin infusion resin works best – and really load it on but try to avoid puddles. Let it cure and then come back and finish machine your surface the next day. You’ll find the resin soaked in and that the MDF is like wood tooling board – hard and able to hold perfect definition. You’ve got to make sure you rough close enough to the final surface (1mm or 1/32″ is good) and that it soaks in well even in corners. The other problem is that you tie up your machine bed overnight and you’ve got to be sure that everything re-indexes within a pretty close tolerance. Also the MDF can warp overnight once one side is coated… and you risk gluing your router table… But hey, if it were easy it would just be “the way!”
Sheet Cutting
For sheet cutting, compression spiral cutters leave clean edges and can be run in two passes – as long as the first pass is slightly deeper than the “up” part of the cutter. My go-to is a ⅜” (9mm) compression spiral though I have used 1/2“ (12mm) and ¼” (6mm) too. For cutting out 2D shapes, you want a bit that is stiff enough to take a heavy cut, but there’s no reason to cut a wider slot than necessary.
Assembling Multi-part Tooling
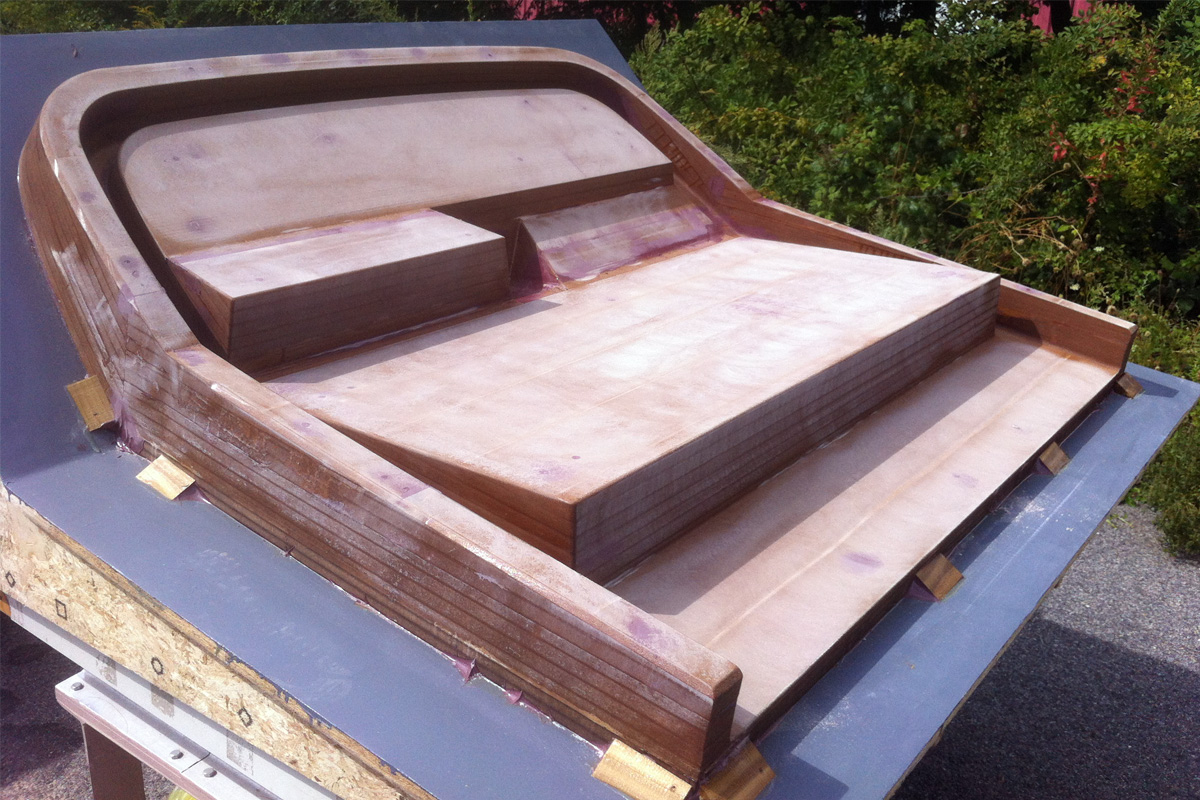
There are going to be lots of times when you want to build a mold/plug from many machined components. This is great, and will save lots of machine time and make it possible to do complicated large composite parts for cheap money. Be careful to have a good gluing strategy for this. I try to model tooling like this with assembly in mind. If you can create a sheet-good “egg-crate” to support the backs of blocks of MDF, that can be a huge help and make it possible to handle large molds as a unit without breaking them. Often you can integrate machined MDF detail pieces into larger stick built tooling this way.
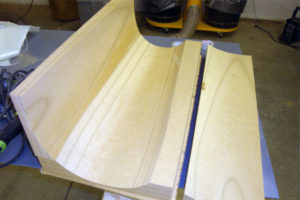
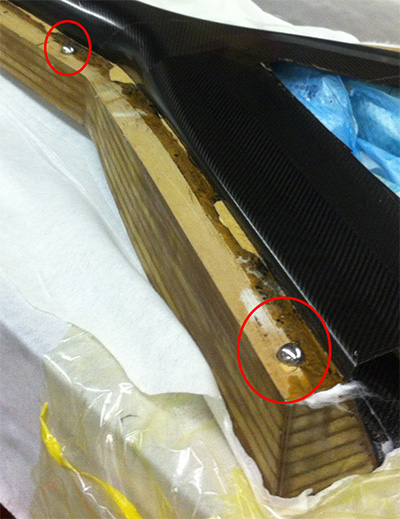
Here’s a hull plug for a boat showing the MDF parts as solid volumes. These were all machined, and the remaining surface was strip planked. Note: some transverse sheet-good structure is omitted in this image for clarity!
One place you can get in trouble is with blocks shifting under heat or vacuum. If you are going to envelope vacuum bag a mold (which you’ll need to do with MDF!) be sure to bag the multiple blocks together when assembling. If you don’t bond the separate blocks very well and with a lot of pressure, they will shift or crack when you are making the part – especially if heat is involved. It is easy to end up with a crack or a step where two separately machined blocks meet.
Check out my videos about building the MIT Hyperloop2 Shell – it’s not fancy but it shows the process of mixing machined and hand-built surfaces to make a mold. Video number 3 shows some assembly of MDF blocks cut on a 3-axis router into a larger taller stack.
We went over breaking up larger or awkwardly-shaped tooling into chunks earlier in this article. Try to make sure you have a plan to index the pieces when you glue them together. Here’s a small semi-cylindrical mold (right) machined in three pieces and glued together. The side pieces were modeled to match the thickness of the flat on the bottom piece, so aligning the off-part edges would force alignment of the curved surface. Compared to machining from a huge block this went very fast and allowed for a slight undercut in the sides. The part could bend to demold but it would have been tough getting a 3-axis cutter in there!
If you need to align two halves of a split mold, the easiest way I know is to use large (1″ (25mm) is my go-to) ball bearings and machine sockets into the two sides. The sockets should be slightly (.5mm) deeper than the radius of the ball so when you coat the MDF, there will still be room for the ball and the mold will close completely. Always use enough alignment balls – four is probably a practical minimum for anything that isn’t tiny. The balls can be dipped in release agent and will come out ok – usually without taking a big chunk of MDF with them. It is totally ok (and a good idea) to make the ball sockets cylinder-shaped rather than machined half-spheres. This makes cleaning them out easier and if they get all gooped up you can use a Forstner bit or reamer to clean the hole without damaging the sides.
One final multi-part mold trick is to make a custom vacuum-tight table and then glue your MDF to it. Here I needed more height than I could machine and didn’t want to glue up a giant block of MDF. I made a quick plywood (precisely) angled table and put two layers of fiberglass and some primer on it to seal the surface. Then I vacuum bagged machined MDF blocks together on the “table” so that there wouldn’t be any chance of blocks moving during part construction – and no seams printed into the part. You can see the alignment wedges around the edge that I used to accurately position the main blocks. This whole thing was made on a CNC with 10″ (250mm) of z-axis travel – and to get to this stage only took a few days.
From here it got primed and faired and a nice shiny part came off. There were even a few plants placed to make extra features. This may not be high tech, but it is an excellent way to make one-off tooling for pre-preg, infusion or bagged wet layup in situations where blocks would just be too awkward to deal with on a flat table.
Finishing
Once you have your milled block of MDF off the machine, you have to choose how to turn the MDF surface into something you can use. This is probably the most complicated part – and also the most tedious. I have done this hundreds of times and wished I had done it differently almost as many times. You’ll have to experiment to see what you like best but here are a bunch of options and a few things you’ll want to be sure you don’t do.
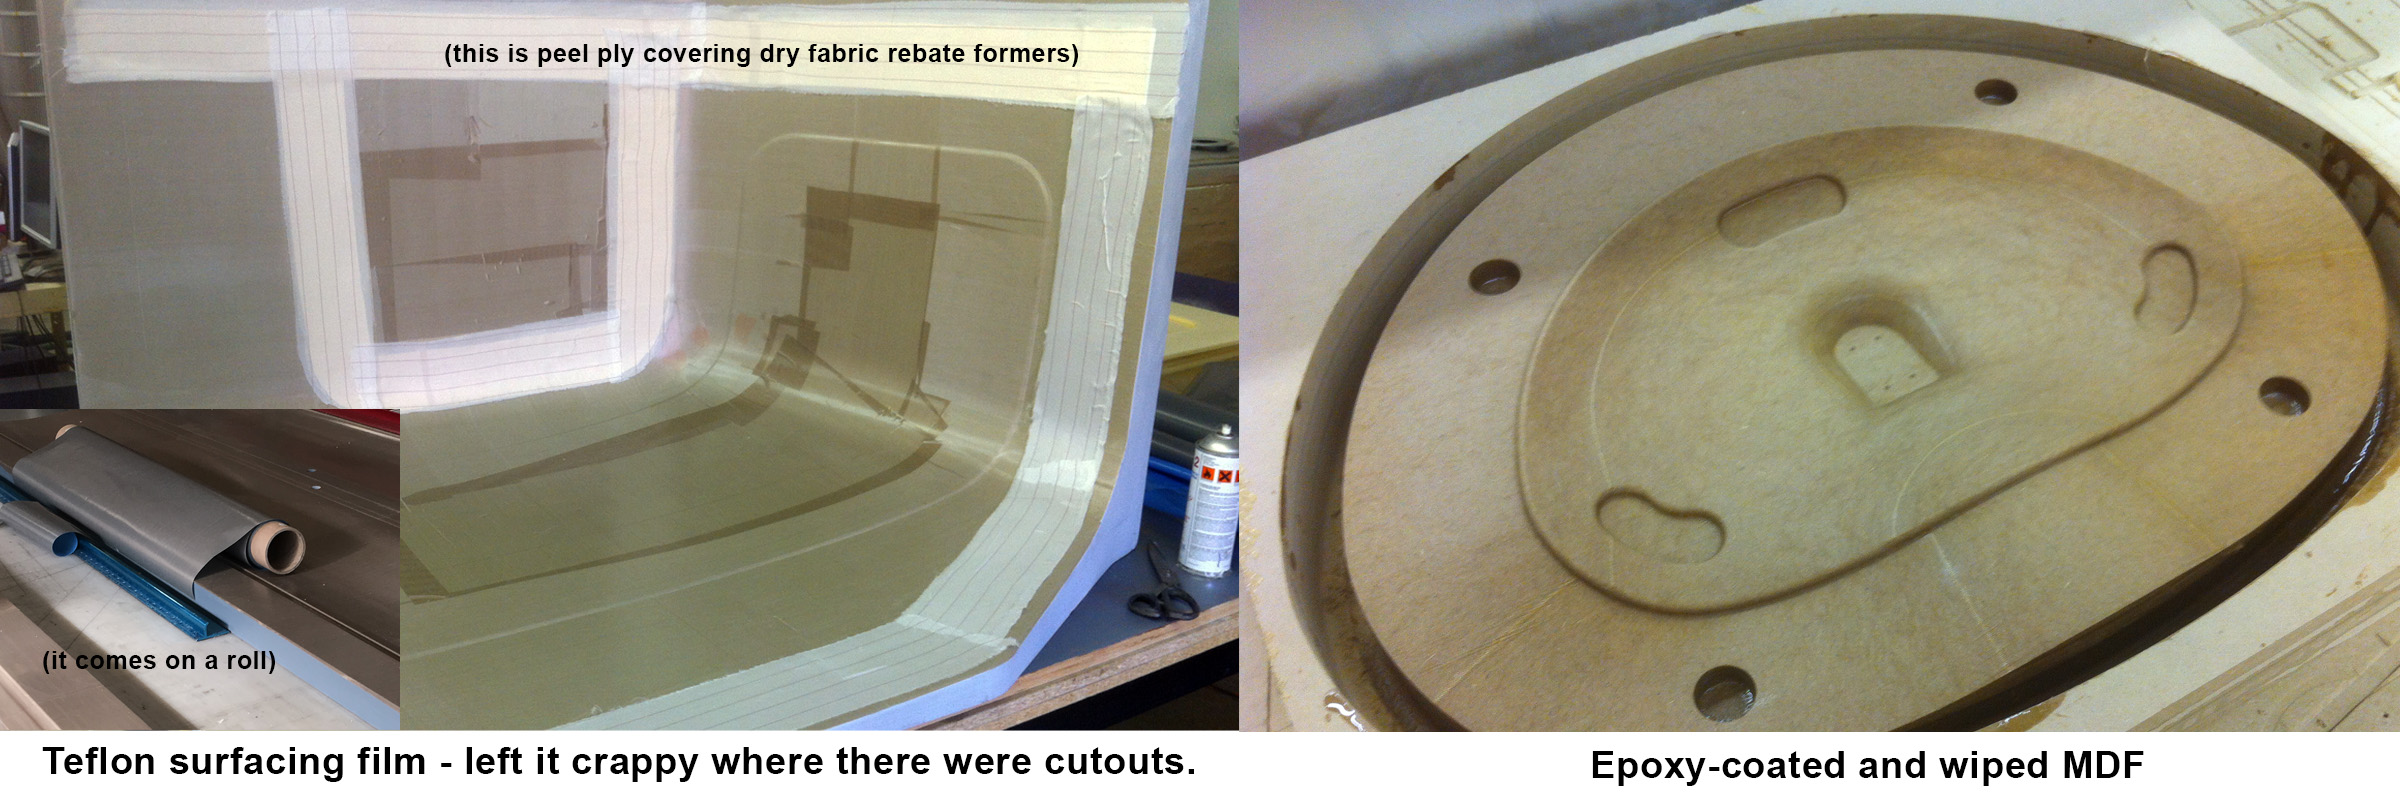
The simplest way to use an MDF mold is to cover it with some type of release film and just go for it. You can use packing tape if you’re in a hurry but it will leave lots of ridges on your parts. I have used a non-perforated release film and glued to to the MDF with spray adhesive (Super 77, Airtac, etc.) The release film is so thin that wrinkles don’t matter much. This really works best with pre-preg, and only when the surface is going to be sanded and painted because the resulting finish is rough and – well it looks like MDF! One clever variation I saw online but haven’t tried, is to vacuum bag high elongation bag film (Stretchlon or similar) over the MDF and apply a release coating to the bag – may be worth a try for some applications… you have got to leave the vacuum on while you laminate. You could even bag to the bag – might be a differential vacuum situation.
A step up is to use an adhesive release film (like Airtech Tooltec or Taconic 6085-05 or any of the many similar options.) This is like a big roll of light fabric impregnated with PTFE (Teflon) on one side with an adhesive (acrylic or silicone) on the other.
Learn more in my article: Adhesive Teflon – It’s Awesome!
You just peel the backer off and stick it to the mold surface and then you have a release system! It doesn’t do compound curves well so it needs to be tailored (wallpaper cuts and little flaps) but if you are going to post finish your surface it can be a huge labor saver. It costs between $2-$5 per square foot so it’s not cheap but it is awesome for one-off parts. Different adhesives are either one-use (acrylic) or can be peeled off and repaired (silicone) for low volume tooling. My preference is to epoxy-coat the MDF and sand it before using an adhesive release film, and you will find it needs a dust free and hard surface for good adhesion – but if you’re in a real hurry it can be stuck directly to wood, MDF and fillers- check it out!
Sealing
Most of the finishing steps require a sealer on the MDF. My go-to for this is epoxy, but it does have some potential problems and you can mess stuff up pretty bad if things go wrong. Your other option is a polyester sealer.
First off, polyester sealers like Duratec clear sealer (or just straight to primer) can work ok, but they aren’t strong and don’t provide the “hard candy shell” that a good coat of epoxy will. Try it though – they are faster and don’t have cure-inhibition problems if you apply a polyester primer over the top. You might find it results in a quicker surface and is good enough – especially if heat is not involved in your processing. You can use gelcoat and build a shiny surface that way and it will work fine – it just might not stay stuck to the MDF when you go demolding. PVA release over wax is a good idea here because it really doesn’t stick – spraying helps the PVA go on smoother.
There are two things you can do to make epoxy sealing work really well and both are additional work – but totally worth it if possible. The first is to heat the MDF block up until it is warm to the touch. Be careful not to heat it too much or for too long or it will crack. When you have this warm block, put it on some sheet plastic and take some normal epoxy that you have already mixed and brush it on. Brush the vertical parts of your mold first – it will soak into the “end grain” of the MDF faster and drip down into the flat areas anyway. Because the block is warm, you will need to move fast and you’ll use a lot of epoxy. Really load it up but try to avoid puddles – we’ll deal with them next. You will want to coat all the sides – even the bottom – of your MDF block or it can warp. Doing this in two steps is fine. I like to drive three screws about 1/2″ into the bottom of small blocks and coat the bottoms first and then flip over and coat the rest in one shot! You’ll need to sand/grind the bottom flat but it will be already well sealed.
The second critical step: after the block is fully coated, give it a few minutes to soak in (but don’t let it start to gel!) and get some cloth rags – not paper towels – they’ll just tear and leave little bits of paper stuck all over your mold. Work your way over the surface wiping up any excess resin with the rags. It requires some pressure and more rags than you think you’ll need. When you’re done – ideally there will be no drips or puddles and the entire surface will have a dull fuzzy look and an even color. If you have light spots, add some more resin, let it soak in and wipe up the extra. Even if you didn’t heat the MDF first, this wiping step is critical to getting a consistent and easy to sand surface for your remaining finishing steps.
If you are going to use an epoxy primer to fair, you can go ahead and sand the surface as soon as it cures. If you are using a polyester or vinyl-ester primer, you will need to post cure the epoxy sealing coat. If you don’t, it can keep the primer from curing and you’ll have to wipe it all off with acetone – ask me how I know! Give it a few hours at 120F or so just to really cure the resin coating. After that you should be able to sand. After sanding, wipe with acetone or denatured alcohol to remove any amine blush. You can also put it out in the sun for a few days – if it’s warm – and that should cure it enough too.
From here on out it’s a finishing problem. I am not a master painter by any stretch so my advice ends here. The best finishing advice I ever got though is to “make sure you sand with something that is the shape you want the surface to become.” Someday when I write my “how to sand” article, I’ll link to it from here!
Conclusions
The MDF will hold up ok, but don’t expect too much. If you cook it it will eventually crack. Cook low and slow and try to keep it under 200F/95C. If you have finely featured geometry, it will eventually break. Make sure you have a reliable release coat system that you test before going all in. Release systems that work on production tooling will sometimes still take chunks off an MDF surface.
It’s not perfect… but it was fast, and it was cheap and sometimes that’s a winning combination!
Feedback
I have some feedback from Dave that I am not giving MDF it’s due when it comes to tool longevity. I heard about a mold that has been going strong since 1996, having been carelessly handled and stored for long periods of time – and has still produced over 100 parts. Point taken! In some cases you will get a long and productive life out of MDF and this is awesome. Geometry and overall thickness make a big difference, and this tool is thin and has few sharp features – and importantly it was epoxy coated when first made. Thank you for sharing your experience, and may it make a hundred more parts!
Revision History
12.12.19 – added clarification on MDF coating
1.17.20 – added alignment balls and edits
4.20.20 – added pictures and section about coating and refinishing and crazy dome mold and vacuum-tight “table” for your stack.
3.17.21 – added cutter selection, stopover, feeds and speeds – made images fixed size
4.25.21 – switched videos from embedded to links, typos and added link to endmilldiscount after talking to Denny
Note
This article contains information that reflects my opinions – I make no promises about its usefulness! It may contain mistakes (please let me know if you find some!) and will include prejudices based on my limited experience. If you disagree with anything here, please get in touch. This is not just for me to share what I know, but to learn from others. I will gladly insert additional information and differing opinions so readers are more aware of the diversity of “right” answers!