Video: My Big 3D Printer Experiment!
I am learning to make videos – and this one is about my experiences making and testing a big 3D printer made out of an old CNC router. Some things are best written, others need to be seen!
How to build with composite materials: design, tooling, materials, laminating and more.
I am learning to make videos – and this one is about my experiences making and testing a big 3D printer made out of an old CNC router. Some things are best written, others need to be seen!
Working on rounding up and laminating some of the first test panels for the Materials Library! Starting with common hand layup, infused and pre-preg parts. Making panels oversize and trimming to 12″x12″ and 12″x1″ strips for some basic bending tests. I have an old Chatillon tension/compression tester that I’m going to try to get working – hoping to do some very basic stress/strain and failure-mode info do the line – not for actual engineering but more for comparisons between panels.

Still trying to figure out how to present the information well without having things get confusing or really hard to manage.
This post is about a technique that lets you speed up the construction of basic cored pre-preg parts by potting the core edges in thickened epoxy. While not the best idea for highly loaded or critical parts, it does let you cut one of the big corners that makes pre-preg parts expensive and time consuming – the price for this – thickened epoxy!
The key idea here is that the whole part gets cooked at once, but only after the core “chocking” material (ideally epoxy that needs post-curing filled with low density filler) had b-staged and is hard to the touch. You are using the cast-in-place core to apply pressure to the outside skin, so it will never be as good as a multiple cook part – but it sure is faster and primary bonds are nice too.
Here’s an example of a test part I made a long time ago. It was a prototype bench for tuning snowboards and I wanted to core the top but also wanted it to be as quick and cheap to build as possible. Weight was important but not critical. This is what the core fit looked like before the second skin went on:

The skin in the mold is not cured – it is just debulked in there well and glue film is debulked into the outside skin under where the core will go. Glue film is just pre-preg resin in a sheet – it is added when bonding core so there is some resin to soak into the core material and form a nice bond.
The honeycomb core was loosely fit and then I mixed up a batch of slow epoxy and thickened it with glass microspheres and about 10%-20% silica. Ideally you could use a resin system that requires a post cure so that there would be some primary bonding going on with the pre-preg – so they would co-cure. This isn’t necessary though – you just want to use a system that doesn’t produce amine blush. The filled resin was squirted into the radii under the core with a cake bag – you could do with a fillet stick too but it would be messier. Then I pushed the core (the corners had been radiused so it didn’t hang up in the corners) down into the fill and it shot up into the honeycomb cells. Then I used the cake bag again to squirt thickened epoxy around the edges to make a fillet. I used a lot!
Once the core was manually pressed in and the fillets were cut neatly, I placed a piece of peel ply (bias-cut no doubt!) then perforated release film and breather and bagged the core in using my debulk bag. This left the nice radii of cured filled resin, ready for the second skin. You can see the peel ply surface on the above picture – that’s why the uncured pre-preg doesn’t look shiny.

Here is the second skin laminate before cooking. The aluminum leg socket formers/mandrels were part of the experiment – they were wrapped in pre-preg material and bedded into the uncured outer skin before the inner skin was laminated over them. Worked pretty well! The part on the right shows the cured and trimmed part – the core didn’t print or leave any voids on the mold surface because it was essentially “potted” in place against the debulked skin.

Here is a more complicated cored part with Corecell foam core instead of honeycomb. One the left it the core fitting stage, which was done before the skins were laminated in the mold. The idea was that the skin thickness (about 0.04″/1mm) would offset the foam uniformly and that if the joints were loose, there would be room for the filled resin to pot the foam against the debulked inner skin. Here the inside and outside radii as well as the perimeter flange made fitting carefully a necessity. One the right – the pre-preg glue film is debulked onto the outer uncured skin.

Here is the step where the core is pressed into the wet filled resin so that it forms a chock-fit – essentially a cast-in-place addition to the foam. One the perimeter of the steps there is a rebate for secondary bonding and this is why there is a wide skim of filled resin around the edge. During the cook, the foam will soften and “thermoform” over any excess glue – which won’t be a big deal because we are going to vacuum bag the foam down with the debulk bag as soon as it is all fit.

Above is a closer look at the process. This would probably get you taken aside for a stern talking-to at Boeing or SpaceX but in this case it saves time and makes a good solid part with only a small weight penalty. The core is all perforated to bleed air and resin when it is cooked – and the excess adhesive mix bleeds out and into the bag stack while the core itself is bagged. So a good deal of this white filled material will never make it into the final part. Here is the core the next day after the bag, peel ply, perforated film and breather was removed:

We went around and detailed the radii by either scraping away high spots or filling carefully with more filled epoxy. The foam here is neatly potted into the outside skin all around and all the pre-preg will get cooked in one final cook at the end. Next we started laminating the second skin. The first layer of the second skin was “combo-laminated” with glue film on a debulking table so that we didn’t have to handle glue-film and then place pre-preg plies onto the film itself – a surefire mess! After cooking, the part was demolded and looked like this:

It came out great! There were no voids or nasty radii and the rebate are around the edge was tight. This would have been even easier with honeycomb core but it works ok with foam – you just have the make sure the core fits loose and there’s room for the excess filled resin to squeeze out. There’s not a ton of detail here but it should help you if you have never used this method before. If you have any questions, just ask!
A hand-held router is an amazing tool for cutting and trimming composite parts. Here are some tools that I really like. Most of these can be used in a die grinder (not the ones with a bearing) for free-hand work and trimming. Be careful – they’ll mess you up if you get a glove or piece of clothing tangled up – ask me how I know!

From the left:
Most of these can also be used in a CNC router – not the ones with bearings or the carving-specific burrs – but the shank-mounted diamond and carbide cutters can make automated trimming an option. If you are doing deep slotting dust clearing will be a problem so you don’t bind things up and create excess heat. Again – this will be a huge mess so good dust extraction is essential!
I am devoted to the Festool routers for their excellent dust control – even though they are very expensive and initially it was hard to get over that. They have a rotating “cup” that fits below the base plate of the router, and for edge work (trimming to a pattern, radiusing, de-coring, etc.) this catches an incredible quantity of the dust created. They are worth looking into if this is an every-day kind of work in you shop or factory.
Over the last five years, 3D printing with long-fiber composites has become a thing that actually happens. The combination of automation, materials technology and the maturing of the 3D printing industry has driven the first round of companies developing and marketing this technology. Dozens of patents have been granted to these first-movers in the the automated, moldless composites space and it seems like there is some overlap in the different approaches these companies have taken – but also a lot of variety. Here’s a look at the most prominent participants – how they compare and where they stand in 2019.
Of these companies, several focus on thermoplastics and others on thermoset resins. The most established is probably Markforged, which has been shipping usable composites 3D printers since 2014. Continuous Composites and Moi use similar robotic arm-based mold-less “printing in thin air” processes, seemingly with thermoset resins. Arevo has shown larger scale multi-axis thermoplastic machines – and has demonstrated a printer bicycle frame. Orbital Composites released the Orb-1 based off a Kuka robot – but it won’t be available until early 2020. Desktop Metal came late to the 2019 party with their “Fiber” system, which looks like it’s aimed right at Markforged… and almost more interestingly it will be sold only as a “hardware subscription.”
The two issues I see are related to patents and to the need to compete with already-existing composites technologies. Many of these companies have patents that seem to my untrained eye to overlap and pretty serious ways. They also overlap onto existing automatic fiber placement (AFP) and automatic tape laying (ATL) technology – which are just different flavors of automated lamination. Both Markforged and Continuous Composites have heavily invested in securing patents on their technology. To the best of my knowledge, nobody has made a fuss over patent infringement yet, but it’ll happen once there is a market to defend.
The market will only really exist as a meaningful alternative to traditional composite technologies once the process is much better developed. This may be fast for some applications (the Markforged, Anisoprint and Arevo machines already have end-use applications) and may take way longer for others. Additively manufactured metal structures that can provide weight savings through generative design, hollow areas and lattice infill may be more of an immediate challenge to traditional high performance composites.
The Markforged system has proven itself useful (I have one and it is pretty awesome) but it is really a half-step toward printing composite structures. The fiber is only laid in one plane. It can be very useful for the right type of part – but more as a metal alternative or as a stronger alternative to other 3D printed options. Markforged has numerous patents relating to thermoplastic printing with fiber and multi-axis printing but have also entered the metal additive market which may have more potential in the short run. Markforged gets plenty of attention but here’s a video overview of their process:
With it’s first patents filed in 2012, Continuous Composites is a pioneer in printing unsupported parts using fiber in a thermoset resin matrix. Cured with UV light or heat as it leaves a robot-mounted extruder, the impregnated fiber bundles cure in mid-air – a process they call Continuous Fibre 3D Printing (CF3D). The potential for certain types of parts is clear, but so far there is no evidence of printing in multiple axes – though this is probably more of a fixturing and software problem than a limit to the technology. This is an impressive company and along with Arevo (which focuses on thermoplastic resins) Continuous Composites looks like a leader in the race to print strong free-form composite structures. Here’s a video of their technology in action:
Founded in 2018 as a spinoff of Politecnico di Milano University in Italy, Moi Composites has similar technology to Continuous Composites. Their Continuous Fiber Manufacturing (CFM) technology uses thermoset resin mixed with glass fiber and cured as it is extruded. They seem to have the ability to lay fiber at different angles and to build relatively complex parts in space. This video shows their technology in 2017:
The Arevo additive system looks kind of like a huge Markforged print head attached to the end of a robot arm. Their whitepaper describes a process called Direct Energy Deposition (DED) in which a laser heats a thermoplastic filament and a compaction roller consolidates the filament eliminating voids. They claim a 50% fiber fraction – so half the weight is carbon fiber – which is really good. They seem to be focused on an electric bicycle as their first product… but the aluminum fixture in the video looks suspiciously like a mold! This is very close to an automated fiber placement process that companies like Automated Dynamics and others have been using for a long time – the laser, the thermoplastic prepreg and the consolidation roller. Just because it isn’t really that new doesn’t mean its not cool!
The Anisoprint printer and prints seem very high quality and similar in size and output to the Markforged system. Apparently they have an option to use basalt fiber – which is cool. The process seems to combine fiber with filament during the extrusion process rather than extruding plastic and then extruding a “prepreg” tow in a separate operation like the Markforged. A 2019 article in 3DNatives shows some non-planar extrusion and gives more information on the technology. It will be interesting to see if they can develop full 3D fiber printing with thermoplastics. The software looks good:
In 2015 and 2016, Orbital Composites made a splash with the idea of 3D printing composites in space. Now in 2019 they have released the Orb-1, which appears to be a FDM / thermoplastic composite printer based on a Kuka robot arm. It’s a neat idea but quite expensive ($99,000) – it also has a huge 1m x 1m x 1m work envelope. It will be neat to see a video of the Orb-1 in operation.
Desktop Metal unveiled the “Fiber” system in late 2019, and it isn’t available yet. The engineering looks very solid, and it uses a variety of thermoplastic resins (PEK, PEKK, PEEK…) and a separate “Micro Automated Fiber Placement” head that lays actual “tapes” of fiber reinforced plastic. I haven’t seen or held a part, but expect that they are similar (maybe better) to that Markforged parts. Higher performance plastic resins will give better stiffness and higher temperature handling. Most interestingly, the printers will be “sold” by subscription only. Apparently the price will be around $3500 per year. I’m excited to learn more about this one!
Magnum Venus Products posted a video of their large format 3D printer – one of the first to use thermoset instead of more common thermoplastic materials. The video only shows simple parts, no long fiber reinforcement and no post-machining, but it is an exciting development for automated composites.
Check it out here: RAM – REACTIVE ADDITIVE MANUFACTURING
and the video:
Most of the other large additive options (BAAM and LSAM) use thermoplastic feedstock, often mixed with a short fiber reinforcement. The output is amazing, especially when machined and primed, but thermoplastic feed-stock is expensive especially if high temperature service is needed. The inter-layer adhesion isn’t ideal (“welding” hot material to cooler material as it is extruded) and shrinkage is a problem. On the bright side it is all recyclable – in theory.
The argument for thermoset based material is that it can be formulated to perform in various ways and the shrinkage is controllable. The cured parts are strong in the z-direction because the beads are bonded together. Unfortunately it is not a recyclable end product. As this technology becomes more mature, it will be interesting to see where each system finds it’s sweet spot!
I’ve had really good luck gluing Markforged Onyx (Nylon) to composite and metal with Plexus MA830. Probably lots of similar methyl methacrylate adhesives would work well too!
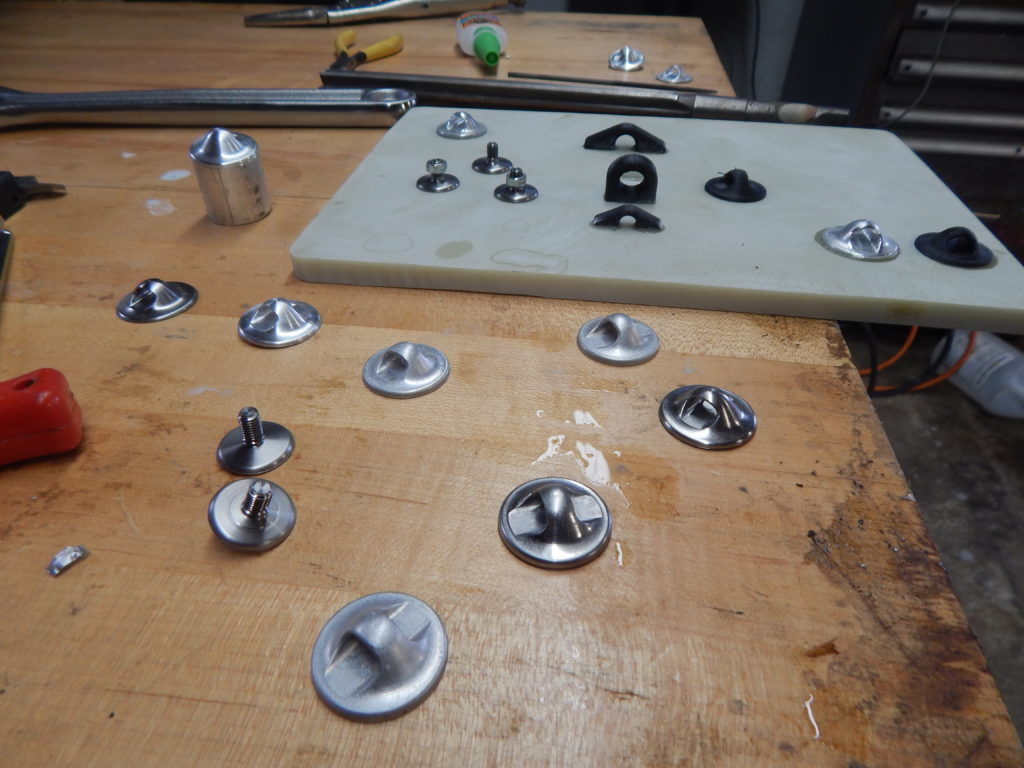
I’ve been working on some small pieces of hardware to attach fasteners to composite parts. Given the strength of methyl methacrylate and epoxy adhesives for gluing dissimilar materials, there are plenty of applications where you can just surface bond fasteners. I am testing the size of the flange needed and how the bond-line holds up to various torture.
My plan is to document the process of gluing these parts and test various adhesives. Plexus MA830 works very well so far, and since it also glues Markforged Onyx (Nylon) parts very well, I’ll test them too!
The lathe skills are not pro-level yet, but I am loving the learning.